
Add and Configure Layer Actions
Learn to use Layer Actions to gain fine control over playback on individual layers
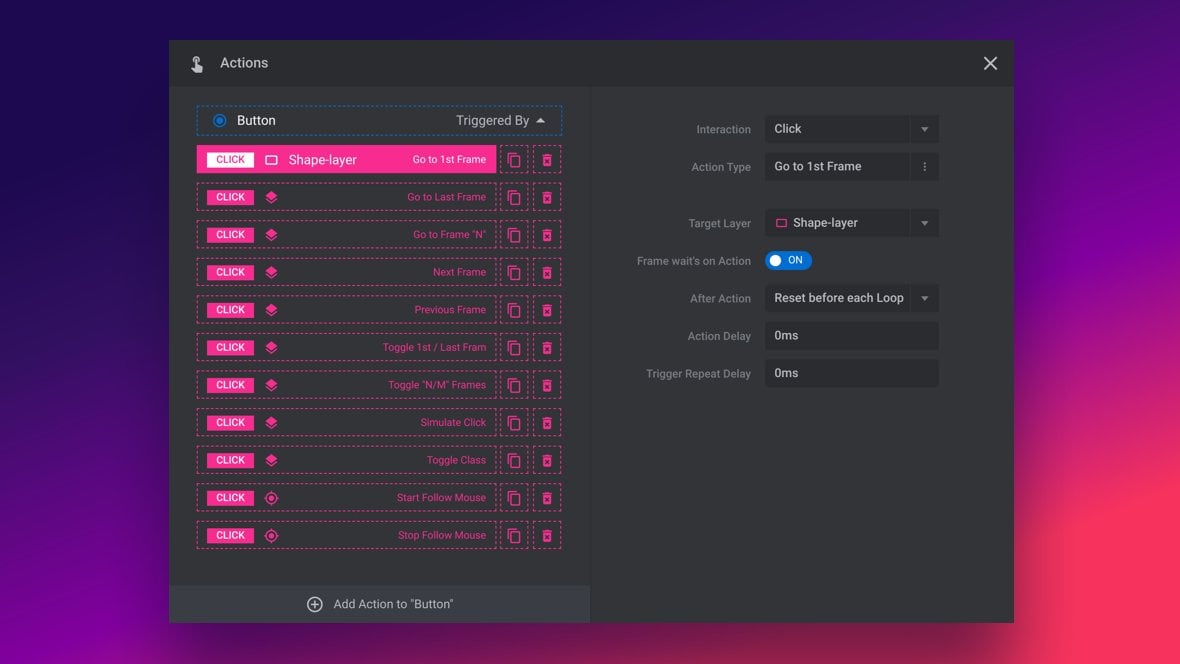
Table of Contents
What Are Layer Actions?
Layer Actions provide a way to add interaction driven fine control to any layer [?]
Layers are containers for visual, audio or layout items and are added to slides. For example, text, button, image, audio, video, group and row are all types of layers.
Layers are added to slides via the module editor., allowing you to jump around its timeline [?]
The timeline is the section of the module editor dedicated to animation and controlling the stacking order of layers.
From this part of the editor animations can be added, adjusted and previewed. Additionally, layers can be selected from the timeline, and can be dragged and dropped up and down on the timeline to modify which appear in front and which behind.
It can be equally compared to both a timeline in a typical video editing application, and a layers panel in a typical graphic design application without affecting other layers.
Layer actions can be used to either:
- Jump to specific keyframes
- Send click events to other layers
- Toggle CSS class names on layers
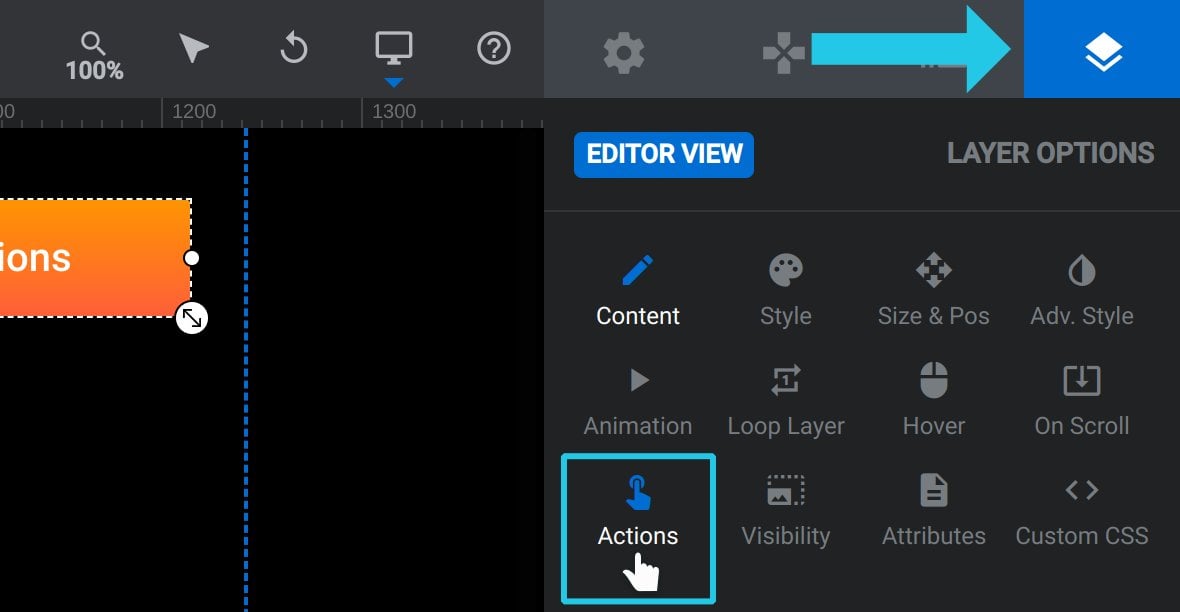
To add a Layer Action select any layer, go to the Layer Options tab, and click the Actions sub-section button:
The Actions dialogue box will open:
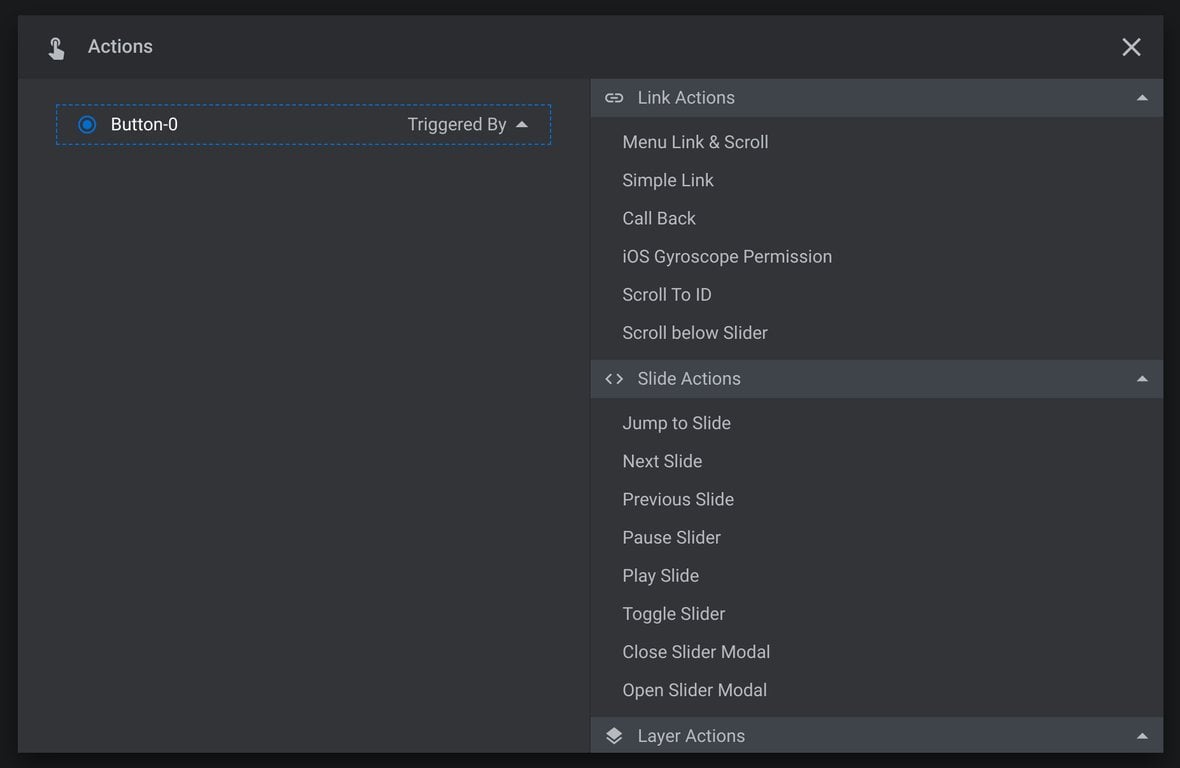
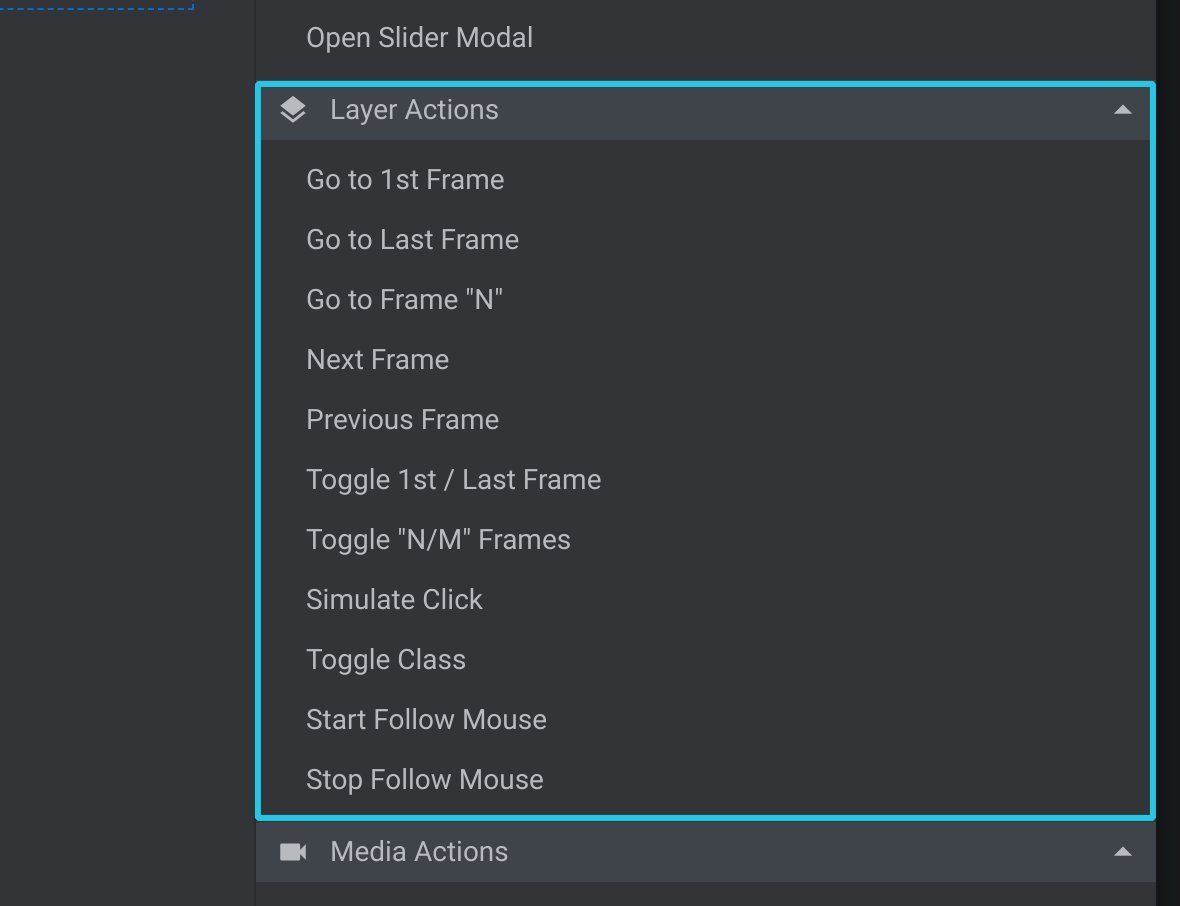
On the right side of the dialogue box, scroll down a little and you will see the Layer Actions section, containing the eleven different available layer actions:
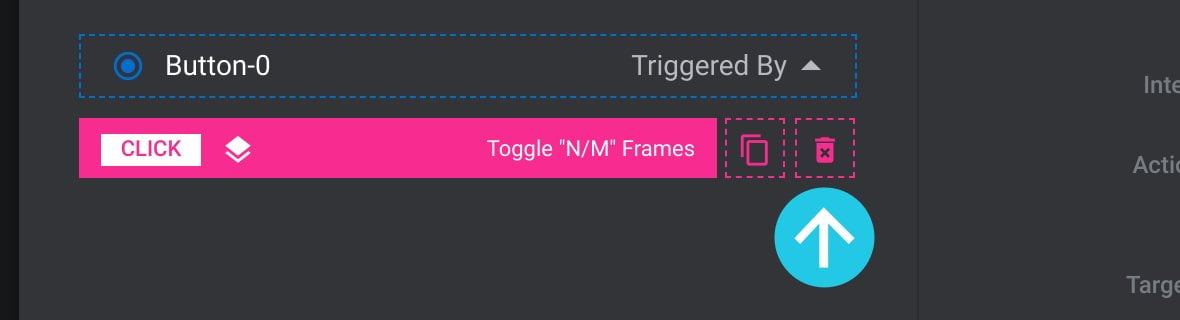
Click one of those actions to apply it to the layer. The applied action will then appear in the list of actions on the left side of the box, while the options for that action will appear on the right side:
To delete an action, click the small trash can icon to the right of the action’s name:
The eleven available layer action types are:
- Go to 1st Frame
- Go to Last Frame
- Go to Frame “N”
- Next Frame
- Previous Frame
- Toggle 1st/Last Frame
- Toggle “N/M” Frame
- Simulate Click
- Toggle Class
- Start Follow Mouse
- Stop Follow Mouse
The behavior of each of these slide [?]
A "slide" in Slider Revolution is a container into which multiple layers can be added, with layers in turn acting as containers for various forms of media such as images, text, video, audio, buttons, and special effects.
Slides are added to modules and edited via the module editor.
Within the module editor, each slide has its own animation timeline, background and collection of layers.
A single module can have one or many slides. A module with one slide is called a scene, and a module with multiple slides is called a slider or carousel. action types can be customized by configuring its options. Let’s now step through the available options for each action type, and learn how to use them.
Note: Changes to action configuration are immediately auto-saved. Manual saving is not required.
Common Action Options
There are a number of options you will find common to multiple layer actions types, and that perform the same function in each case. Rather than go over these options multiple times, we’ll cover all of them at once as we look at each action type.
Interaction
The Interaction option is available for all eleven Layer Action types.
Use the Interaction option to specify how the user will need to interact with the layer in order to trigger the action:
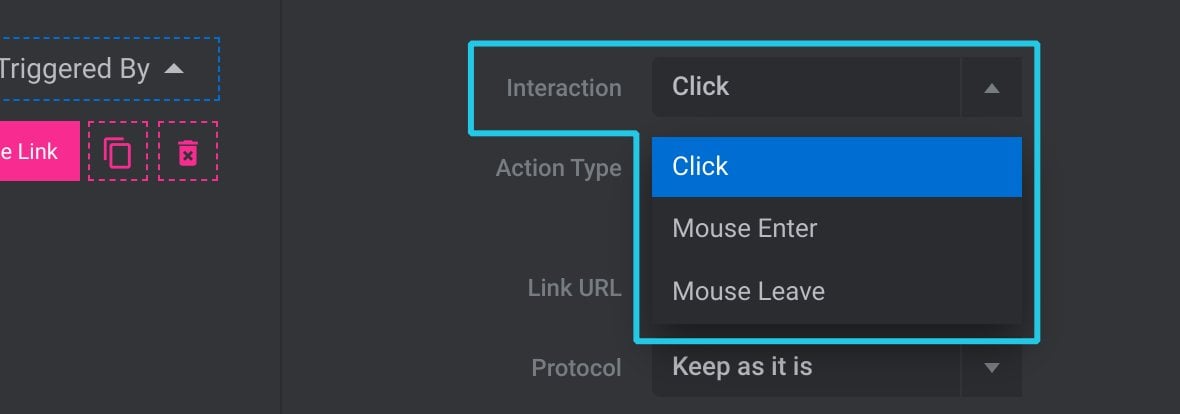
There are three possible settings.
Click triggers when the layer is left clicked with the mouse, or tapped on a touch screen.
Mouse Enter triggers when the mouse first hovers over the layer.
Mouse Leave triggers when the mouse stops hovering over the layer.
Action Type
The Action Type option is available for all eleven Layer Action types.
The Action Type option shows the currently selected action type:

This option also acts as a shortcut to switch action types. Click the option and you’ll be taken to the list of actions, from where you can choose a different type.
Target Layer
Use the Target Layer option to choose a layer the action should affect:
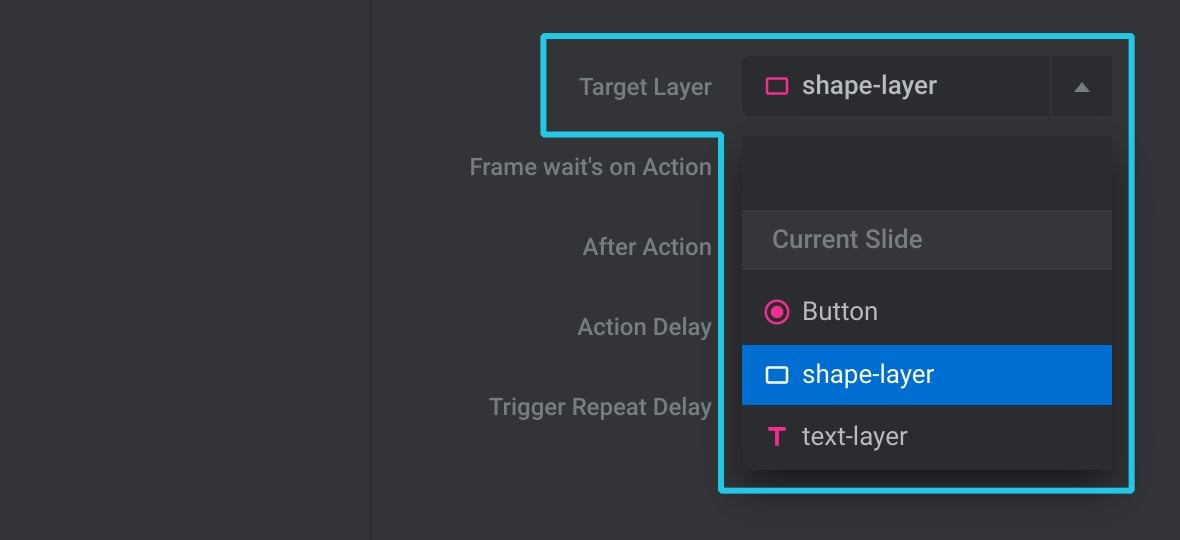
No layer other than the target layer will be affected by the action.
Frame Waits on Action
When the Frame Waits on Action option is toggled to ON, the target layer will stop playback before whichever keyframe the action relates to, and will then only proceed once the action is triggered:

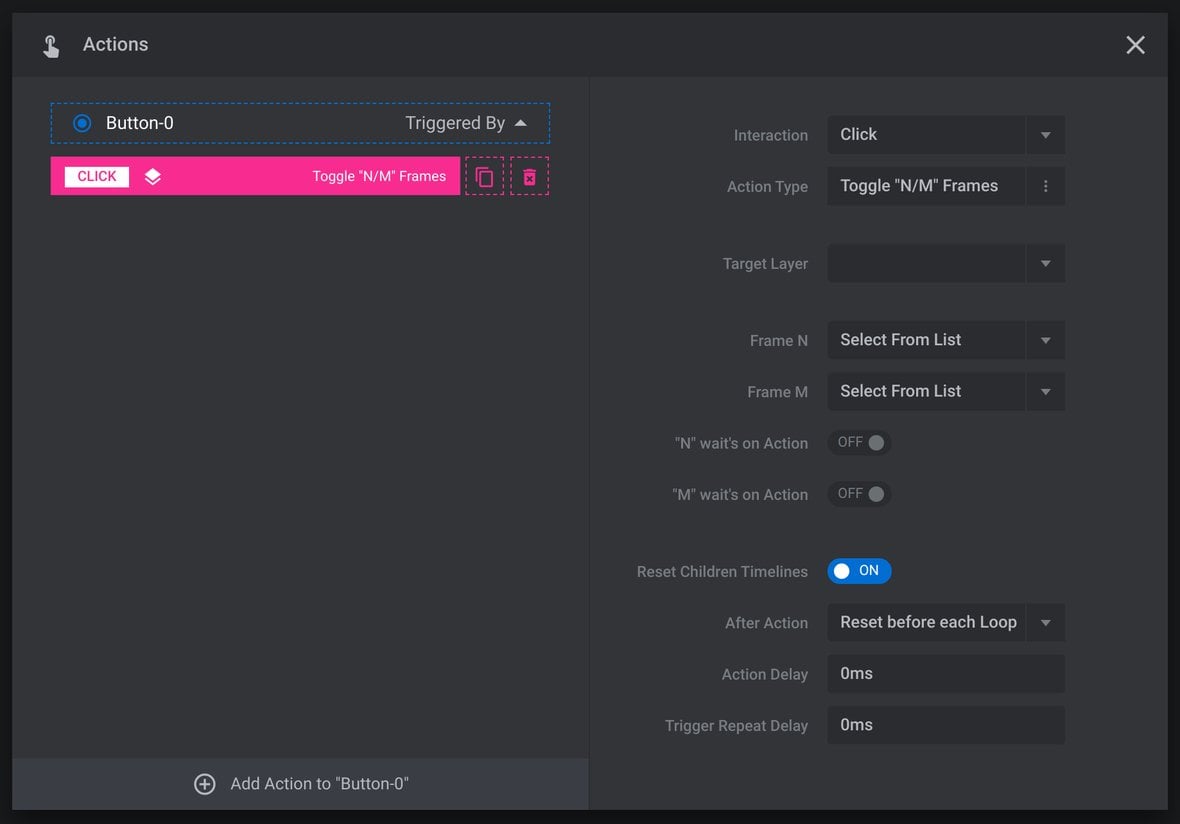
After Action
The After Action option is relevant if the Frame Waits on Action option is toggled to ON. It determines the target layer’s behavior each time its slide is loaded as the module [?]
A module in Slider Revolution acts as a container for slides, which in turn act as containers for layers. Modules are created and edited with the module editor.
A "module" is a single, self contained piece of content. You can think of this as being similar to the way a post or page in regular WordPress is a self contained piece of content.
A module can represent any kind of content Slider Revolution is capable of creating, such as a slider, carousel, hero unit, navigation menu, posts display and so on.
Multiple modules can be combined to form rich content such as complete sites and landing pages. loops.
The two possible settings are Reset before each Loop and Keep Last State:
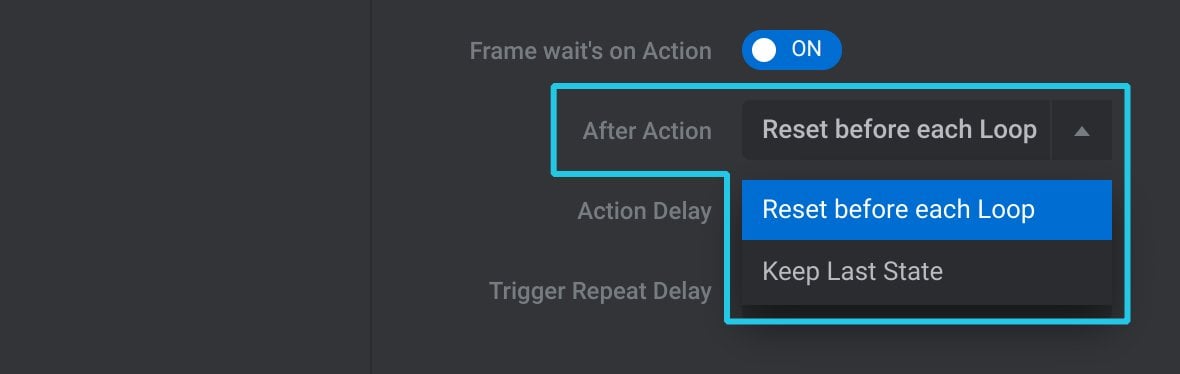
Choose Reset before each Loop to reset the layer to its initial state each time the slide appears.
Choose Keep Last State to instead retain the layer’s last state, keeping playback at whatever position it was previously.
Action Delay
The Action Delay option is available for all eleven Layer Action types.
With Action Delay you can optionally add a delay, in milliseconds(ms), between when the action is triggered and when it takes effect:

Trigger Repeat Delay
The Trigger Repeat Delay option is available for all eleven Layer Action types.
With Trigger Repeat Delay you can optionally add a period of time, in milliseconds(ms), that must elapse before an action can be triggered again:

Individual Action Options
Now that we’ve covered the configuration options common to multiple Layer Action types, let’s move on to the functionality and options specific to individual action types.
Go to 1st Frame
The Go to 1st Frame action type returns to the first frame on the layer’s timeline and plays from there:
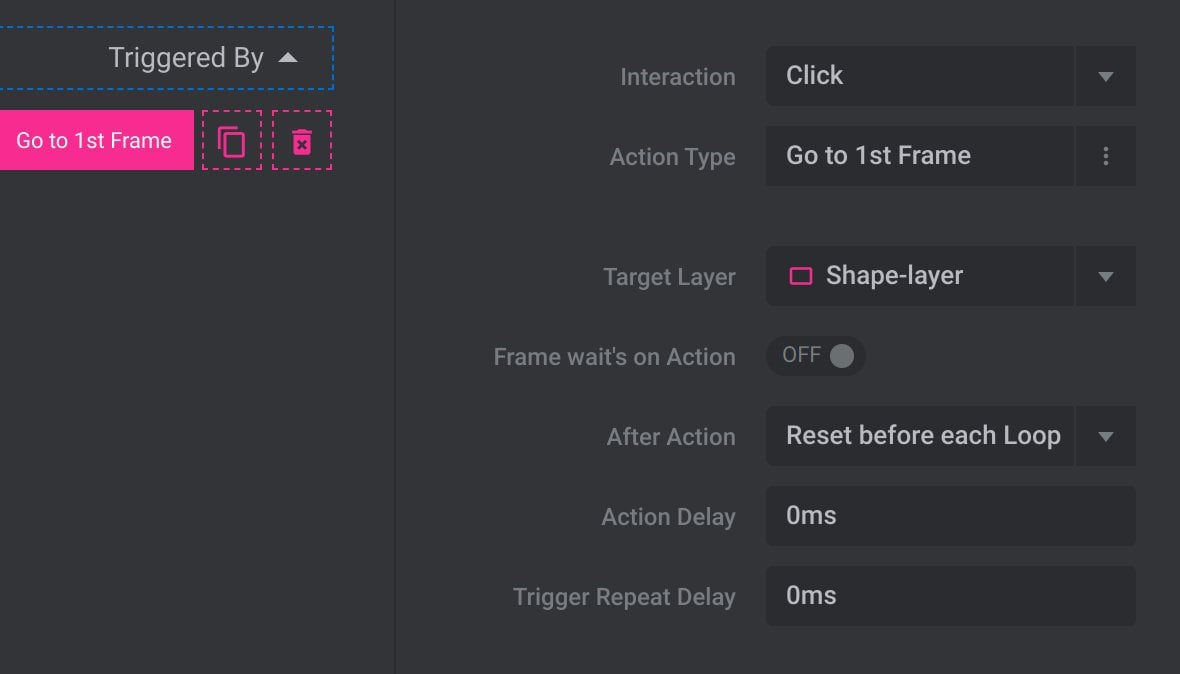
Common Action Options
- Interaction
- Action Type
- Target Layer
- Frame Waits on Action
- After Action
- Action Delay
- Trigger Repeat Delay
Go to Last Frame
The Go to Last Frame action type jumps to the last keyframe on the layer’s timeline and plays it:
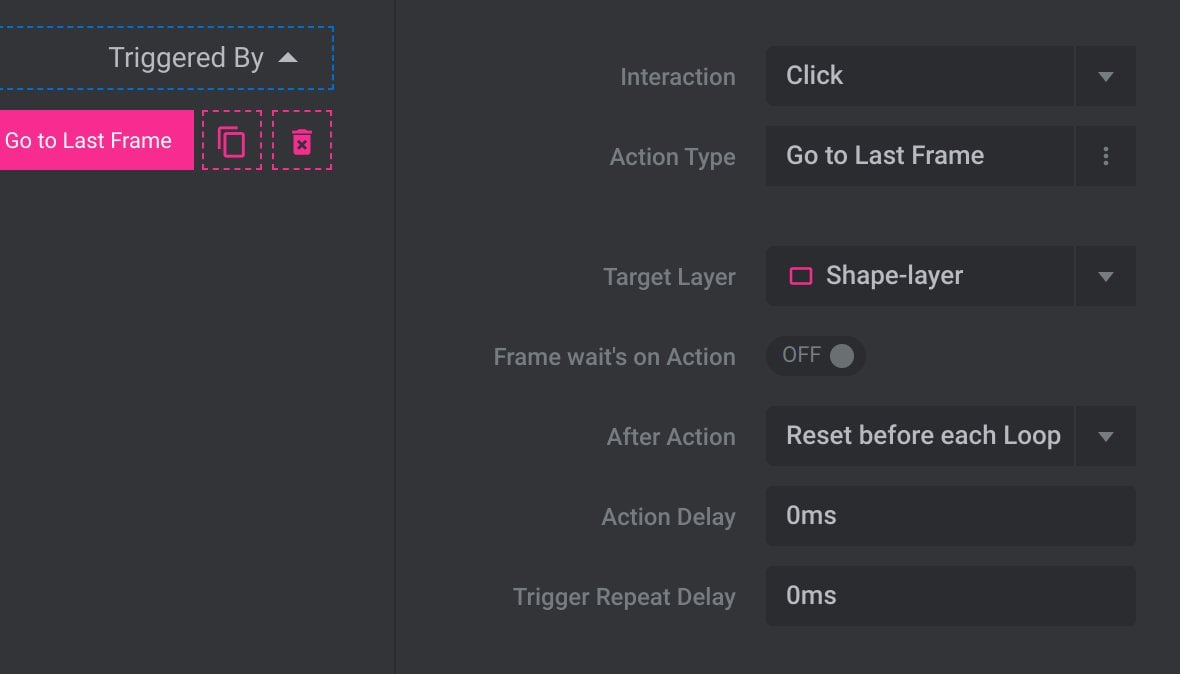
Common Action Options
- Interaction
- Action Type
- Target Layer
- Frame Waits on Action
- After Action
- Action Delay
- Trigger Repeat Delay
Go to Frame “N”
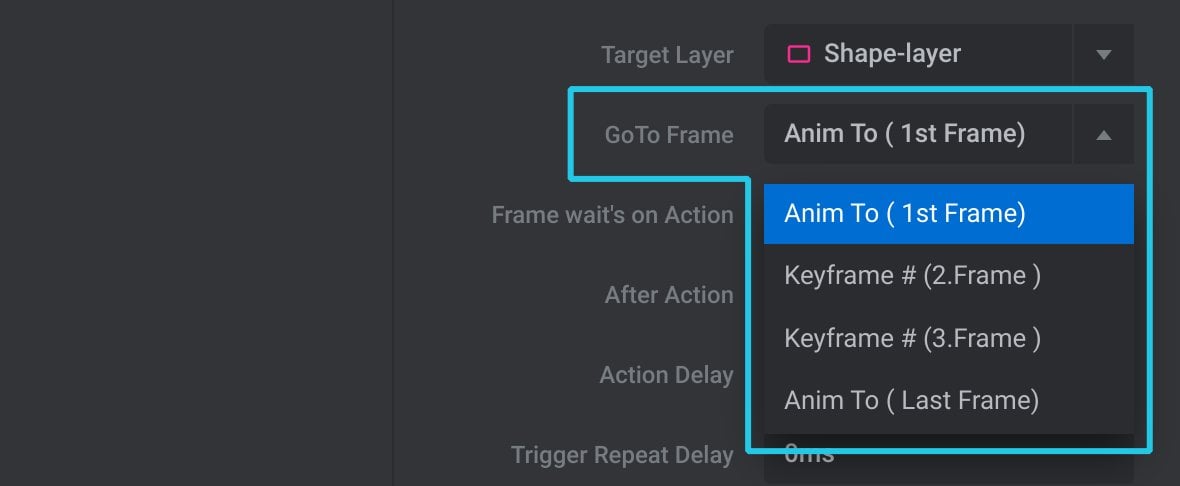
The Go to Frame “N” action type jumps a specified keyframe on the layer’s timeline and plays from there:
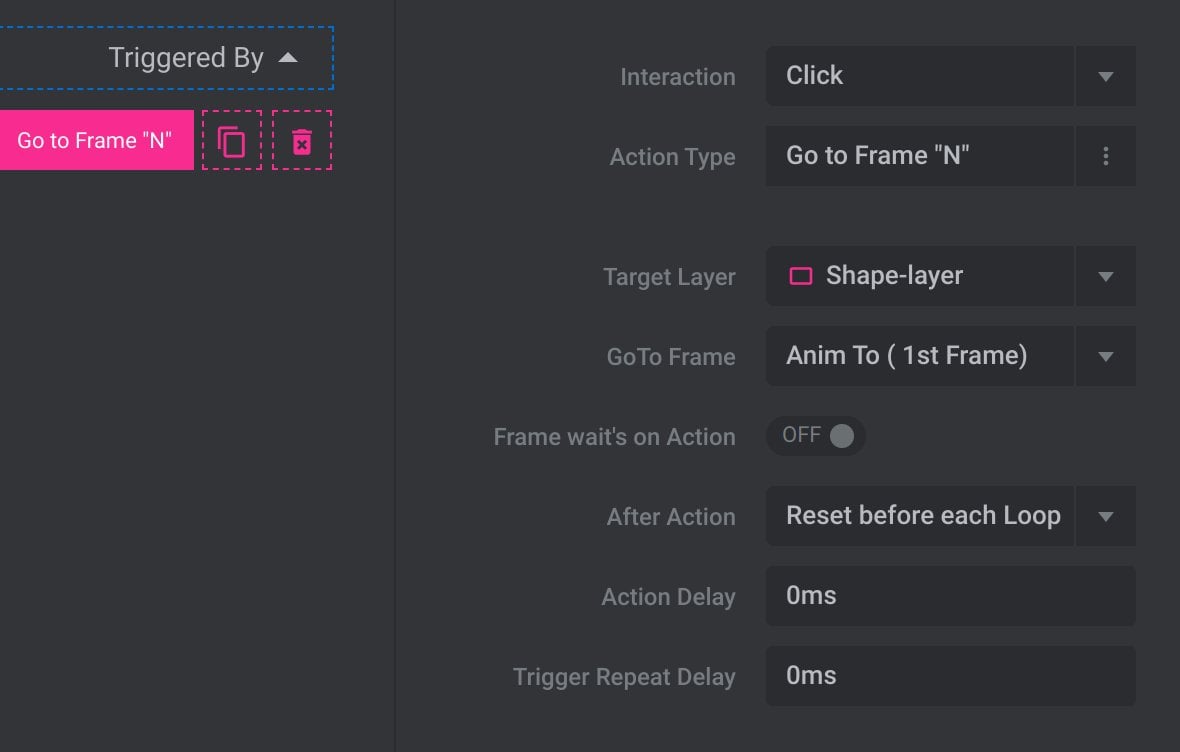
Action Specific Options
Go To Frame
Use the Go To Frame option to select the keyframe you would like to jump to:
Common Action Options
- Interaction
- Action Type
- Target Layer
- Frame Waits on Action
- After Action
- Action Delay
- Trigger Repeat Delay
Next Frame
The Next Frame action type jumps to whichever keyframe is next on the layer’s timeline:
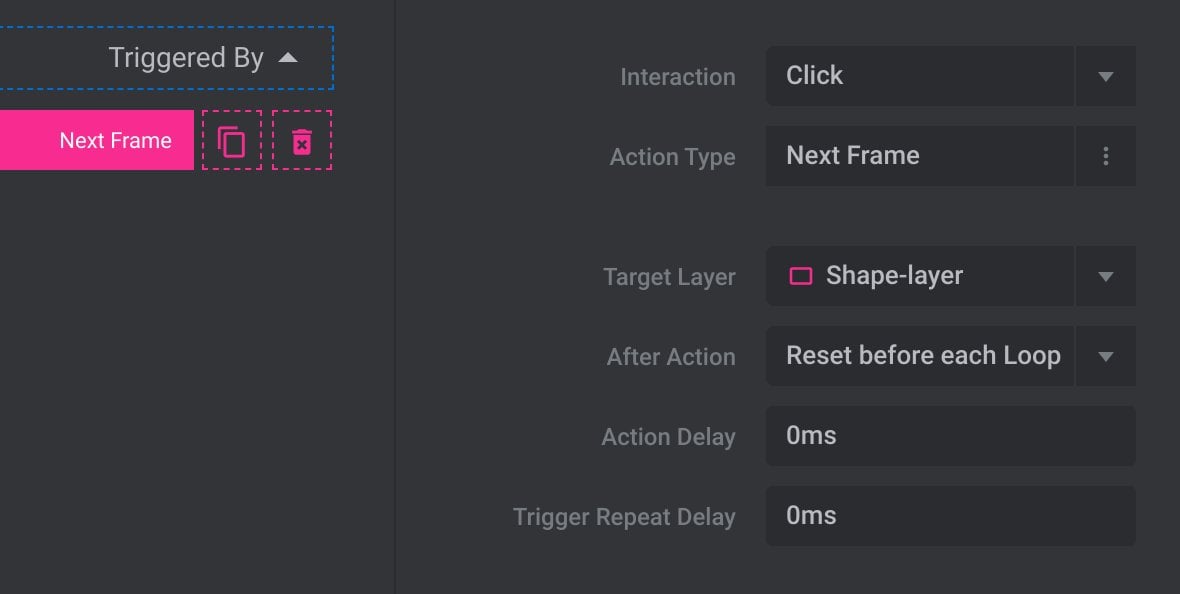
Common Action Options
- Interaction
- Action Type
- Target Layer
- After Action
- Action Delay
- Trigger Repeat Delay
Previous Frame
The Previous Frame action type jumps to whichever keyframe is immediately before the playhead’s current position on the layer’s timeline:
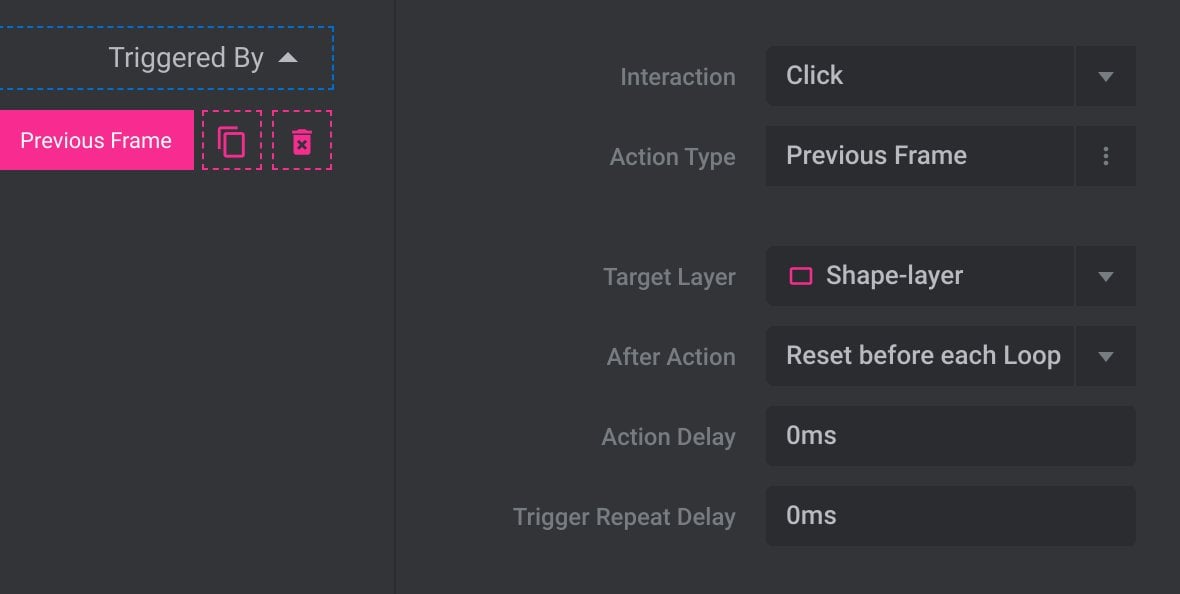
Common Action Options
- Interaction
- Action Type
- Target Layer
- After Action
- Action Delay
- Trigger Repeat Delay
Toggle 1st/Last Frame
The Toggle 1st/Last Frame action type jumps between the layer’s first and last keyframes:
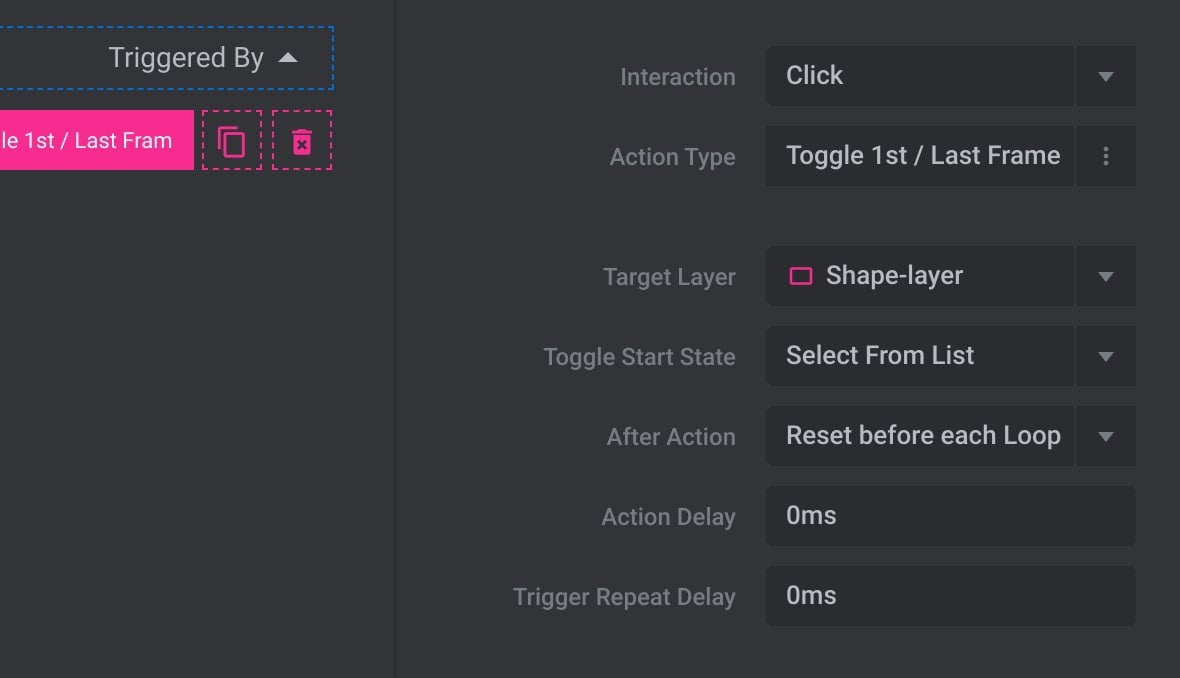
Action Specific Options
Toggle Start State
This option allows you to specify the URL to be opened when the action is triggered:
Common Action Options
- Interaction
- Action Type
- Target Layer
- After Action
- Action Delay
- Trigger Repeat Delay
Toggle “N/M” Frame
The Toggle “N/M” Frame action type works in the same way as the Toggle 1st/Last Frame action, except now you can choose the two keyframes to switch between:
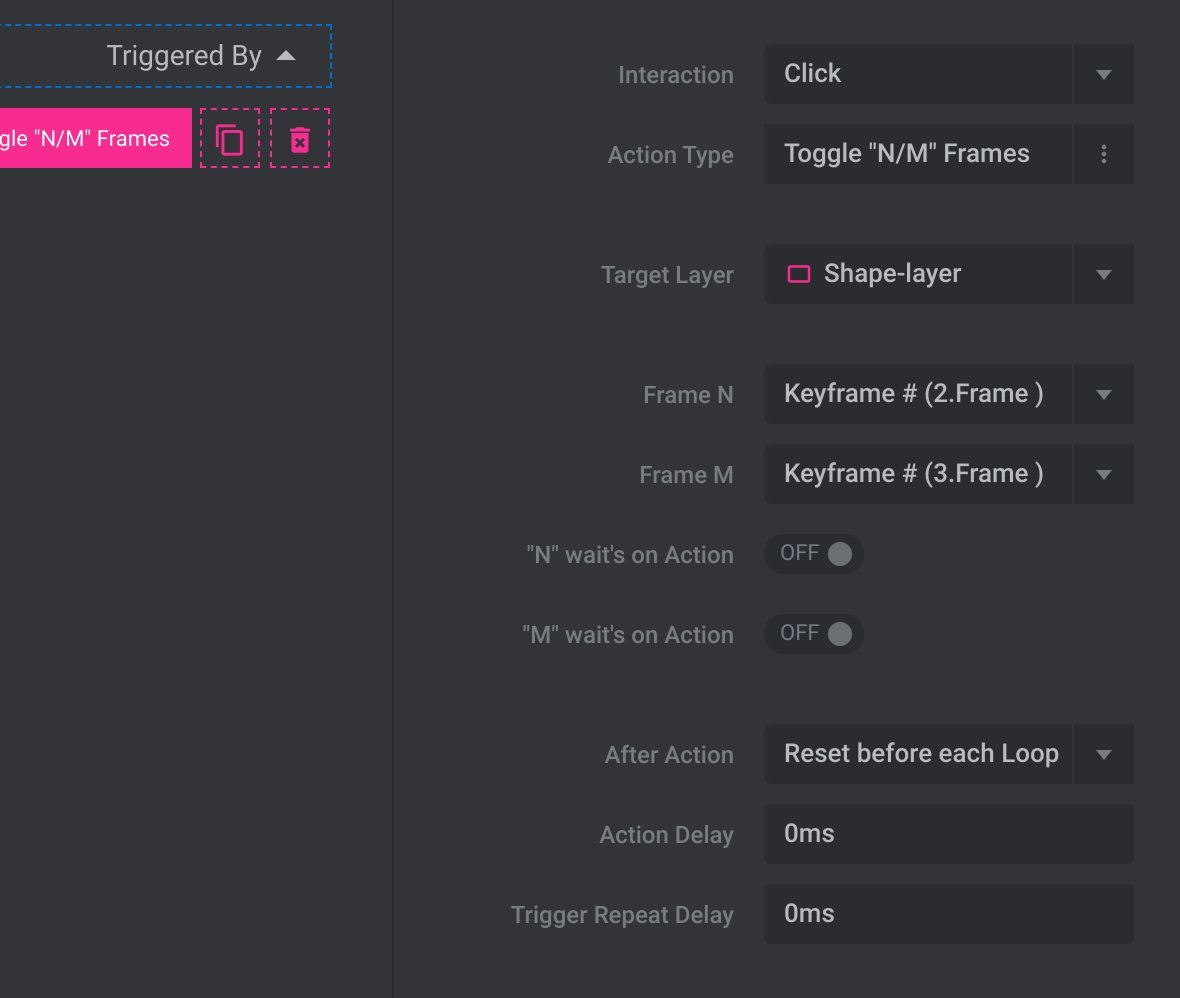
Action Specific Options
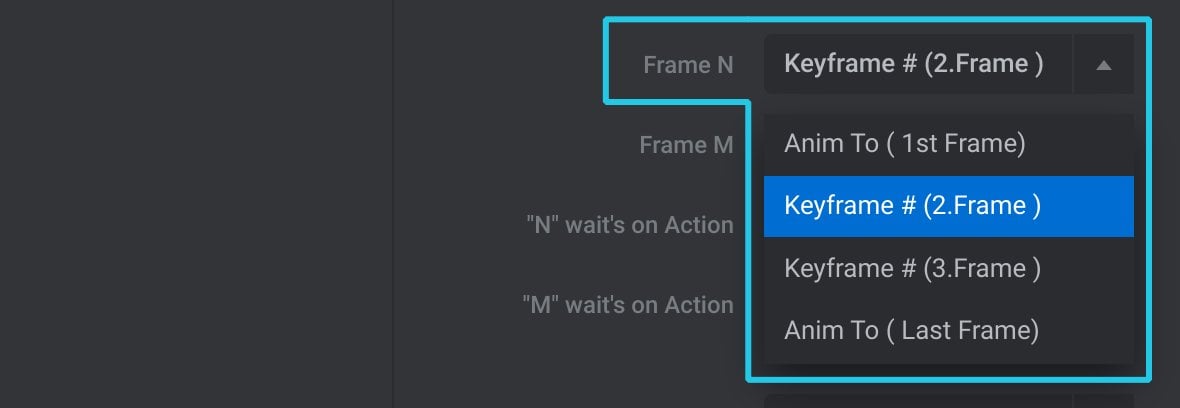
Frame N
Choose the first of the two keyframes to be toggled between:
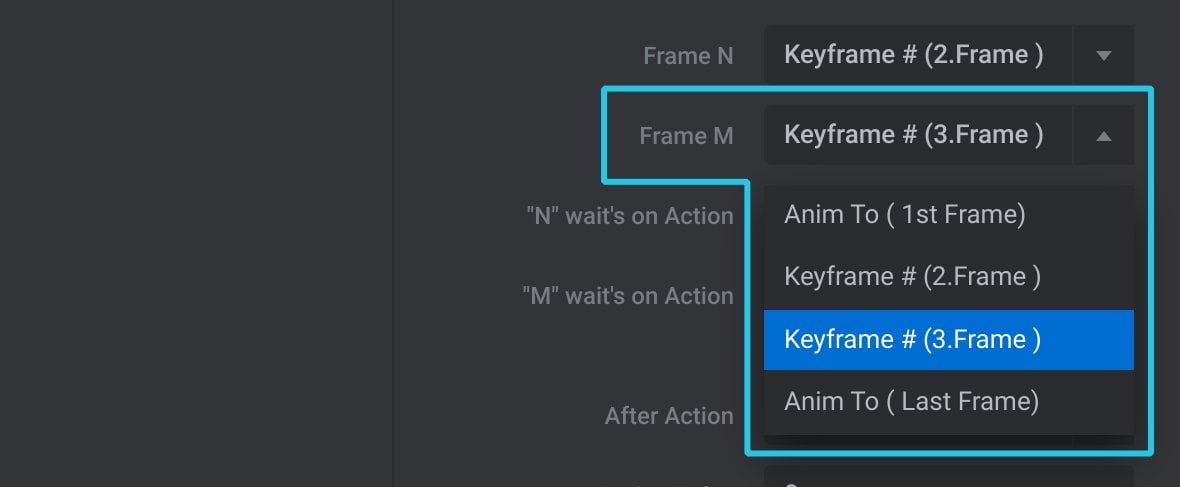
Frame M
Choose the second of the two keyframes to be toggled between:
“N” Waits on Action
If “N” Waits on Action is toggled to ON, the layer’s playback will not proceed past the keyframe specified as Frame N until triggered by an interaction:

“M” Waits on Action
If “M” Waits on Action is toggled to ON, the layer’s playback will not proceed past the keyframe specified as Frame M until triggered by an interaction:

Common Action Options
- Interaction
- Action Type
- Target Layer
- After Action
- Action Delay
- Trigger Repeat Delay
Simulate Click
The Simulate Click action type allows you to send a “click” event to another layer, in turn allowing you to trigger click based actions on that layer:
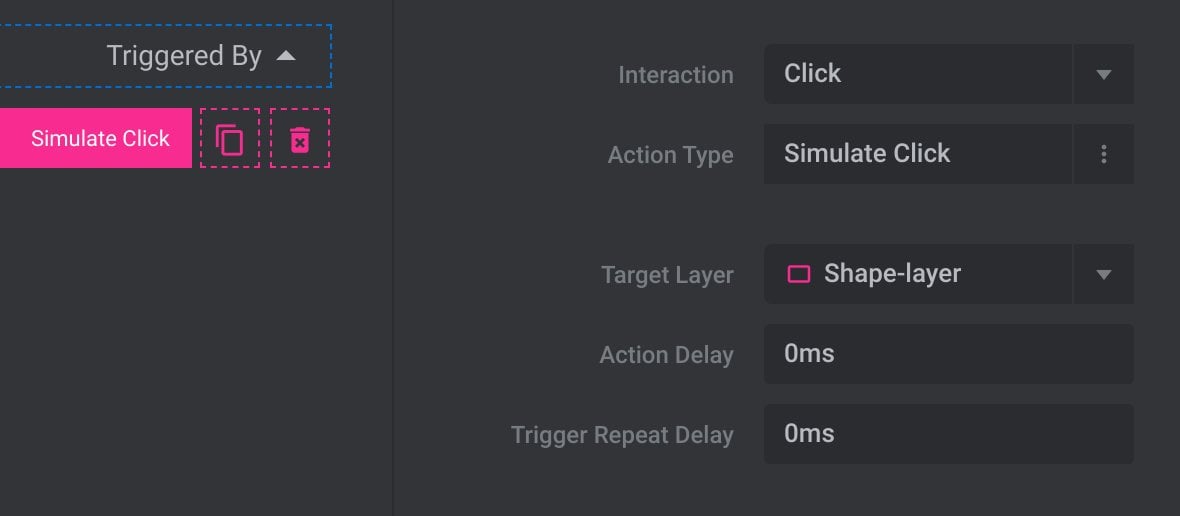
In this way you can set off multiple sections on multiple layers with a single initiating interaction.
Common Action Options
- Interaction
- Action Type
- Target Layer
- Action Delay
- Trigger Repeat Delay
Toggle Class
The Toggle Class action type allows you to add and remove a class name from the target layer:
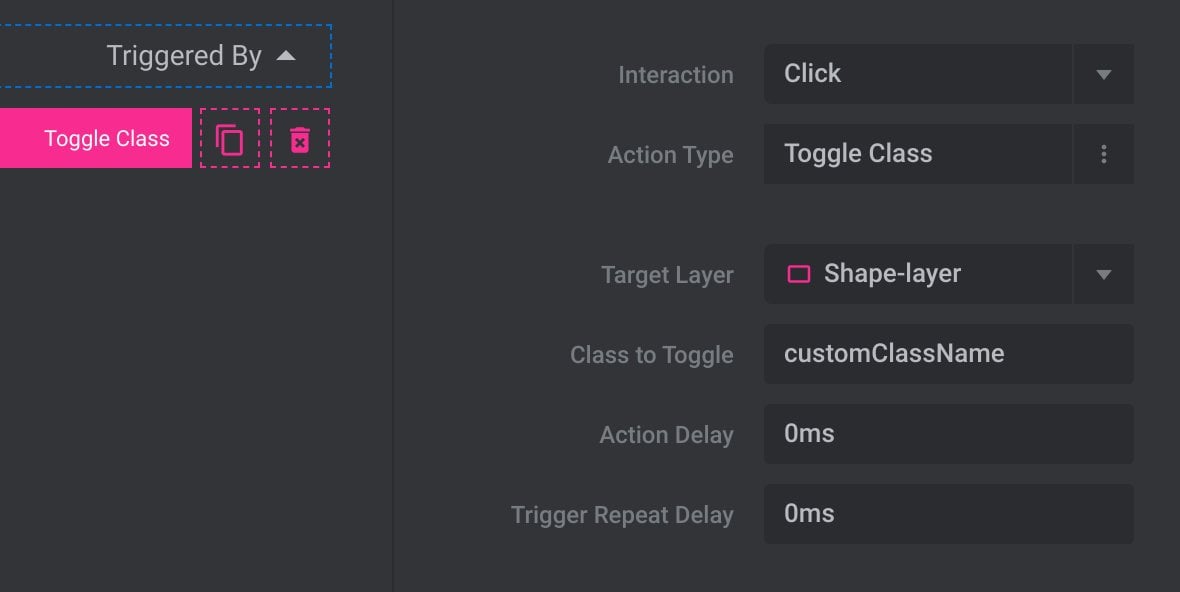
Action Specific Options
Class to Toggle
Use the Class to Toggle option to specify the class name that should be added and removed:

Note: Only one class name can be specified, and it should not be prefixed with a dot(.).
Common Action Options
- Interaction
- Action Type
- Target Layer
- Action Delay
- Trigger Repeat Delay
Start Follow Mouse & Stop Follow Mouse
The Start Follow Mouse and Stop Follow Mouse actions tell the target layer to start or stop following the position of the mouse.
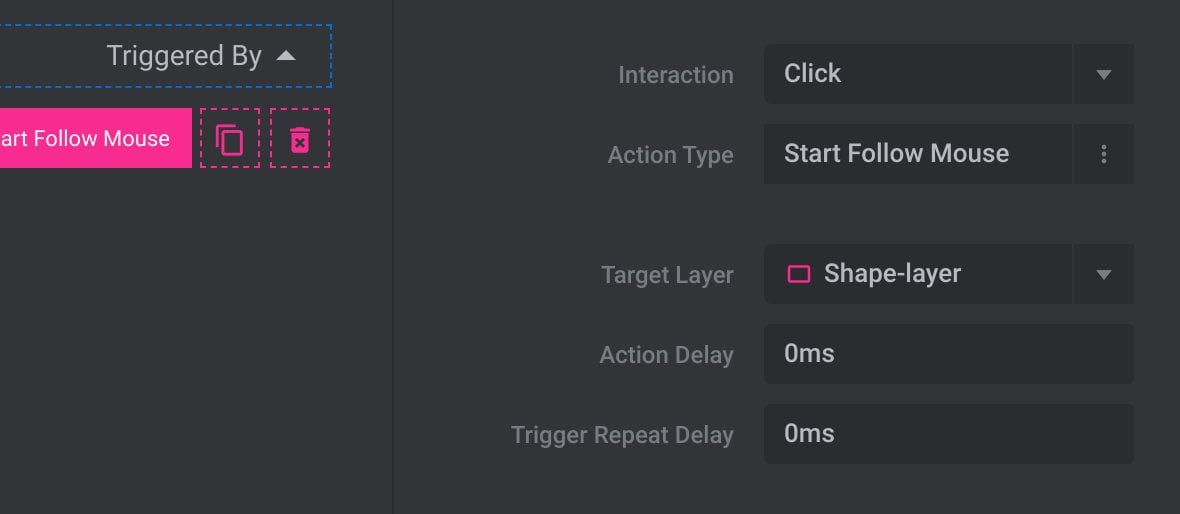
However, the Mouse Trap addon is a more feature filled method to achieve this type of functionality, and we recommend using that instead.
Common Action Options
- Interaction
- Action Type
- Target Layer
- Action Delay
- Trigger Repeat Delay