
Customizing Particle Effects
Learn how to use the options that power beautiful, dynamic particle effects in Slider Revolution
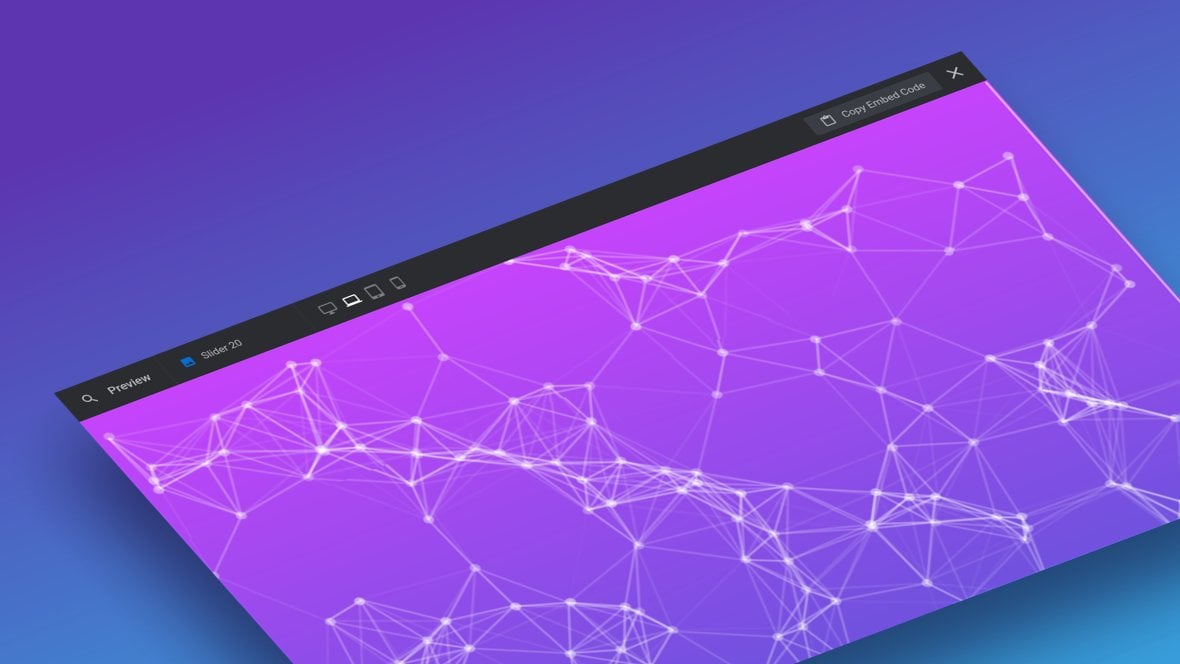
Table of Contents
Customizing or Making Your Own Particle Effects
On the last page of the manual we saw how particle effects from the default library can be applied to a slide [?]
A "slide" in Slider Revolution is a container into which multiple layers can be added, with layers in turn acting as containers for various forms of media such as images, text, video, audio, buttons, and special effects.
Slides are added to modules and edited via the module editor.
Within the module editor, each slide has its own animation timeline, background and collection of layers.
A single module can have one or many slides. A module with one slide is called a scene, and a module with multiple slides is called a slider or carousel..
After applying a particle effect, there are several ways you can customize it to suit the module design you are creating.
And when you have a particle effect you love, you can save it as a custom preset and use it again any time you want.
In this guide we’ll cover all the available configuration options you can use to customize or make your own unique particle effects.
But before we get into that, let’s quickly go over how you can manage custom presets.
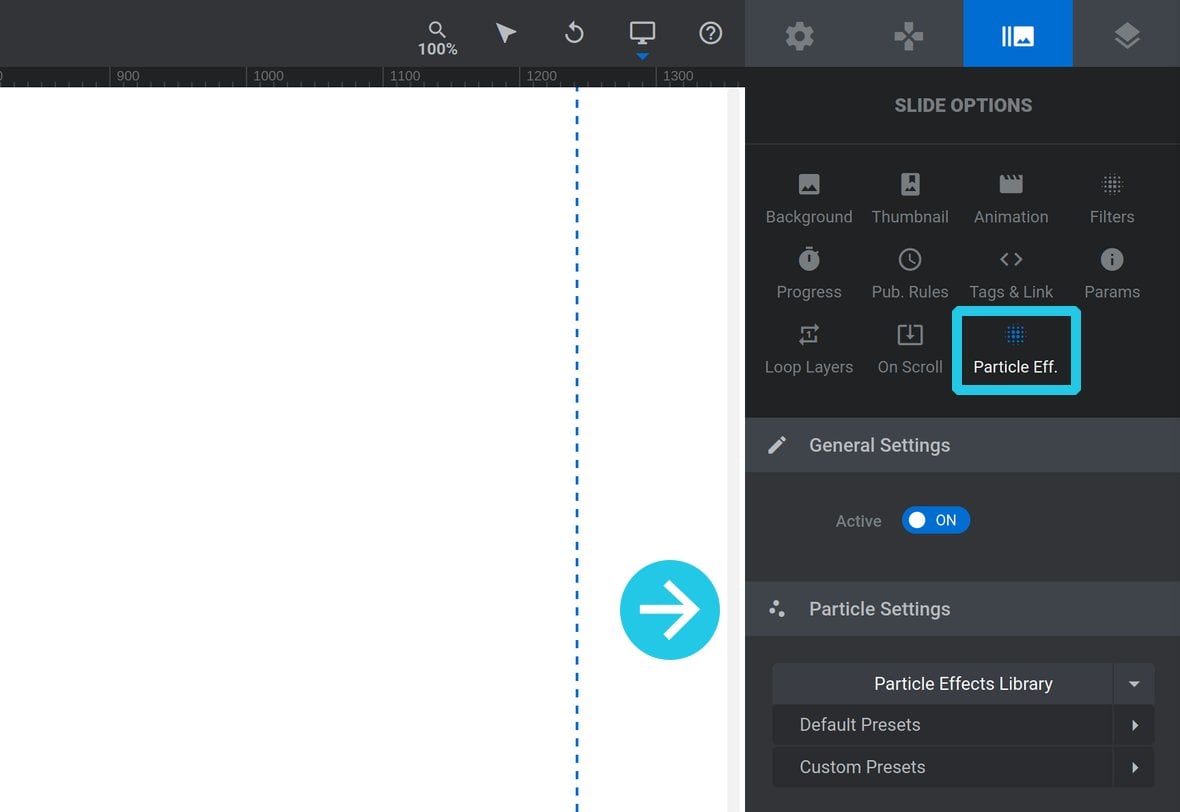
Note: Every option discussed in this guide can be found in the Slide Options tab, Particle Eff. sub-section, Particle Settings panel:
Managing Custom Presets
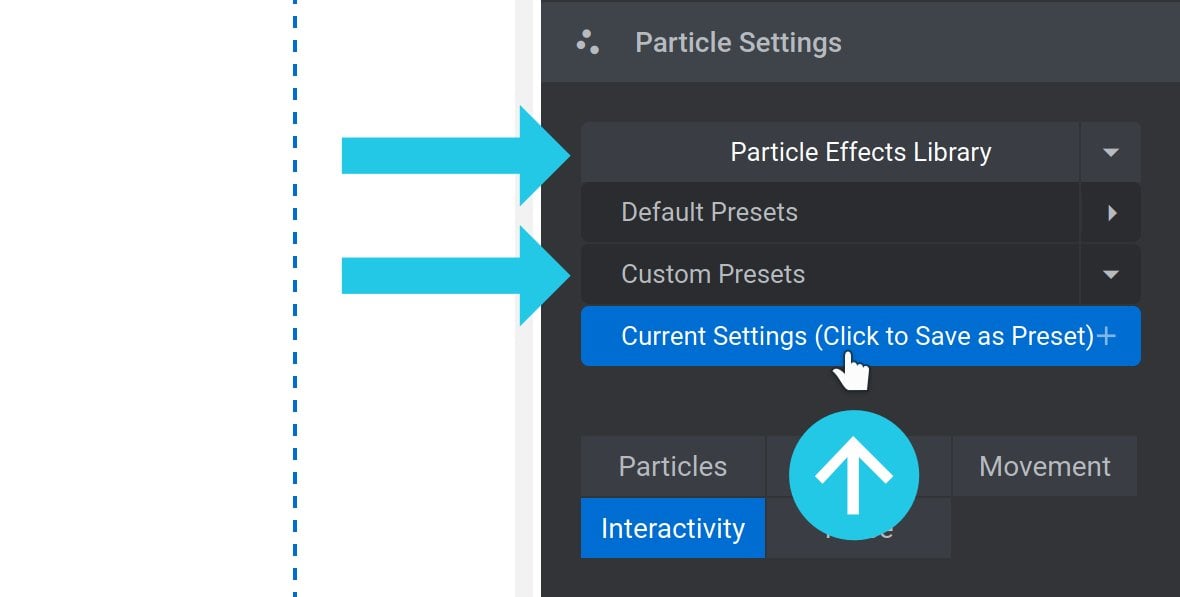
After customizing a particle effect it can be saved as a custom preset in the Particle Effects Library for use later. Let’s see how.
Saving a Custom Preset
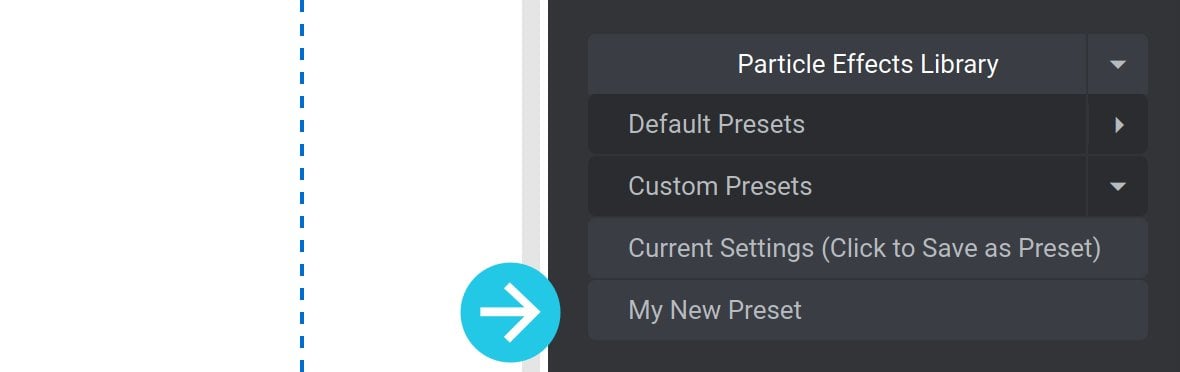
To save a custom preset, click to expand the Particle Effects Library and Custom Presets, then click the line labeled Custom Settings (Click to Save as Preset):
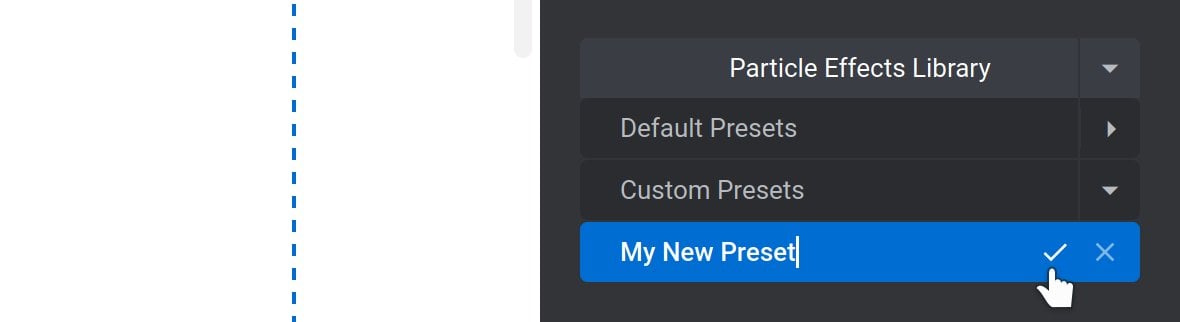
The line will turn blue and placeholder text such as “Give name” or “custom” will appear:
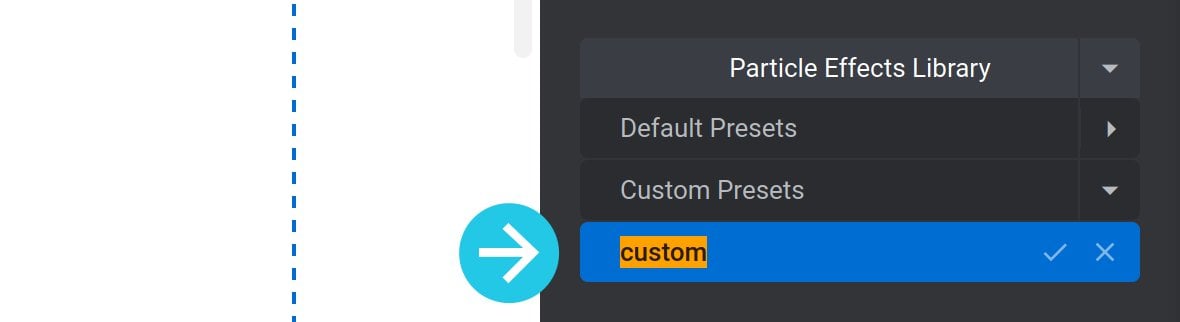
Replace that text with a name for your custom preset, then click the tick at the end of the line:
Your custom preset will be saved and you’ll now see it listed under Custom Presets:
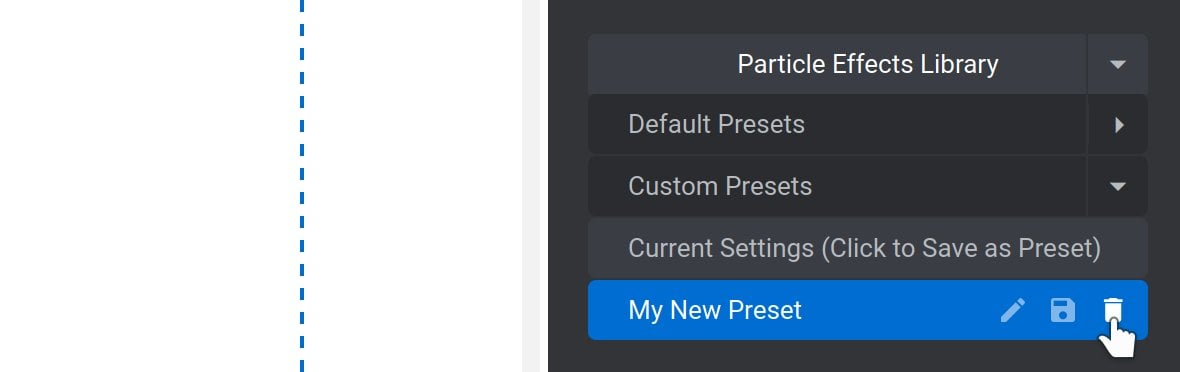
Deleting a Custom Preset
If you need to delete a custom preset, hover over it, then click the bin icon at the end of the line:
Customizing Particle Effect Settings
Below the Particle Library you’ll see tabs for 5 categories of options you can modify in order to create a custom a particle effect:
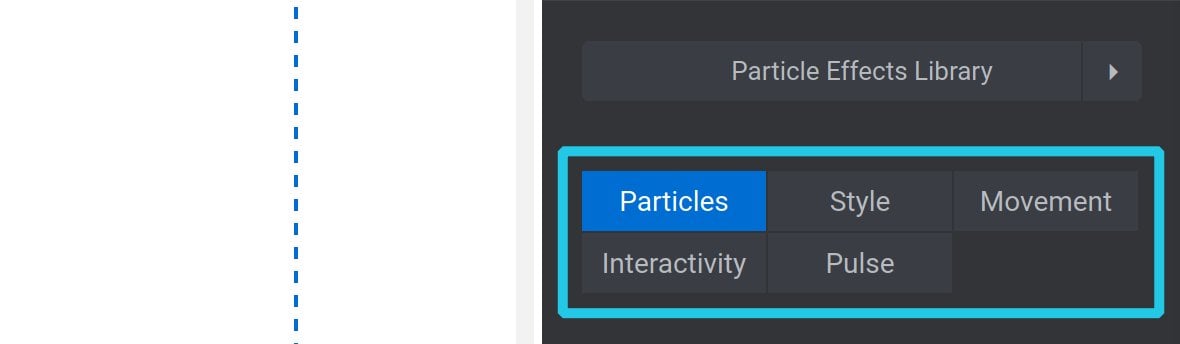
Those categories are:
- Particles – particle shape, number and size.
- Style – particle color and appearance.
- Movement – particle direction, speed and bounce.
- Interactivity – particle response to mouse hover and click.
- Pulse – continuously pulse particle size and/or opacity.
Let’s dig into the individual options available in each category.
Particles
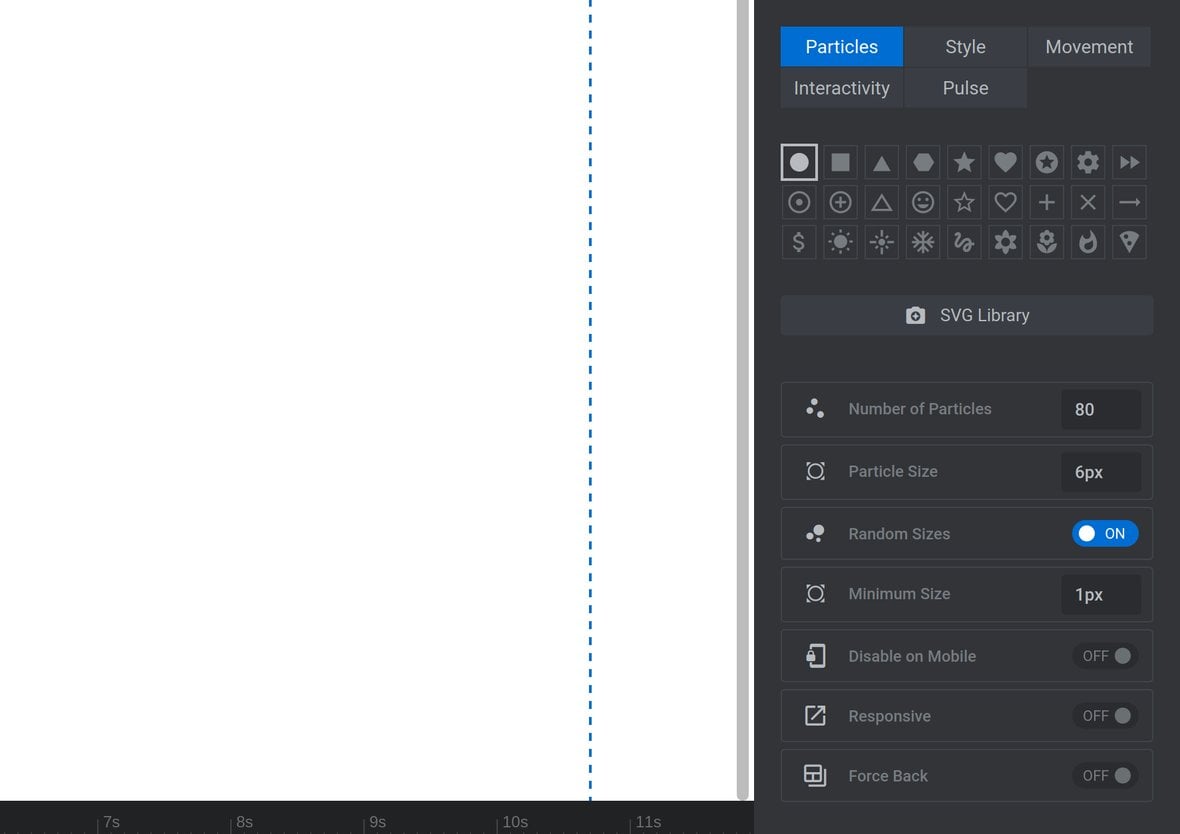
The Particles category of options allows you to choose the shape of your particles, their number and size, and to hide the particle effect in mobile devices if you choose:
Particle Icon
At the top of the Particles option area you’ll see a collection of particle icons to choose from.
Here you can select an icon to display in the effect, or multiple icons, by clicking those you wish to use:
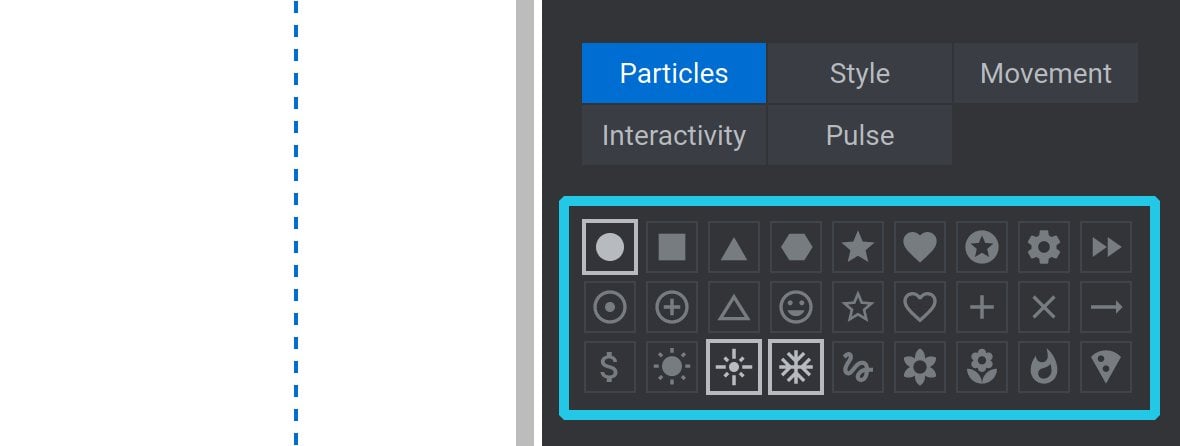
To deselect an icon, click it a second time.
Below the icons you’ll also see a button labeled SVG Library:
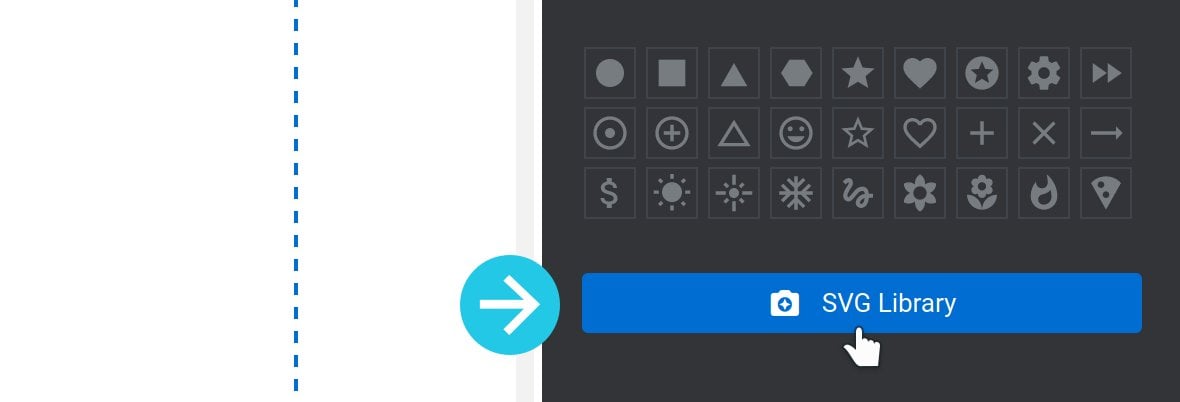
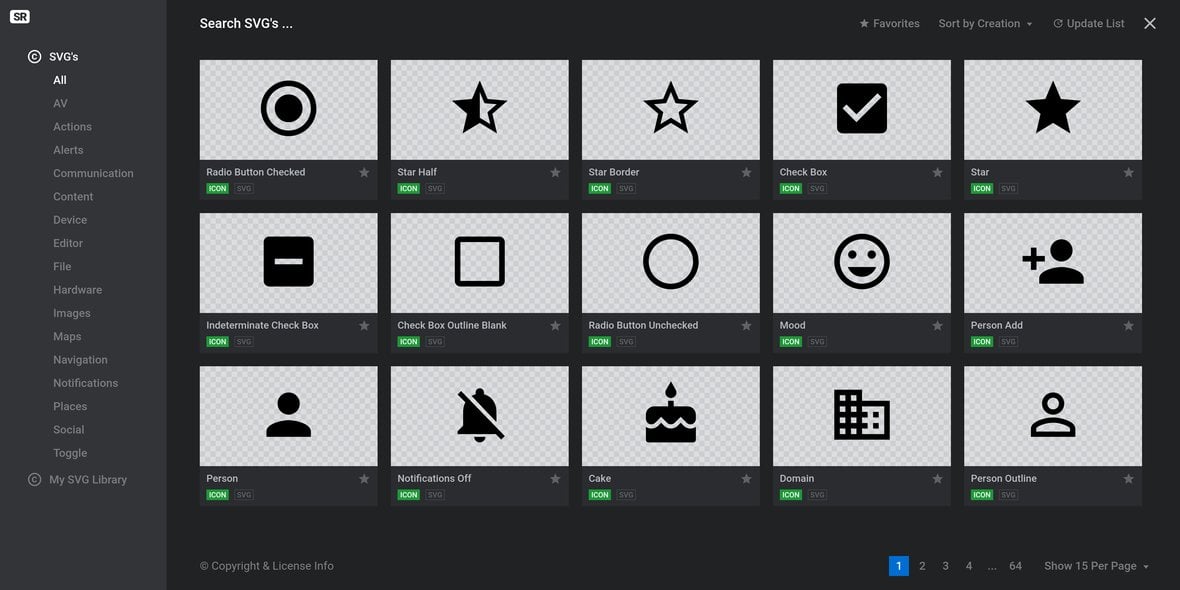
Click this button to open up a window with an additional 900+ SVG shapes to choose from for your particles:
Note: It’s also possible to use custom SVG shapes. We’ll cover how to do so on the next page of the manual.
Number of Particles
The Number of Particles option allows you to cap the maximum number of particles being displayed at any one time:

Be aware that the more particles you allow the more resources will be required, so if you find you need to boost performance try decreasing the value you use for this option.
Particle Size
Use the Particle Size option to set the size of each particle in pixels:

Random Sizes
If the Random Sizes option is toggled to OFF, every particle will be the size set in the Particle Size option.
If Random Sizes is toggled to ON, every particle will instead have a random size:

If so, the particles will be no larger than the Particle Size setting, and no smaller than the Minimum Size setting.
Minimum Size
The Minimum Size option only appears if Random Sizes is toggled to ON.
As described above, this option sets the smallest size a randomized particle can be, in pixels:

Disable on Mobile
If you have a particle effect that is significantly large or performance heavy, you can toggle Disable on Mobile to ON to hide the effect on mobile devices.

Responsive
If your module uses linear resizing, i.e. you don’t have mobile device views active, toggle the Responsive option to ON and the entire particle effect will resize in a linear manner along with the overall module layout:

As the module shrinks or expands in a viewport, so too will the particle effect.
Note: In the future we also intend to add scaling options that interact with mobile device views as well.
Force Back
If your slide is using the Slide Link option, and you have Sensibility set to Over Layers (Front), you will notice that your particle effect now also sits in front of your slide’s content layers [?]
Layers are containers for visual, audio or layout items and are added to slides. For example, text, button, image, audio, video, group and row are all types of layers.
Layers are added to slides via the module editor..
To correct this, toggle the particle effect’s Force Back option to ON and it will go back to appearing behind your content layers:

Style
The Style category of options allows you to control the colors, opacity, borders and connected lines used in your particle effect:
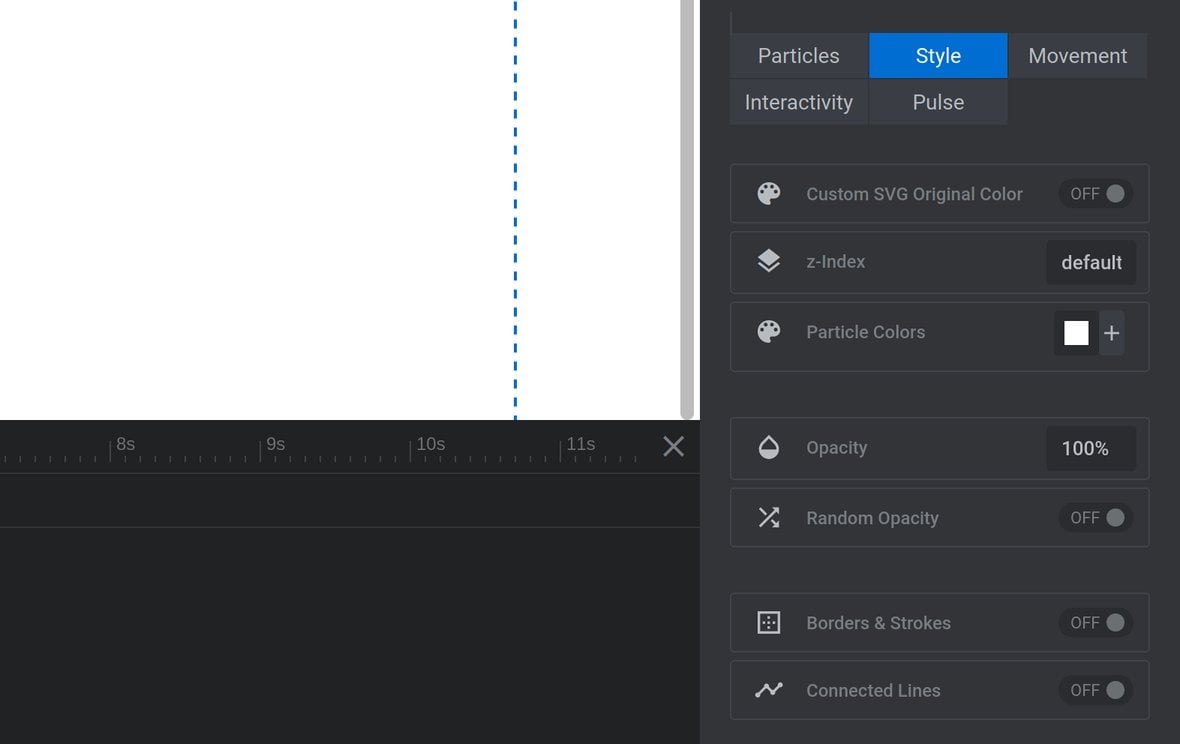
Custom SVG Original Color
The Custom SVG Original Color option relates to working with custom SVGs in particle effects. As such, check out our guide to using custom SVG particles on the next page of the manual to learn about it.
z-Index
The z-Index option allows you to control whether your particle effect sits behind, or in front of, layers added to your slide:

This is a relatively advanced option, and if you would like to use it we recommend reading a little about the z-index CSS property that drives this feature.
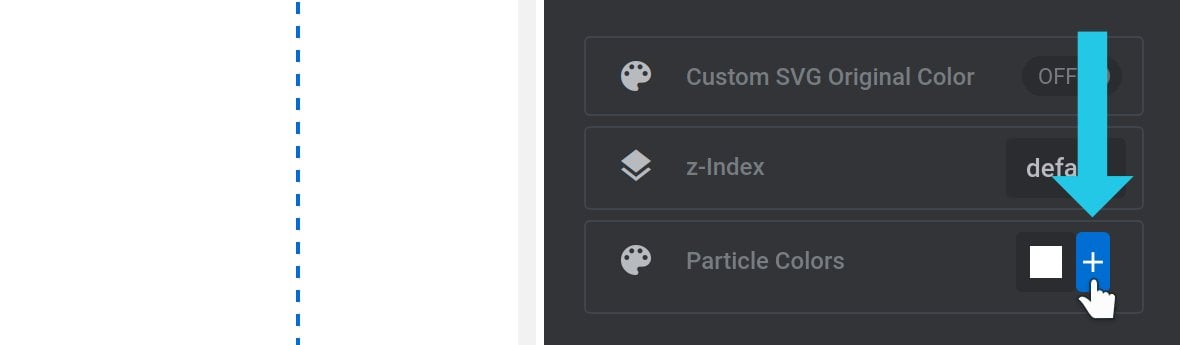
Particle Colors
The Particle Colors option allows you to set the color of your particles:

A single color is set by default. Change this by clicking the little color swatch to the right of the option label, then choose a color using the color picker that opens:
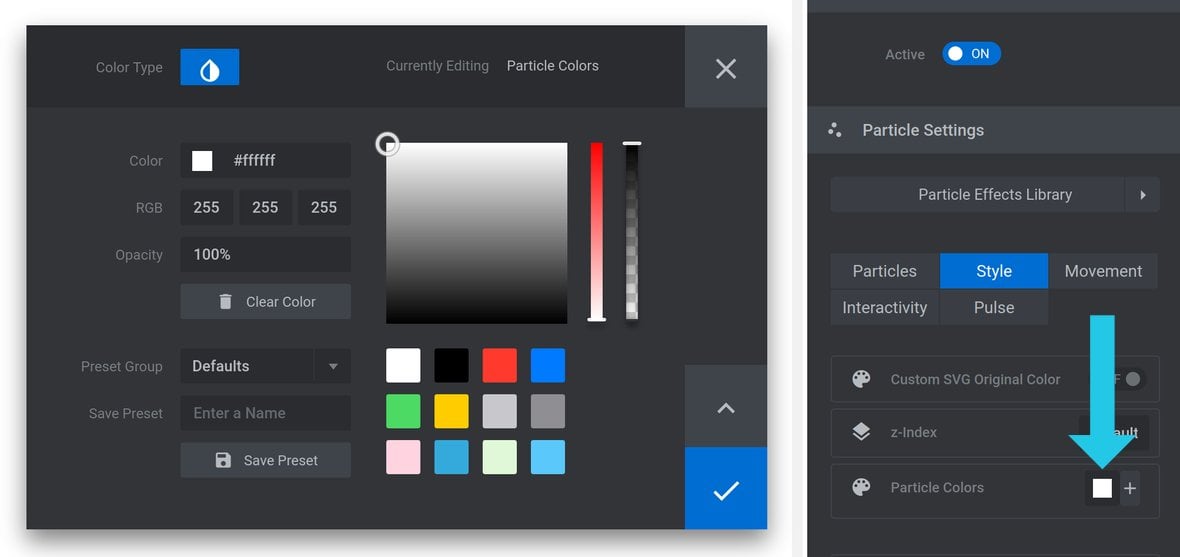
You can, optionally, also add extra colors which will be randomly and equally distributed across all your particles.
To do so, click the small + icon to the right of the default particle color swatch:
This will make a new color variant appear below, with its own color swatch that you can click to choose a color:
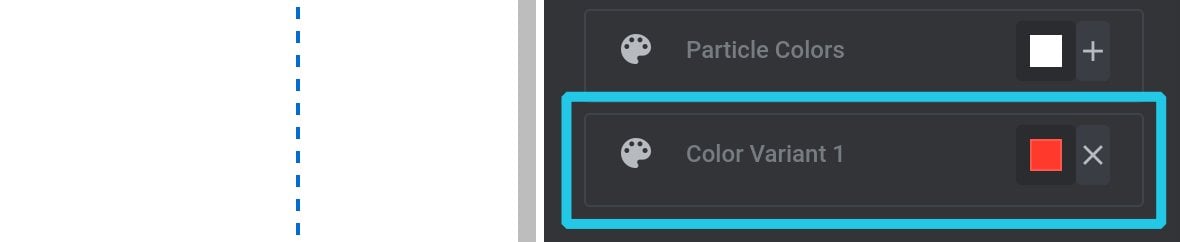
You can add as many color variants as you want.
To remove a color variant, click the X to the right of its color swatch.
Opacity
Use the Opacity option to set how transparent each particle is, as a percentage:

0% represents entirely transparent, and 100% represents entirely solid.
Random Opacity
If the Random Opacity option is toggled to OFF, every particle will have the opacity level set in the Opacity option.
If Random Opacity is toggled to ON, every particle will instead have a random opacity:

If so, the particles will be no more solid than the Opacity setting, and no more transparent than the Minimum Opacity setting:
Minimum Opacity
The Minimum Opacity option only appears if Random Opacity is toggled to ON.
As described above, this option sets the most transparent a randomized particle can be, as a percentage:

Borders & Strokes
If the Borders & Strokes option is toggled to OFF, particles will just be a solid color, as set via the Particle Colors option described above.
However if Borders & Strokes is toggled to ON, three additional options will appear that allow you to configure outlines around each particle:
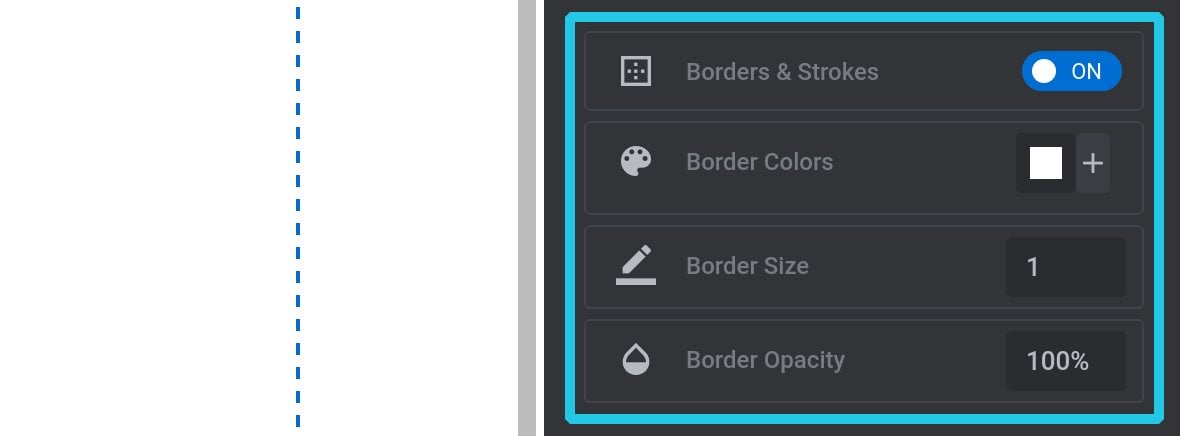
Border Colors
The Border Colors option allows you to set the color of your particles:

By default a single border color is set, which you can change by clicking the little color swatch to the right of the option label, then choosing a color using the color picker that opens.
You can, optionally, also add as many extra border colors as you’d like, all of which will be randomly and equally distributed across all your particles.
To do so, click the small + icon to the right of the default border color swatch. This will make a new border color variant appear below, with its own color swatch you can click to choose a color:

To remove a border color variant, click the X to the right of its color swatch.
Border Size
The Border Size option allows you to set the width of particle borders, in pixels:

The same border size will be applied to all particles.
Border Opacity
The Border Opacity option allows you to set how transparent your particle borders are, as a percentage:

0% represents entirely transparent, and 100% represents entirely solid.
The same border opacity will be applied to all particles.
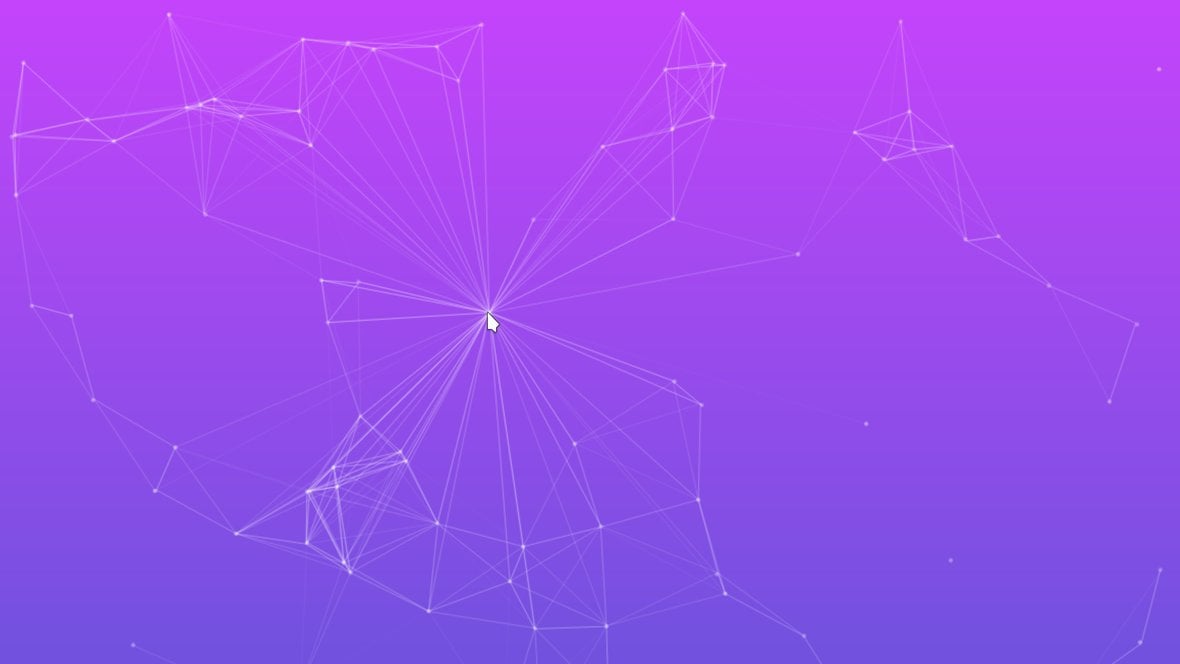
Connected Lines
If the Connected Lines option is toggled to ON, particles will be connected to each other with lines, creating a spider-web type visual:
When this option is active, four additional options will appear that allow you to configure the connected lines:
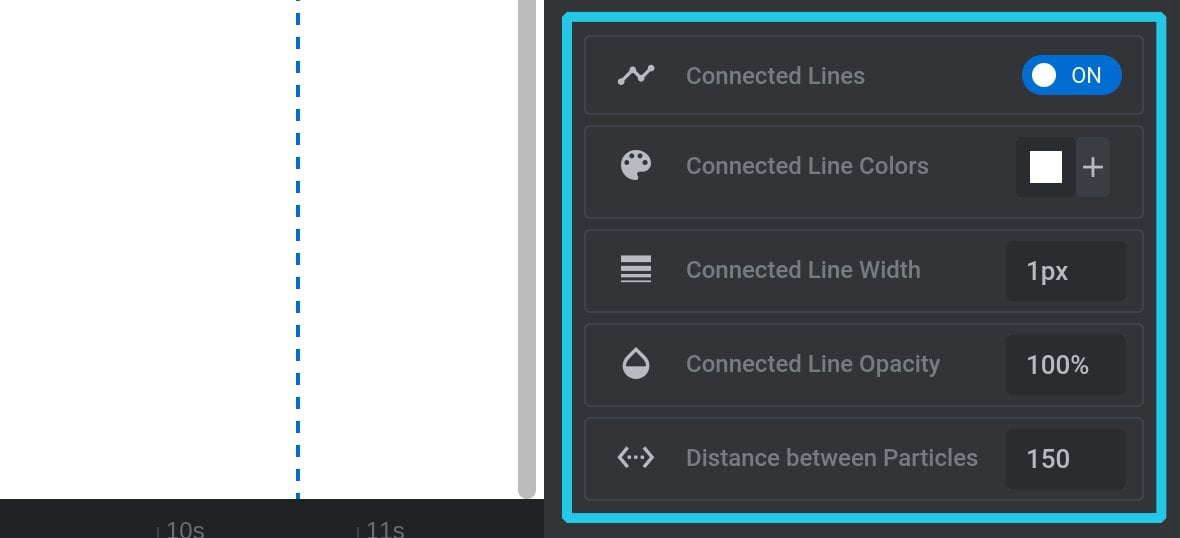
Connected Line Colors
The Connected Line Colors option allows you to set the color of the connected lines between particles:

By default a single connected line color is set, which you can change by clicking the little color swatch to the right of the option label, then choosing a color using the color picker that opens.
You can, optionally, also add as many extra connected line colors as you want, all of which will be randomly and equally distributed across all the lines.
To do so, click the small + icon to the right of the default connected line color swatch. This will make a new connected line color variant appear below, with its own color swatch you can click to choose a color.
To remove a connected line color variant, click the X to the right of its color swatch.
Connected Line Width
The Connected Line Width option allows you to set the width of the connected lines between particles, in pixels:

The same border size will be applied to all connected lines.
Connected Line Opacity
The Connected Line Opacity option allows you to set how transparent the connected lines between particles are, as a percentage:

0% represents entirely transparent, and 100% represents entirely solid.
The same connected line opacity will be applied to all particles.
Distance Between Particles
The Distance Between Particles option allows you to set the farthest distance in pixels, up to 400, at which you’ll allow a connected line to form between particles:
Increasing the value lets particles that are farther apart have connected lines. This means more connections and hence a more dense spider-web effect:
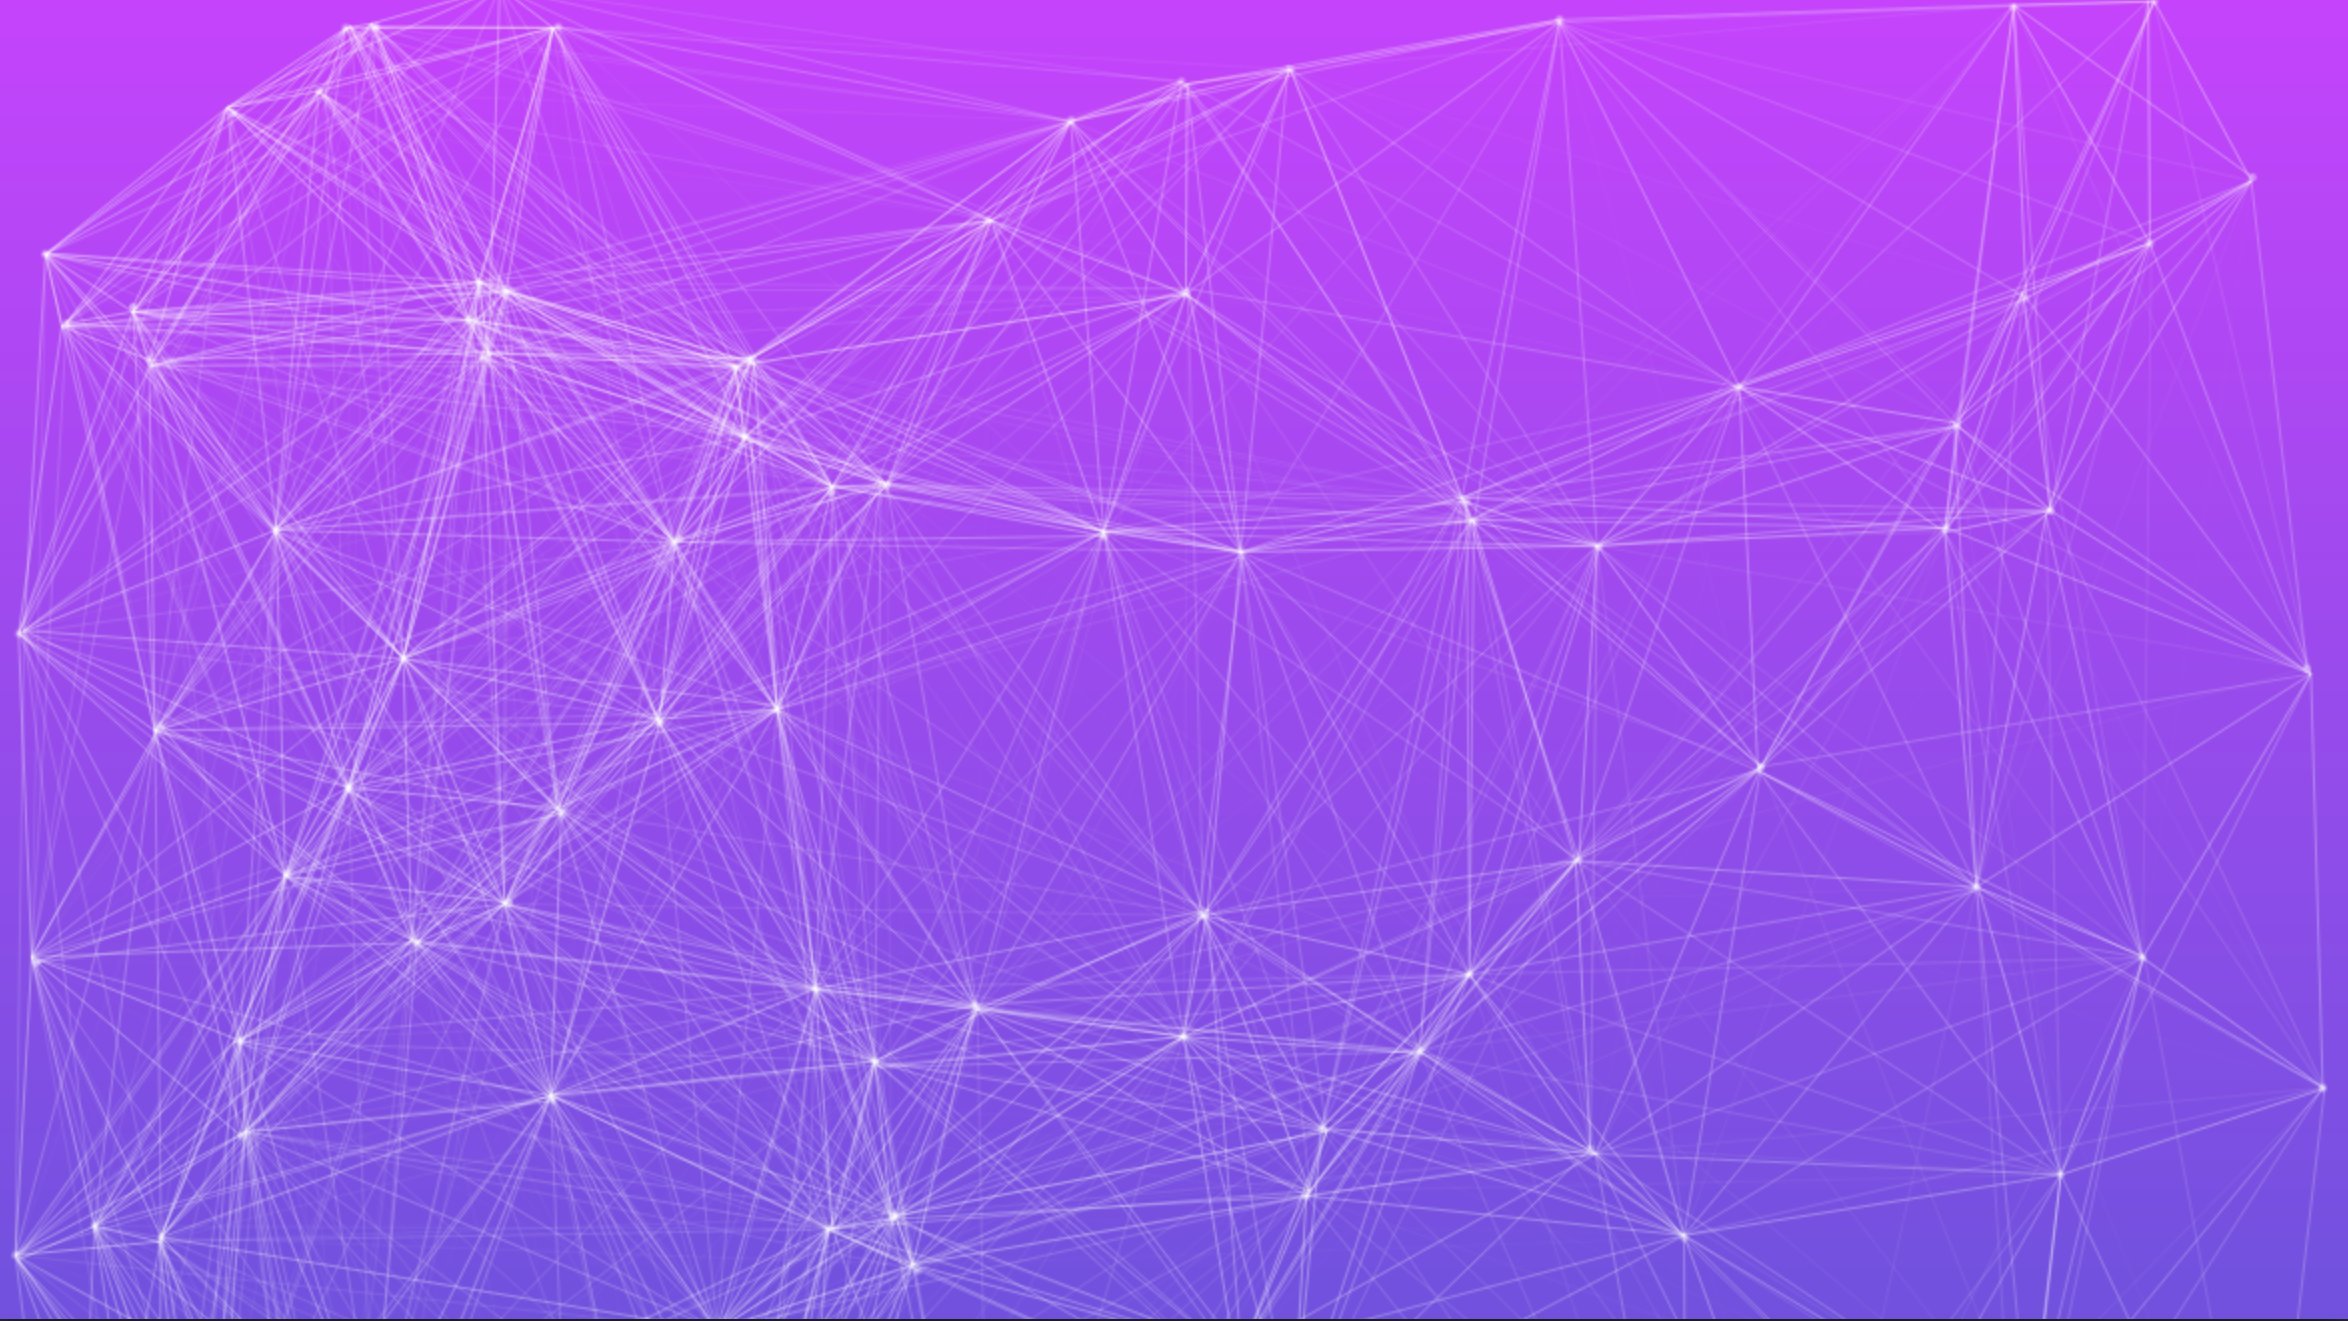
Decreasing the value only allows particles that are close to form connected lines. This means fewer connections and hence a more sparse effect:

Movement
The Movement category of options allows you to choose whether or not particles move, and if so, their speed, bounce, and direction:
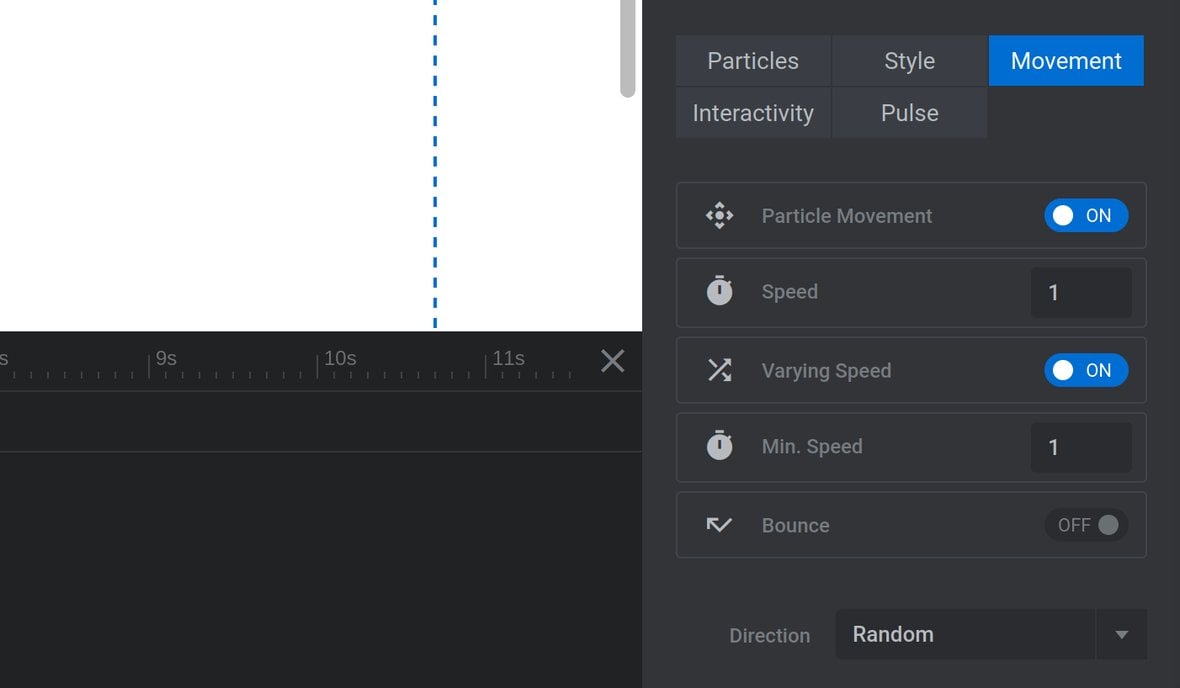
Particle Movement
If the Particle Movement option is toggled to OFF, particles will remain stationary, creating a static image effect.
However if Particle Movement is toggled to ON, as is the most typical case with particle effects, five additional options will appear that allow you to configure the movement of your particles:

Speed
The Speed option controls the rate at which the particles move, and can be set within a range of 0 to 200:

0 represents the slowest speed, but not zero movement. 200 represents the fastest speed.
Varying Speed
If the Varying Speed option is toggled to OFF, every particle will have the movement speed set in the Speed option.
If Varying Speed is toggled to ON, every particle will instead have a random movement speed:

If so, the particles will move no faster than the Speed setting, and no slower than the Min. Speed setting.
Min. Speed
The Min. Speed option only appears if Varying Speed is toggled to ON.
As described above, this option sets the slowest a randomized particle can move, with a range between 0 to 200:

Bounce
If the Bounce option is toggled to OFF, particles will disappear when they reach the module’s [?]
A module in Slider Revolution acts as a container for slides, which in turn act as containers for layers. Modules are created and edited with the module editor.
A "module" is a single, self contained piece of content. You can think of this as being similar to the way a post or page in regular WordPress is a self contained piece of content.
A module can represent any kind of content Slider Revolution is capable of creating, such as a slider, carousel, hero unit, navigation menu, posts display and so on.
Multiple modules can be combined to form rich content such as complete sites and landing pages. bounding box.
If Bounce is toggled to ON, particles will instead bounce off the bounding box “walls” and keep moving in another direction:

Direction
The Direction option allows you to specify the direction particles should move:
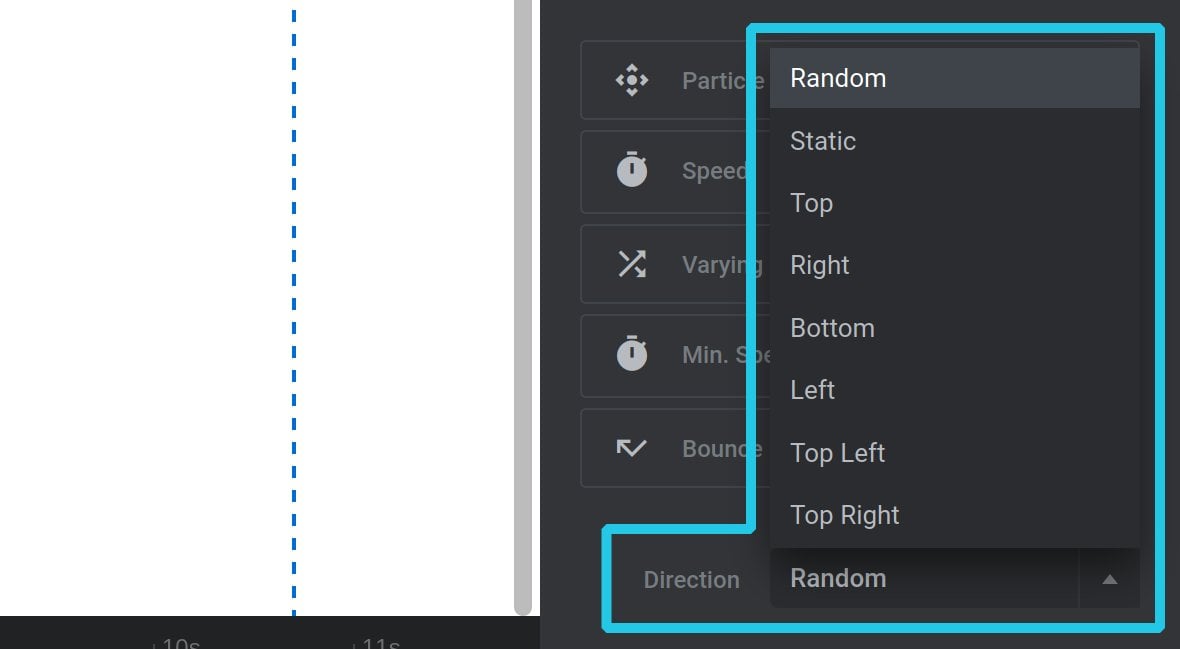
Movement is defined by the edge, (top, right, bottom, left), or corner, (top left, top right, bottom left, bottom right), the particle should move towards.
Additionally, you can choose the “Random” setting and particles will move in a random direction.
Or, you can choose “Static” and particles will remain stationary, as though Movement were turned off. However, the difference is this configuration allows interactivity based movement to work fluidly, a feature we’ll look at in just a moment.
Varying Movement
If Varying Movement is toggled to ON, particles will predominantly move in direction set via the Direction option, but with some variance:

You can think of this option as being half way between using a fixed vs random direction.
Note: This option will not appear of Movement is set to “Random” or “Static”.
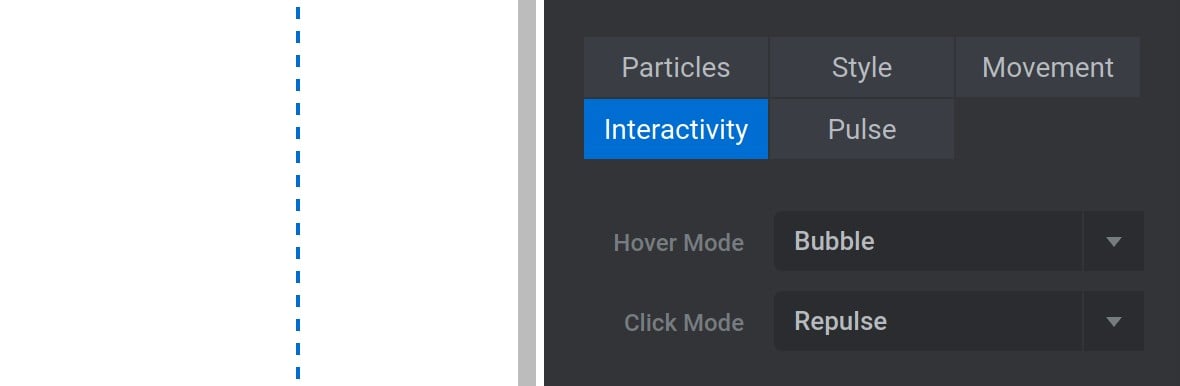
Interactivity
The Interactivity category of options allows you to control how particles respond to mouse hover and mouse click:
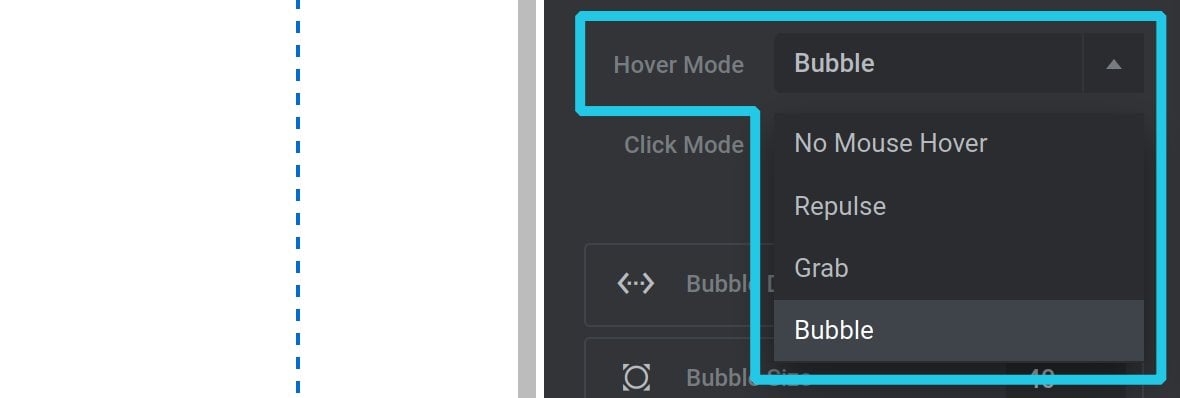
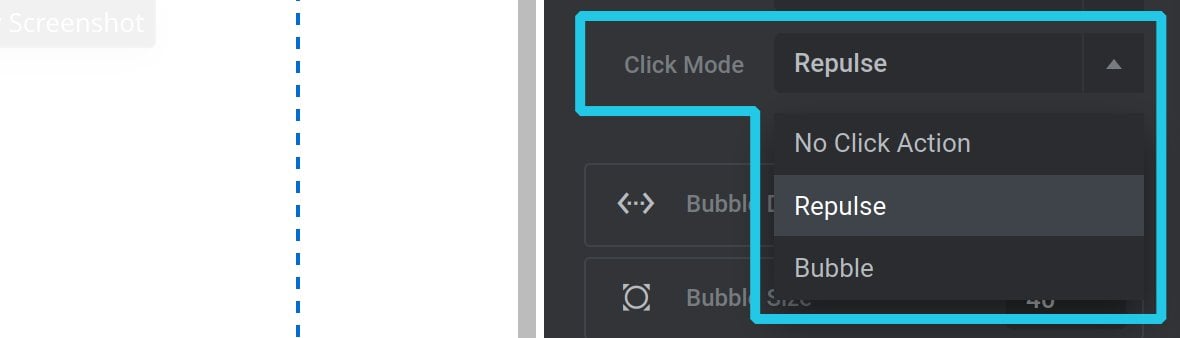
The mouse can trigger three possible effects:
- Repulse – repel nearby particles away from the mouse
- Grab – “grab” nearby particles with a collection of new connected lines
- Bubble – inflate nearby particles to a multiple of their original size
Mouse hovering can trigger all three effects. Use the Hover Mode option to select which of these three effects to trigger, or choose “No Mouse Hover” for no effect:
Mouse clicking can trigger the repulse and grab effects, but not the bubble effect. Use the Click Mode option to select which of these two effects to trigger, or choose “No Click Action” for no effect:
As mentioned above, for Interactivity movement to be fluid, the Particle Movement option in the Movement category needs to be toggled to ON.
When you select one of the available effects for either Hover Mode or Click Mode, additional options will appear below so you can configure how the effect behaves.
Repulse Effect
With the repulse effect, particles near the mouse will move away.
In click mode this will look like little “pops” where the particles move away in all directions. In hover mode it will look like the mouse is chasing the particles around.
Repulse Distance
The Repulse Distance option allows you to set how far, in pixels, the particles will be repelled from the mouse, within a range of 0 to 1200.

Repulse Easing
The Repulse Easing option allows you to set how quickly the particles will move when repelled, within a range of 0ms to 1000ms:

If the value is set at the minimum of 0ms, particles will immediately jump the distance set in the Repulse Distance option.
If the value is set at the maximum of 1000ms, particles will take a full second to travel the same distance, moving faster at first and then easing into their destination point.
Grab Effect
The grab effect “grabs” nearby particles with the same types of lines used in the Connected Lines effect. These lines are drawn from the location of the mouse, out to each particle:
Note: The colors and line width used in the grab effect are pulled from the settings used for Connected Lines.
Grab Distance
The Grab Distance option determines how close the mouse needs to be to a particle before a line will be drawn connecting to it. The value is in pixels, between a range of 0 to 1200:

Grab Opacity
The Grab Opacity option lets you set the opacity level for connected lines when the grab effect takes place:

While grab effect lines inherit color and width from Connected Lines settings, their opacity setting can be unique.
Bubble Effect
The bubble effect can be used to inflate the size of particles near the mouse. It can also be used to shift the opacity of those particles at the same time.
Bubble Distance
The Bubble Distance option sets the farthest away from the mouse a particle can be and still be affected by the bubble effect. The value is in pixels, and can be within the range of 0 to 1200:

Bubble Size
The Bubble Size option sets the largest size, in pixels, a particle should be inflated to. The possible range is between 0 and 1200:

Note: If the value set in the Bubble Size option is smaller than a particle’s original size, it will “deflate” to that smaller size.
Bubble Opacity
The Bubble Opacity option sets the transparency of bubble affected particles as a percentage:

The closer to the mouse a particle is, the nearer to this opacity value it will be. For example, if your particles are 50% opacity by default, and you have Bubble Opacity set to 100%, particles right under the mouse will be fully solid, and those further away from the mouse will be more transparent.
Bubble Opacity can be either higher or lower than default particle transparency, both work equally well.
Pulse
The Pulse category of options allows you to configure your particles to continuously pulse in size and/or opacity:
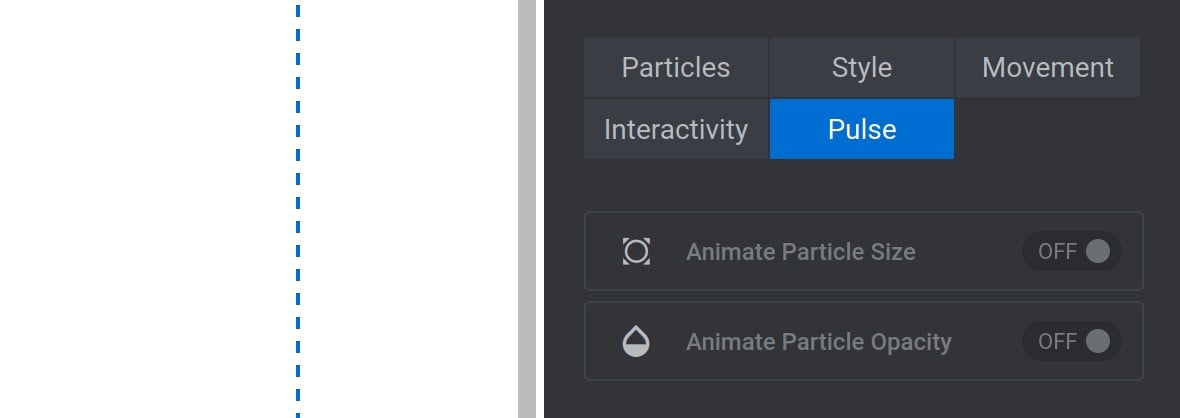
Animate Particle Size
If Animate Particle Size is toggled to ON, particles will pulse in size.
Three additional options will be revealed that allow you to configure this effect:
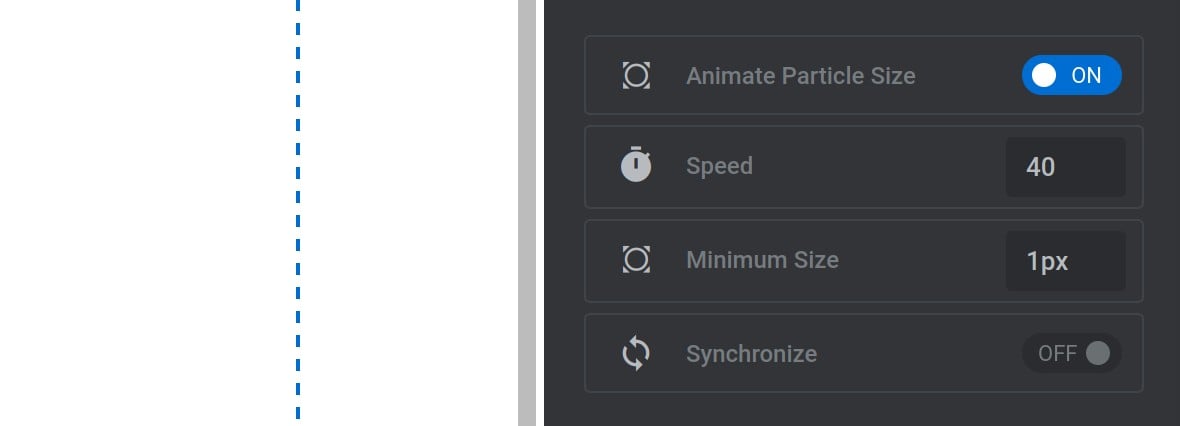
Speed
The Speed option allows you to control how fast the size of your particles pulse, with a range between 0 and 1000:

To increase the speed of the pulsing effect, increase the value. And to decrease the pulsing speed, decrease the value.
Minimum Size
The Minimum Size option specifies the smallest size, in pixels, the particles will shrink to:

Note: The value set here needs to be lower than the default size of the particles. The pulse effect can only shrink particles, not enlarge them.
Synchronize
Toggle the Synchronize option to ON and all the particles will pulse at the same time:

Otherwise, they will each pulse at their own random time.
Animate Particle Opacity
If Animate Particle Opacity is toggled to ON, particles will pulse in transparency level.
Three additional options will be revealed that allow you to configure this effect:
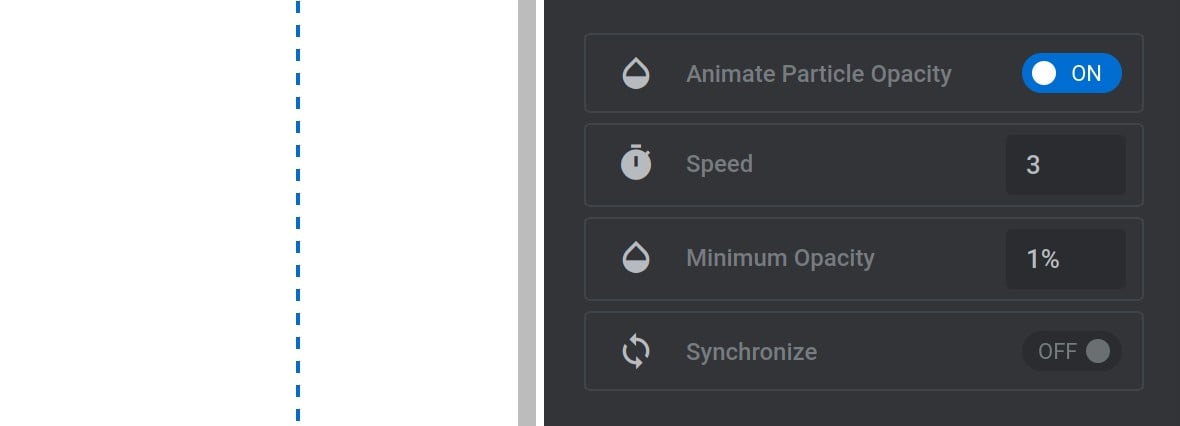
Speed
The Speed option allows you to control how fast the transparency of your particles pulse, with a range between 0 and 1000:

To increase the speed of the pulsing effect, increase the value. And to decrease the pulsing speed, decrease the value.
Minimum Opacity
The Minimum Opacity option specified the lowest opacity level the particles will animate to, as a percentage:

Note: The value set here needs to be lower than the default opacity of the particles. The pulse effect can decrease opacity, i.e fade out, not increase opacity.
Synchronize
Toggle the Synchronize option to ON and all the particles will pulse at the same time:

Otherwise, they will each pulse at their own random time.
Coming Up
In the next guide, we’ll see how you can bring in your own custom SVGs and use them in your particle effects.