
When a visitor enters your home page, what do you want them to see first? While it’s important for them to get acquainted with the header elements, they’re not as important as your hero image.
Think of your hero image as a 15-second pitch. Visitors should get a crystal-clear summary of who your brand is and what your site is about from that first section on the home page.
You can certainly impress visitors with a great-looking hero image or video. But that’s only half of what you need to accomplish. They need to see more than just your visual story. They need to read the words, too.
One of the most effective ways to do this is by adding motion to your hero’s headline.
In the following tutorial, we’re going to show you different animated headline designs for inspiration. Then we’ll walk you through a quick and easy way to implement a wow-inducing headline animation effect with Slider Revolution.
Table of Contents
- Animated headline ideas for your home page
- How to install and customize your Slider Revolution template
- The easy way to add headline animations to your WordPress website
Animated headline ideas for your home page
There’s no need to recreate the wheel when it comes to animating headlines. Slider Revolution has over 200 templates, many of which are built using creative headline animations and tricks.
For example, the Big Summer Sale template comes with a fun headline effect:

The first thing that happens is the words “Big Summer Sale” slide down onto the page. The “Up to 50% On Selected Items” sticker then expands and does a little wiggle motion.
Here’s another neat animated headline example. This one is in the Creative Hero Collection template:

There are a number of noteworthy animations taking place here:
- The delayed entry of the word “Creative” mimics the triangular shape present throughout the design
- The word “Potential” slides into place next, the letters compressing inwards from the right and left
- The call-to-action “Start Exploring” bounces in a wave shape after the initial animations end
The Photographer & Videographer Slider template gives each headline in the slider a magical touch:

Some of the letters in the headline appear blurred until the words finally settle into place together.
Let’s look at a simpler hero image animation on the Visual Art Forms Slider template:

This one uses a popular animation technique whereby a statement — “Click to See Full Image” — is designed in a circular shape and spins non-stop.
Another popular animation trend right now is the text typing effect. You’ll find that one in the Cyber Glitch Effect Slider template:

The headline is the first string of text we see on the screen. It uses a smooth slide-in animation from the left. Once the headline stabilizes, the hero description quickly gets typed out onto the screen. This is possible thanks to the new Typewriter Addon in Slider Revolution.
These kinds of complex animations might be difficult to build using WordPress out of the box. But with Slider Revolution, all you have to do is repurpose the module template for your own purposes.
How to install and customize your Slider Revolution template
Now that you’ve seen some of the cool things you can do, let’s review how to install a Slider Revolution template and then customize the content while preserving the animated headline effect.
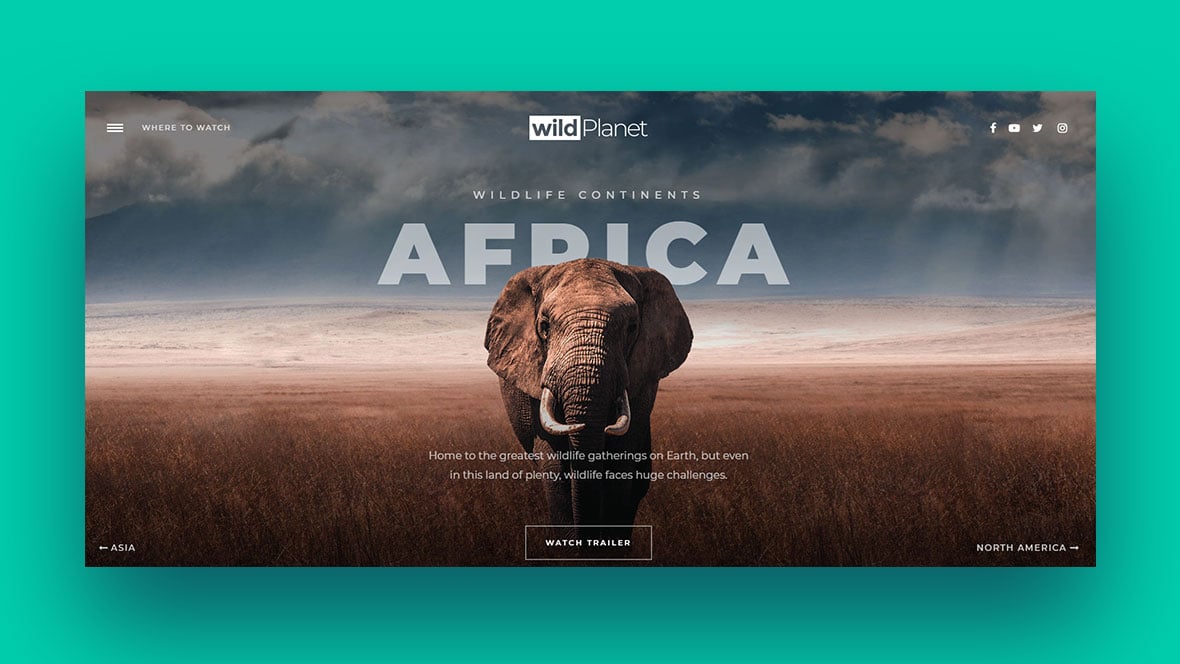
In this tutorial, we’re starting with the Cinematic Wildlife Slider template. The animated headline in this template does two things:
- Fades in from 100% transparent to 100% opaque.
- Grows bigger which gives it a feeling of coming closer to us.

We’re going to preserve these animation traits and quickly modify the home page hero so it looks like this:

By the way, if this is your first time editing a Slider Revolution template, check out our Slider Revolution 101 tutorial [link] first as it’ll show you what the key editor features do.
Step 1: Create a new module from the template
Open the Slider Revolution plugin in WordPress and click on “New Module from Template”:

Do a search for the “Cinematic Wildlife Slider”:

Pro tip: When searching the Slider Revolution module template library, look for the yellow “Package” badge on the templates. If you want all the functionality and modules included in the template, you can only get them from a template package. If you’d rather only use one of the modules from a template (which you can preview by clicking the eyeball icon), look for purple “Module” badges instead.
Click the plus-sign (+) to select the slider template:

For this tutorial, we’re not using the Cinematic Wildlife Modal module (the video pop-up) that’s included in the package, so all we need to do is “Install Template” for this one.
From your Slider Revolution home screen, find your new module under “Search Modules…”:

Hover over it and click the pencil icon to open the module and customize it in the editor.
Learn more:
Step 2: Edit the animated headline
Let’s start with the animated headline. To edit it, click on the text in the visual editor.
To change what the text says, go to “Layer Options” and “Content”:

Simply enter the new text in the text editor.
You can also adjust the way the headline looks:
- To change the font or the style of it, go to Style.
- To alter the size and position, go to Size & Pos.
- To adjust other settings, like the shadow, blend, or strokes, go to Adv. Style.
If you want to tweak the existing animation, you’ll find those settings under Animation:

Under Keyframes, you can choose from a variety of premade animations. To adjust them even further, use the Basics and Advanced tabs below.
The timeline editor will also allow you to adjust when your headline appears on the screen and for how long:

If you’re happy with the animated headline as it is, then there’s no need to adjust this setting.
Learn more:
Step 3: Edit the surrounding content
You can just as easily edit the content surrounding the headline.
To change the background image, click on it in the visual editor and then select “Slider Options” on the right:

Go to “Background” and “Source” to change out the background image. You can add a different image, video, or even change it to a solid color.
To remove the elephant graphic, simply click on it and hit the “Delete” button on your keyboard.
To swap it out for something else, select the elephant layer. Then, go to “Layer Options”, “Content”, and upload a new image from your media library:

Feel free to use the Slide and Layer editing settings to adjust your newly uploaded graphics. You can change their position, size, and even color filter.
While you can animate background images and image layers in Slider Revolution, that might not be the best idea for this hero image design. The whole purpose of the animated headline is to draw visitors’ attention to the messaging. If the rest of the module is moving around, they might feel overwhelmed or get distracted by it all.
As a general rule of thumb, try to keep animations to a minimum so they can make a greater impact.
There are other elements in this module — like the text towards the bottom, the call-to-action button, and the country navigation links in the bottom corners. For our purposes, we’re going to delete everything but the button. It’s up to you how much you want to preserve or delete from your design.
Learn more:
- Selecting Layers via the Canvas or Timeline
- Changing Template Background Colors and Images
- Editing Images in Template Modules
Step 4: Tweak your text
Before you move onto the next step, check in on your headline. The original background image was a bit darker, so the semi-transparent white text stood out just fine against it. If that’s not the case with your new image, make adjustments to the color and/or the shadow to make it stand out.
The same goes for the button and the other textual elements you keep on the slide.
Step 5: Update the slides in your module
If you are using a template that has multiple slides and you want to keep them, simply edit them as you did the first.
You’ll find them all under “Slides” in the top toolbar.
If you want to delete some or all of them, hover over the ones you don’t want and click the trash can icon:

You can make your slider smaller or you can turn it into a single hero image using the “Slides” panel.
Learn more:
Step 6: Edit the Global Layers
Every Slider Revolution template has what’s called “Global Layers”. These are typically the elements that appear from slide to slide.
You won’t be able to see your Global Layers when editing your slides. To show them, click on “Slides” in the toolbar and select “Global Layers”:

From here, you can:
- Remove layers
- Customize existing ones
- Add new ones
You’ll use the same exact editing tools you used on your regular slides to do this.
Don’t forget to save your changes when you’re done. Then, open the “Preview” (in the bottom-right corner) to make sure you’re happy with your new hero image and animated headline.
Learn more:
The easy way to add headline animations to your WordPress website
When you’re competing for attention online, you need to be able to quickly capture the attention of your audience. And motion is a great way to do this.
While adding animated headlines to a WordPress site might have been a cumbersome task in the past, that’s not the case with Slider Revolution. All you need to do is find a template that has the animation you want and then quickly repurpose it for your needs!


Beautiful next generation work here. So impressed besides getting my full attention Some have me catching my breath in awe. Best tool for any visual designer in my opinion.
I know there are competing sliders and we should avoid the Who’s best silliness and just fork out the pennies and own all of the good tools and use them as inexpensive work materials at our dispense (I actually have every tool I like) rather than comparing away all day, — but do the slider apps also make dropjaw full websites that remove the need for looking up premium themes and templates, for me it’s more the time involved in looking around so thank you and it’s very fun like a kid in the arcade thank you..
Those who know — presentation is king, — and RS6 is the most dynamic and fun tool period for visual passionates like me. This is next best to having AfterEffects generating organic HTML..(almost but so it feels). Well, Thanks and keep the samples pumping(and my blood)!! — (and keep the costs down). Give lots of prime freebies😋🥰 to get great new newbies. 💁🏻💁🏼🧏🏾♀️🧏♀️
You may share any part of this message,
👽👾🤠😶🌫️
URI KIRSTEIN,
SHINING MEDIA™
Great step by step tutorial that is so crystal clear and helpful. Thanks. 2 quick comments:
1. It’s great to see the template on a desktop, but we also need to see how it pans out on a mobile device. Right now, we won’t know how it turns out until we have downloaded the template. Then there is massive editing to consider to make texts fit into a smaller screen.
2. I like to learn from your templates by looking at the animations used, but when I go to the keyframes, I don’t see anything highlighted to help me know which animation is used. Even when I choose my own animation, I don’t see anything highlighted. Am I missing something? Hope you can point me to a clue somewhere.
Hi Shon,
thanks for your comment. For starters our templates are always optimised to look good on any device size. To test this you could either use one of these devices to check out our live examples via https://www.sliderrevolution.com/examples (nothing beats the real thing 😉 ) or you could test it via Chrome: https://www.makeuseof.com/google-chrome-preview-website-different-devices/
I am not sure I understand your second question completely. Could you be so nice and send a screenshot with a ticket at https://support.sliderrevolution.com ? Our team of experts will be there to help!
Cheers, Dirk @ Slider Revolution
Thanks Dirk. The link is v helpful indeed. My 2nd qsn was about learning from your templates & see which animation preset is being used for a layer. Although I can see a layer sliding in eg, I don’t know if it was a ‘slide transition’ or a ‘masked transition’. I can’t tell because the animation settings don’t show which preset was the chosen one.
Hi Shon,
Thanks for your reply. I believe we’ve discussed this on live chat. For our reference, let’s assume that you’re using an animation(fade-out) and made some changes. It will be a custom animation without a name. What you can do would be to save the animation that you like and import it to the slider that you’re working on.
Cheers, KC @ Slider Revolution
Hi, I have learned the basics. Is possible to animate text FROM TO using letter spacing parameter?
Hi Jurik,
Thanks for your message. Sorry, I’m not so sure what you mean there. Maybe you can share an example of what you’re trying to achieve there.
Cheers KC @ Slider Revolution