
When you go to the grocery store and buy any kind of packaged food, it comes with a label on the back that provides various details on what’s inside. The list of ingredients and associated nutrition info is always included.
When consumers buy food online, however, this kind of information isn’t always readily available. If it is, it might be in a photo taken of the food label on the package, which can be hard to read. Or the data might be stored in a table below the product’s photos and descriptions, which some users might miss if they don’t know it’s there.
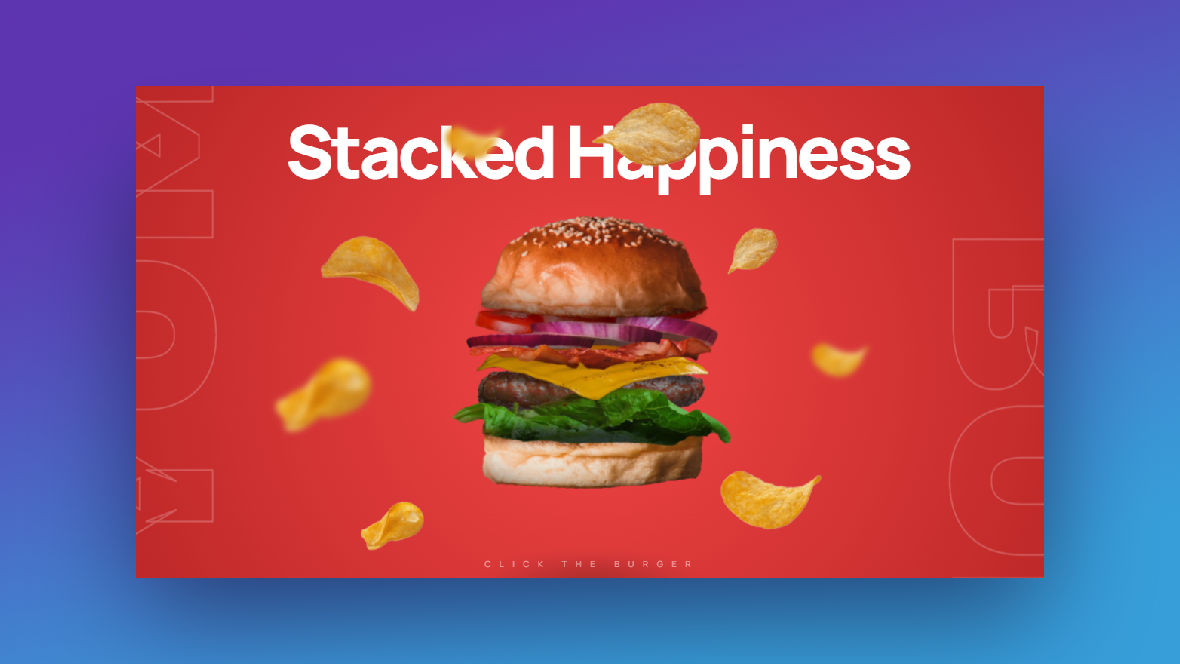
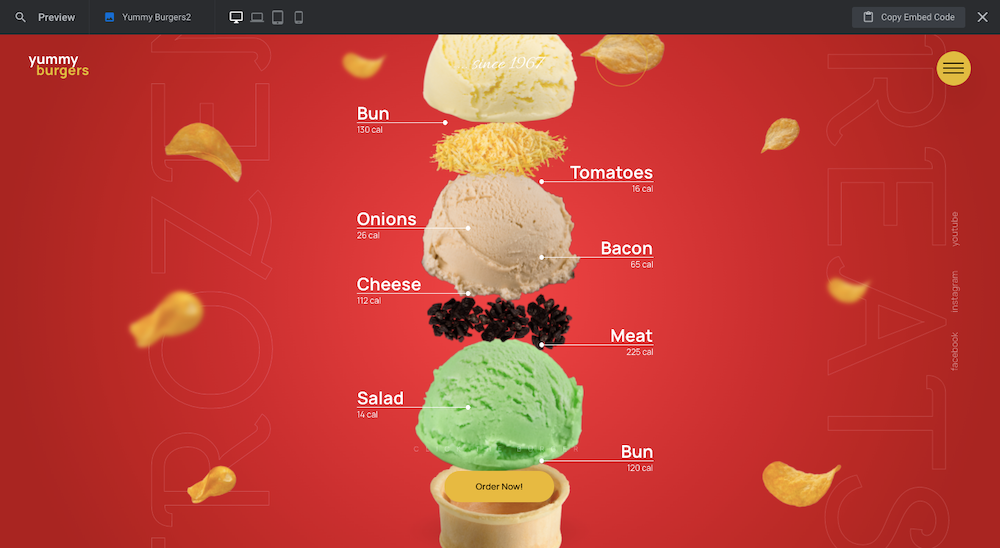
Even if your website doesn’t sell packaged food or drinks (like on restaurant websites), it’s important to display ingredients and nutrition info somewhere for the people who want it. In this tutorial, we’re going to show you a fun and interactive way to display this data using the Yummy Burgers template.
Table of Contents:
- Step 1: Delete all slides but one
- Step 2: Edit the slide text layers
- Step 3: Update burger ingredient layers
- Step 4: Edit nutritional label layers
- Step 5: Delete the floating elements and shadow layer
- Step 6: Customize the background
- Step 7: Customize the button
- Step 8: Edit the global layers
- Step 9: Remove the navigation
How to display ingredients in a fun and interactive way on a website
You can use this Slider Revolution template to build hero images on websites for food production companies, local eateries, and others in the food and beverage industry:
In the following tutorial, we’re going to show you one way to edit this slider template and turn it into an interactive hero image that can be placed atop any product or single food item page:

Before you get started, make sure you’re acquainted with the Slider Revolution builder:
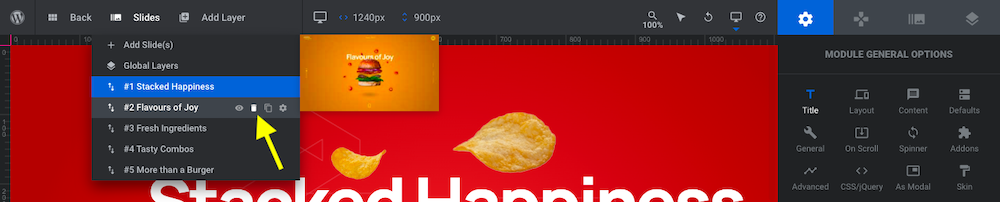
Step 1: Delete all slides but one
This template contains five slides. The burgers and their components are the same in each slide. The main difference is the messaging above eachburger and the floating ingredients.
We’re going to simplify this design a bit. While the slider works well to promote the brand’s food product and promise on the home page, we want a singular, interactive graphic to display ingredient and nutritional info at the top of our product page.
Since the slides are all designed using the same structure and components, it doesn’t matter which ones you delete. That said, if there’s a background color gradient you want to use, save that slide and delete the rest so you won’t have to manually edit the background later (in Step 6).
To delete all of the slides but one, open “Slides” in the toolbar. Hover over the various slides and click the trash can icon to delete:
When you’re done, save your changes.
Learn more:
Step 2: Edit the slide text layers
There are three text layers to edit in this step:
- Headline
- Vertical Text Left
- Vertical Text Right
Let’s start with the big headline above the burger. To edit what the text reads as well as the font and style, select Headline from the timeline editor. Then, open up “Layer Options”:
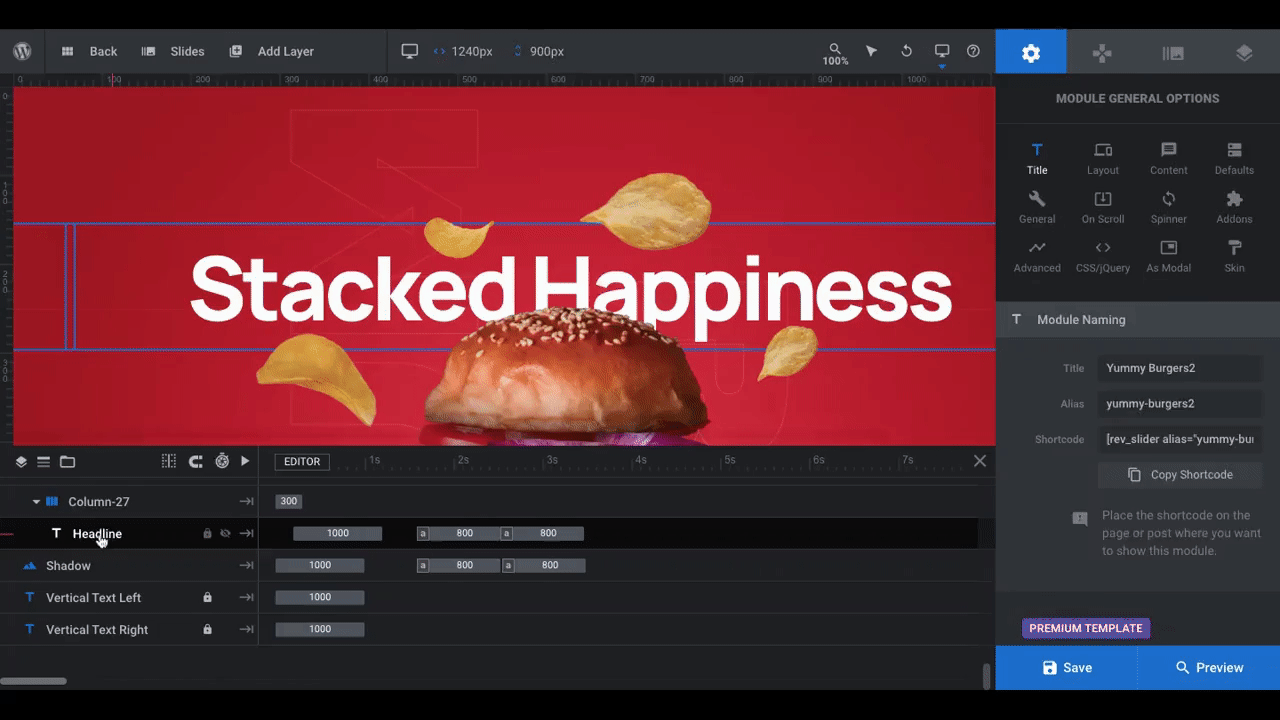
Replace the text under “Content”. Then, adjust the font and corresponding styles under “Style”. If you feel as though the text layer needs to be resized or repositioned, make those changes under “Size & Pos”.
The other two text layers are the ones that appear vertically along the left and right sides of the slide. Edit them the same way you did the Headline layer.
There are a couple things to note about these layers first though:
For starters, they’re locked from editing. That’s why you see a lock next to each of them in the timeline:
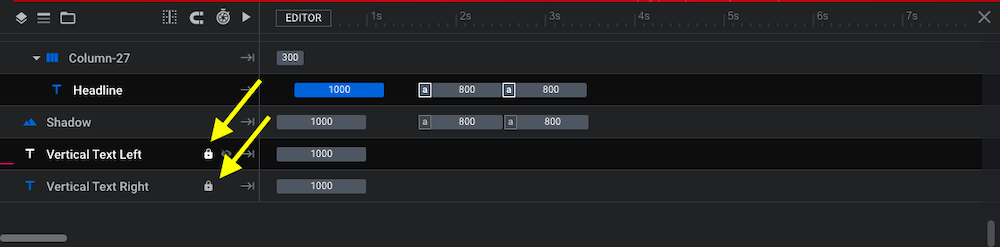
To open them up, click on the lock symbol. You can always relock them after you’re done editing.
The other thing to note is that these text layers look the way they do because of two factors:
- Under “Style”, the font color is set as transparent.
- Under “Adv Style”, the text stroke setting is enabled.
This is what gives these layers the sketched look they have. Feel free to adjust them if you’d like.
We’ll edit the tagline at the top of the page in Step 8.
Learn more:
Step 3: Update burger ingredient layers
This step is going to take a bit of finagling if you’re going to replace the burger’s wide thin layers with ones that are not. But that’s okay. We’ll break down what you need to do to display all the ingredients one on top of the other.
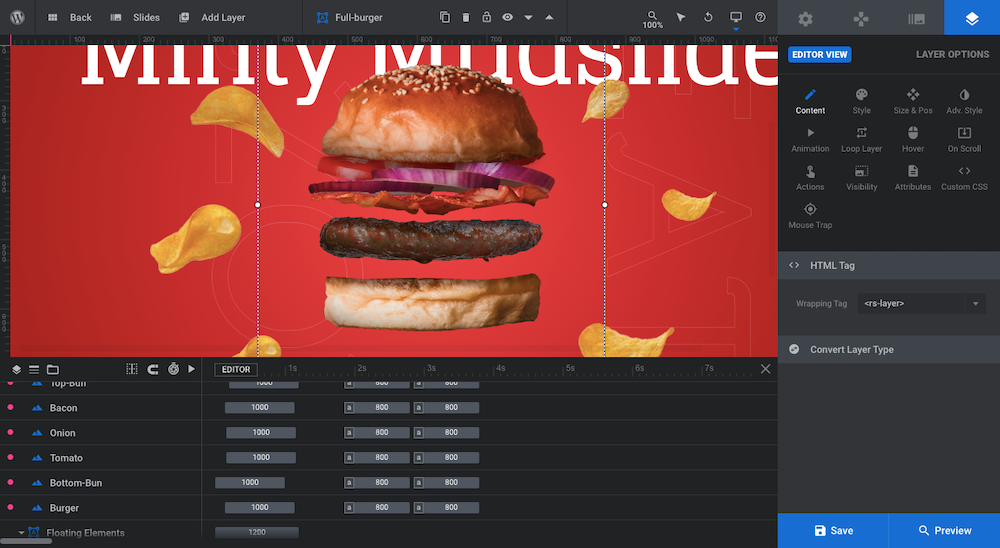
First, decide how many layers you need. The Full-Burger block consists of eight image layers. If there are any you don’t need, select them in the timeline editor and hit the “delete” button on your keyboard.
We’ve deleted the lettuce and cheese layers. You can see what that looks like here:
Pro tip: To create the same effect as the burger, use cutout layers with transparent backgrounds. Then, crop your ingredient images close to the borders so you won’t have to do a lot of resizing or as much repositioning in the slide.
Rather than add your ingredients as new image layers, replace the existing layers with your own. To do this, select the ingredient layer in the timeline. Go to “Layer Options” and “Content” to upload your new media files:
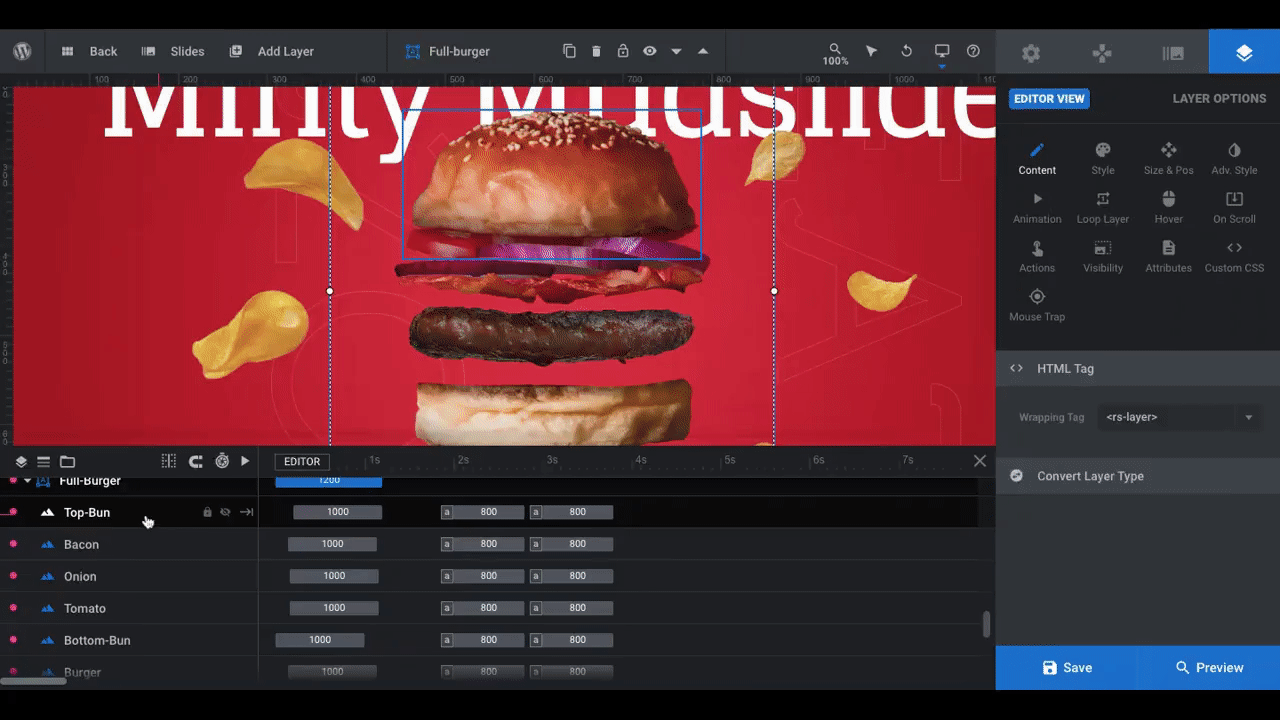
Chances are good these layers aren’t going to fall neatly into place. The first way to fix this is to reposition them under “Size & Pos”.
So long as you cropped the images close, you shouldn’t need to adjust their horizontal position along the x-axis. Instead, focus on moving them vertically into place along the y:
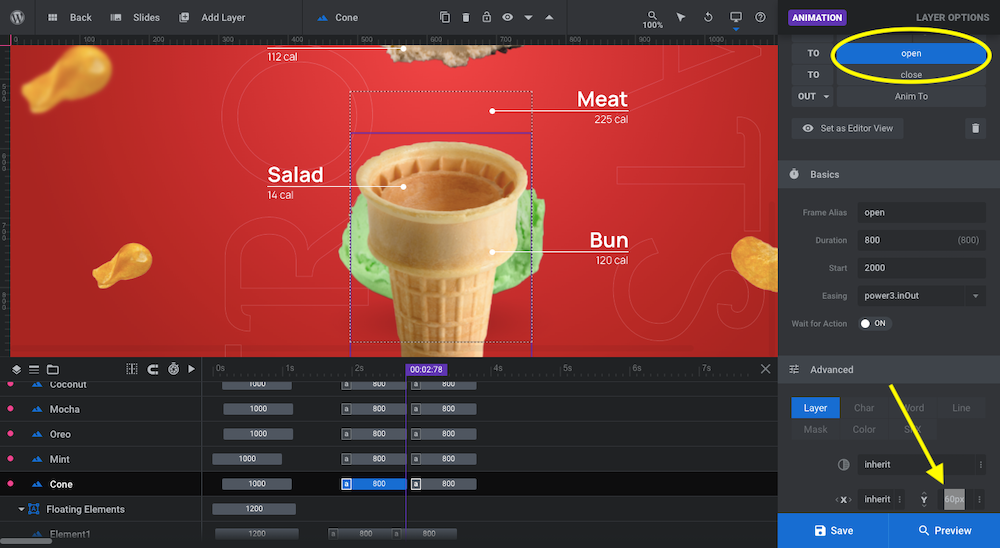
In addition to repositioning the layers when they’re layered atop one another, you’ll have to reposition them in their open state. To do this, select each layer one at a time. Go to “Animation”, click the open keyframe, and then scroll down to “Advanced”.
From here, you’ll be able to finesse the y-positioning so that each layer remains in the same order as when the whole thing is closed and has ample space between it and the next one:
Check your work using Preview mode to ensure that the layers are properly spaced. The canvas will do a good job of reflecting what you’ll see on the frontend of the site, but there might be some small discrepancies.
One last thing to do is adjust the order of your layers. Under the Full-Burger block (or whatever you’ve renamed it to), you can drag-and-drop the ingredient layers around. Changing the order of them in the timeline editor won’t change their position on the page. However, it will change whether they appear in front of or behind the layers around them.
To move a layer in front, move it higher up in order of ingredients. To move a layer behind, move it lower.
Pro tip: Be sure to check responsive mode to verify that the new ingredients show up crystal-clear and are positioned correctly. You may need to make device-specific positioning adjustments before moving on.
Learn more:
- Editing Images in Template Modules
- Desktop, Laptop, Tablet and Phone Size Variants
- Adjusting for Responsiveness
Step 4: Edit nutritional label layers
Open the Preview screen and click on your new layered food graphic:
If you made major adjustments to the number and position of your layers, do the same for your labels.
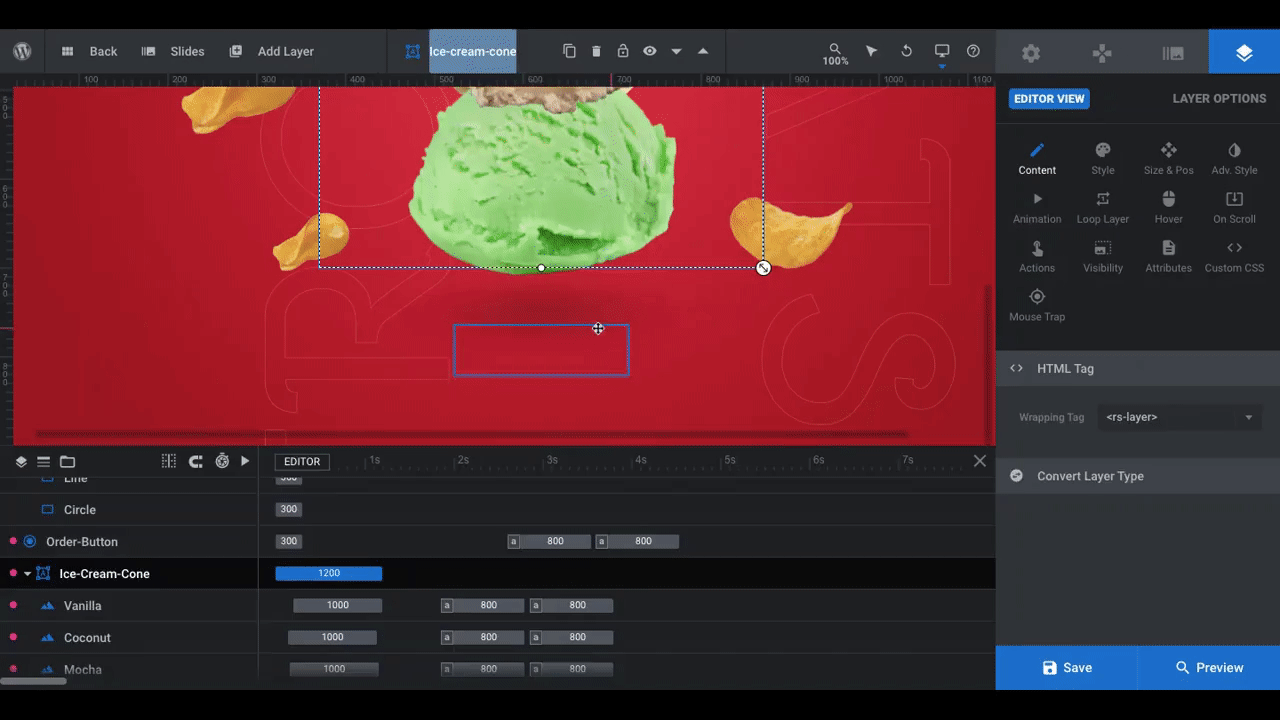
To start, delete as many labels as you did ingredient layers. Click on the top-level Label-Pointer-# in the timeline editor and delete it to remove the entire label component.
Pro tip: If you delete any of the labels, make sure that you leave alternating labels so that it goes left-right-left-right-left-right when you’re done.
Next, go one-by-one through the remaining labels to edit them. Start by editing the Label-Pointer-# layers. Open the “Animation” settings, click on the “show” keyframe, and go to “Advanced”.
Edit the y-value so each label aligns with the open position of the corresponding ingredient:

Pro tip: Rename the Label-Pointer-# so you can more quickly update the data within each now and in the future.
You can also customize each of the text layers within the labels:
To edit the Copy (Ingredient) Label layers:
- Ingredient name under “Content”
- Font and styling under “Style”
To edit the Copy Cal(ories) layers:
- Nutrition info under “Content”
- Font and styling under “Style”
You may decide later on to change the color of your text depending on which background color you choose. For now, leave that be.
Learn more:
Step 5: Delete the floating elements and shadow layer
Because we’re simplifying the overall purpose and goal of this design, we’re going to remove some of the extraneous elements. This is completely optional for your design.
The first component we’re removing is the Floating Elements:
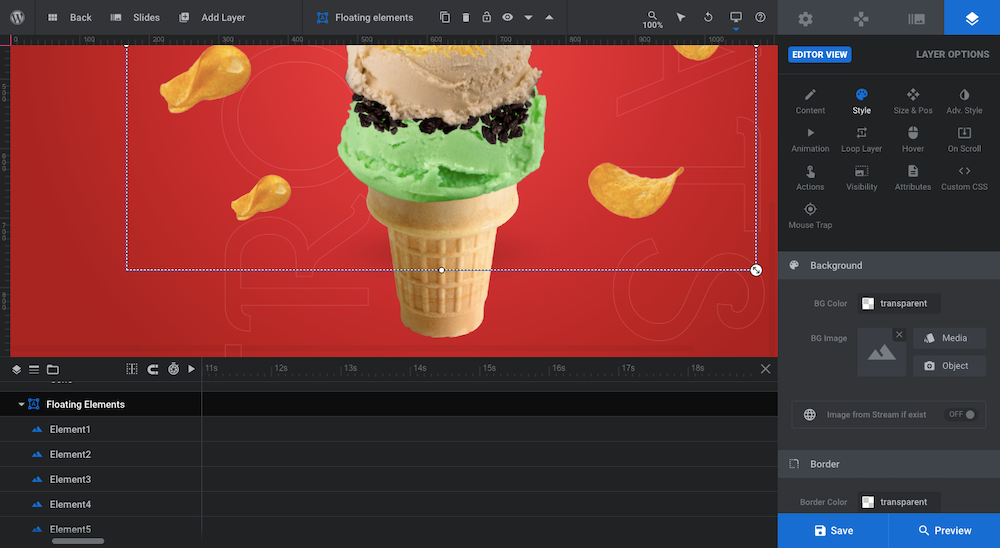
Rather than delete them one at a time, all you need to do is select the Floating Elements group and hit the “delete” key.
The other layer to delete is the Shadow. In the template, this layer serves as a shadow for the burger. It gives it the sensation that it’s floating — much like the floating elements around it. So that’s not something we need either.
Step 6: Customize the background
Your food item should be the central focus on this slide. As such, you want to keep the background relatively tame, so no photos or videos.
To edit the color of the background, go to “Slide Options” and “Background”. Click on BG Color to open the color selection dialogue:
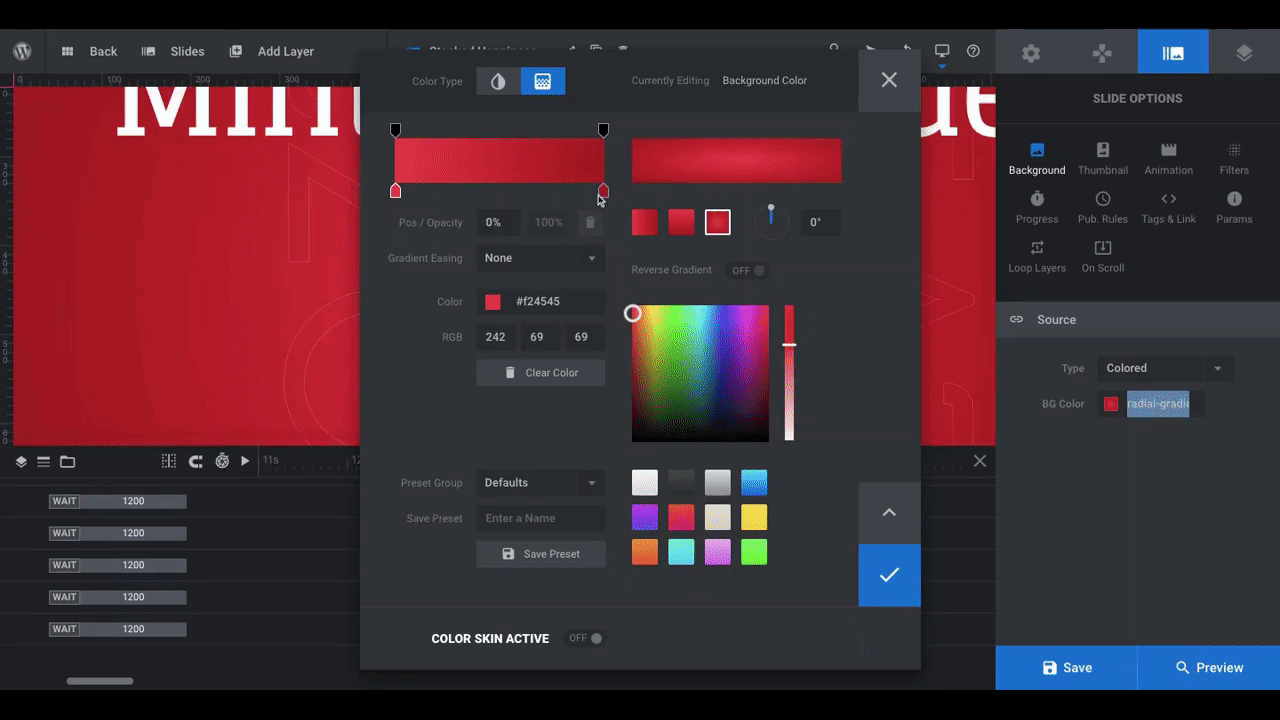
The existing radial gradient looks good as the lighter inside area draws the eye into the center where the food is. So, we’re going to keep that same style of gradient for ours. You can always switch to a solid color if you prefer.
Learn more:
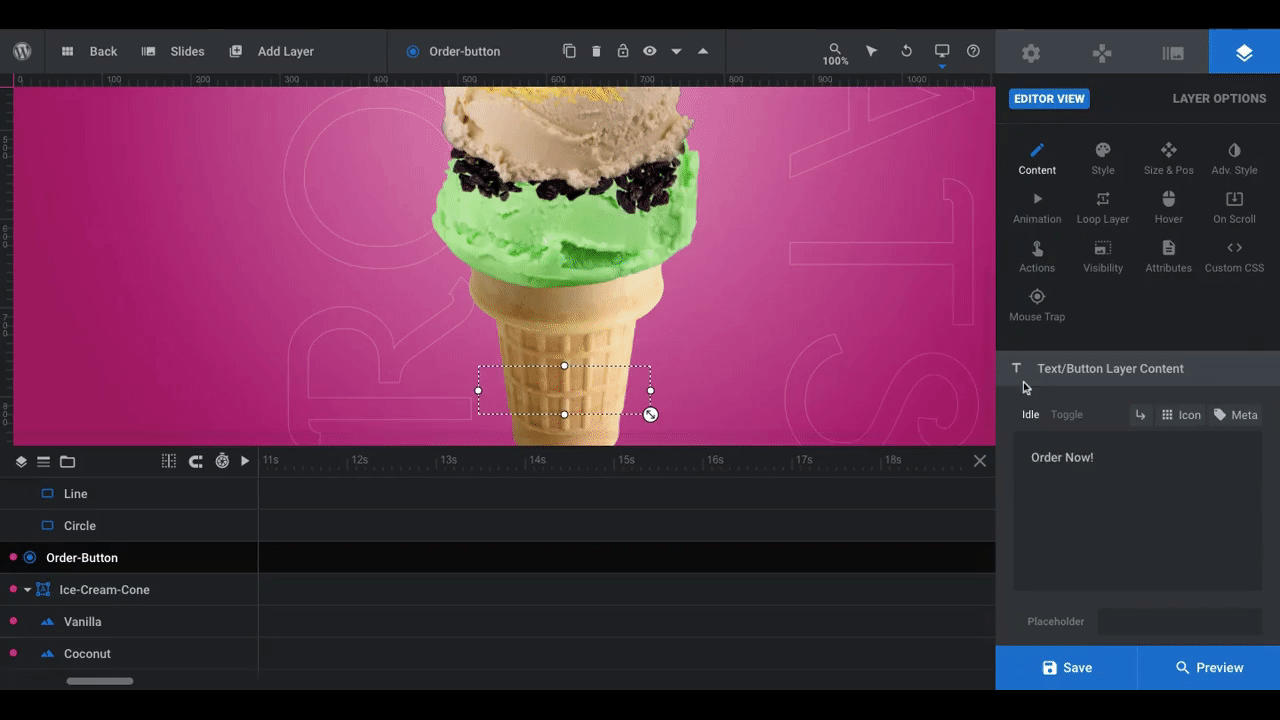
Step 7: Customize the button
When your food layers open up and the ingredients and nutrition info are displayed, a call-to-action button will appear at the bottom that says “Order Now!”. To edit the button, locate the layer called Order-Button in the timeline editor.
You can edit everything about the button:
Use “Content” settings to change the text.
Use “Style” settings to update the font and text styling. You can also edit the button’s background color and shape under “Background”, “Spacings”, and “Border”.
Use “Size & Pos” settings to move the button to a different location on the page.
Use “Adv Style” settings to update the button’s shadow and make it stand out from the background.
Use “Hover” settings and “Style” to change how the button and text look when someone hovers over it.
You won’t be able to see the changes as you make them, so check in from time to time with the Preview to confirm that your edits are what you intended.
If you have any further tweaks to make to the slide’s content (like adjusting the font colors so they contrast well with the new background), make those changes now. Save your changes before going to the next step.
Learn more:
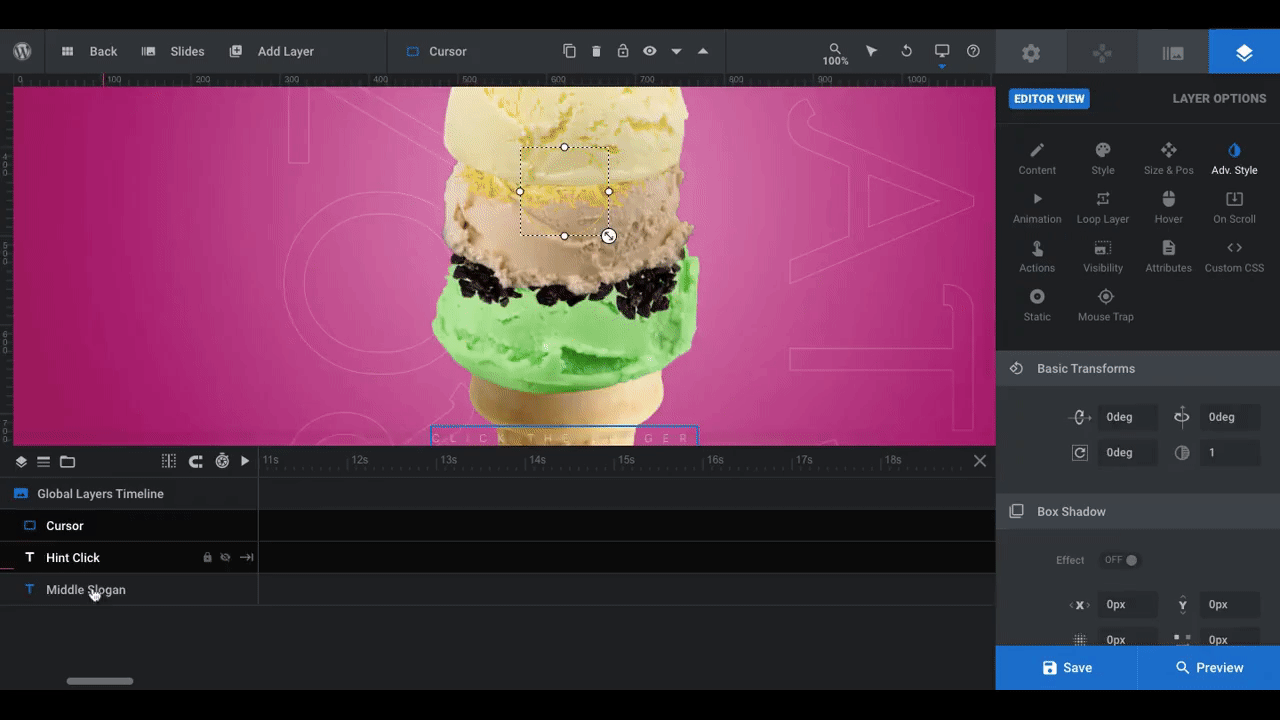
Step 8: Edit the global layers
In this step, we want to clean up the Global Layers. A lot of what’s here is useful if you’re creating a vertical slider or a micro-site for your ingredient and nutrition info. If you’re not, though, then you’re not going to need a bunch of these layers.
First, go to “Slides” in the toolbar and switch to “Global Layers”. Next, go down to the timeline editor and delete the following groups and layers:
- Logo group
- Menu-Button group
- Menu group
- Scroll layer
- Social-Media group
You can select them all at once by holding down the “CTRL” or “command” button on your keyboard:

Note: You won’t be able to delete the Menu group until you click the crossed-out eyeball icon next to it.
There should be three layers that remain. You can leave the Cursor alone. The other two — Hint Click and Middle Slogan — are text layers. Edit them the same way you did the text layers in the main slide:
When you’re done, save your changes.
Step 9: Remove the navigation
The last component to deal with in this template is the navigation. Because we’ve turned this into a single interactive hero image, we don’t need any navigational controls.
To remove the navigation from the left side of the module, open up your slide once again. Then, go to “Navigation Options”:
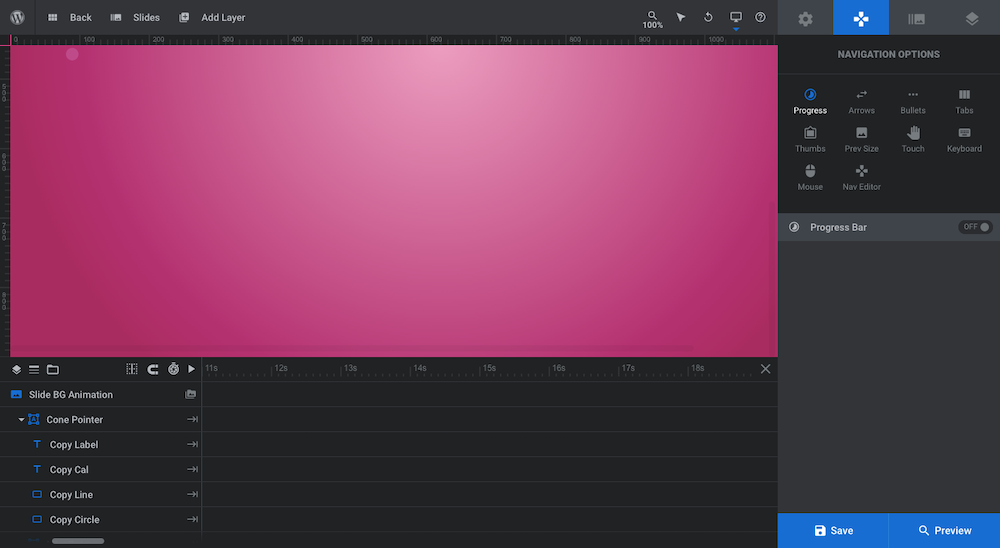
There are two settings to deactivate. The first is Bullets. The other is Touch.
When you’re finished, save your changes and preview your design once more to make sure you customized everything in the template that you needed to.
Surprise website visitors with hidden ingredient and nutrition info
As more people become mindful of what they eat, they want greater visibility into what they’re putting into their bodies. You can always include a traditional nutrition box on your product pages to provide them with this information. That’ll be useful for breaking down details about the vitamin and nutritional composition of each food or beverage item.
In addition, if you want to really impress your visitors, display ingredient and nutrition info in an interactive way. The Yummy Burgers template by Slider Revolution offers you a fast and simple way of creating such a fun, visual, and educational surprise.


