
Although splash pages aren’t a common feature on websites, there’s a time and place for them. You can use them to briefly greet visitors, ask them “Are you 21?”, or give them a taste of what they’re in for.
In this tutorial, we’re going to show you how to transform the OakGrove Wine Slider template and create a splash page for a local speakeasy.
Table of Contents:
- Step 1: Delete every slide but the first
- Step 2: Update the photo
- Step 3: Edit the headline
- Step 4: Edit the pop-up description
- Step 5: Customize the badge
- Step 6: Reconfigure the badge
- Step 7: Delete elements you don’t need
- Step 8: Update global layers
- Step 9: Create the splash page
How to create a splash page for your online establishment
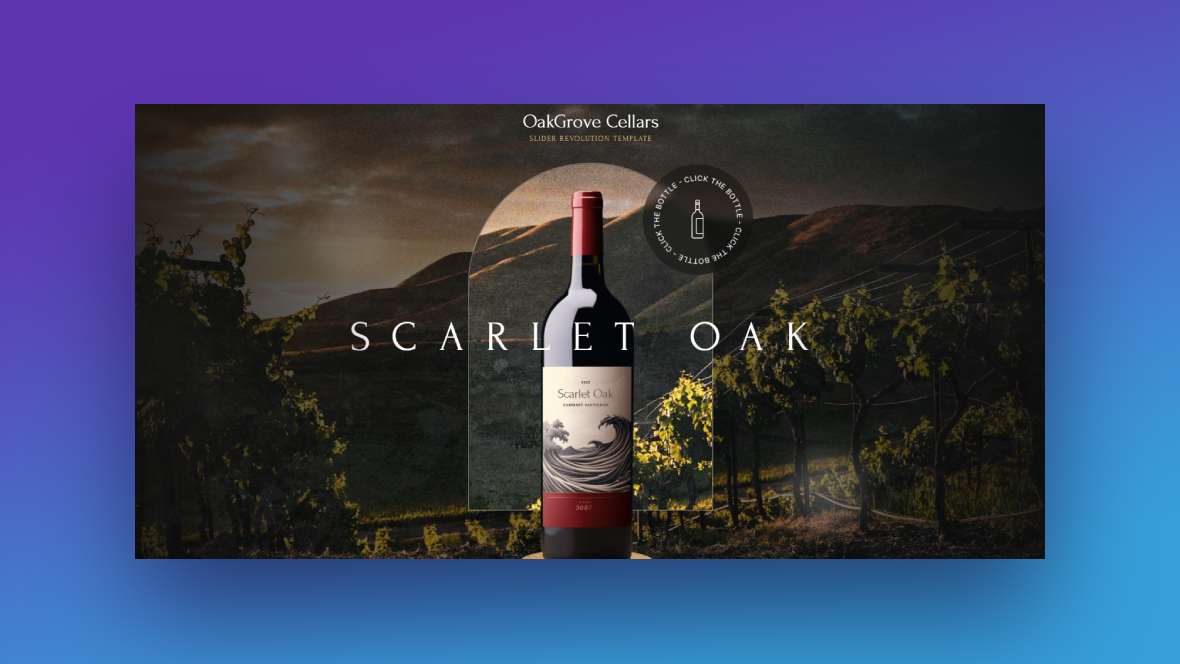
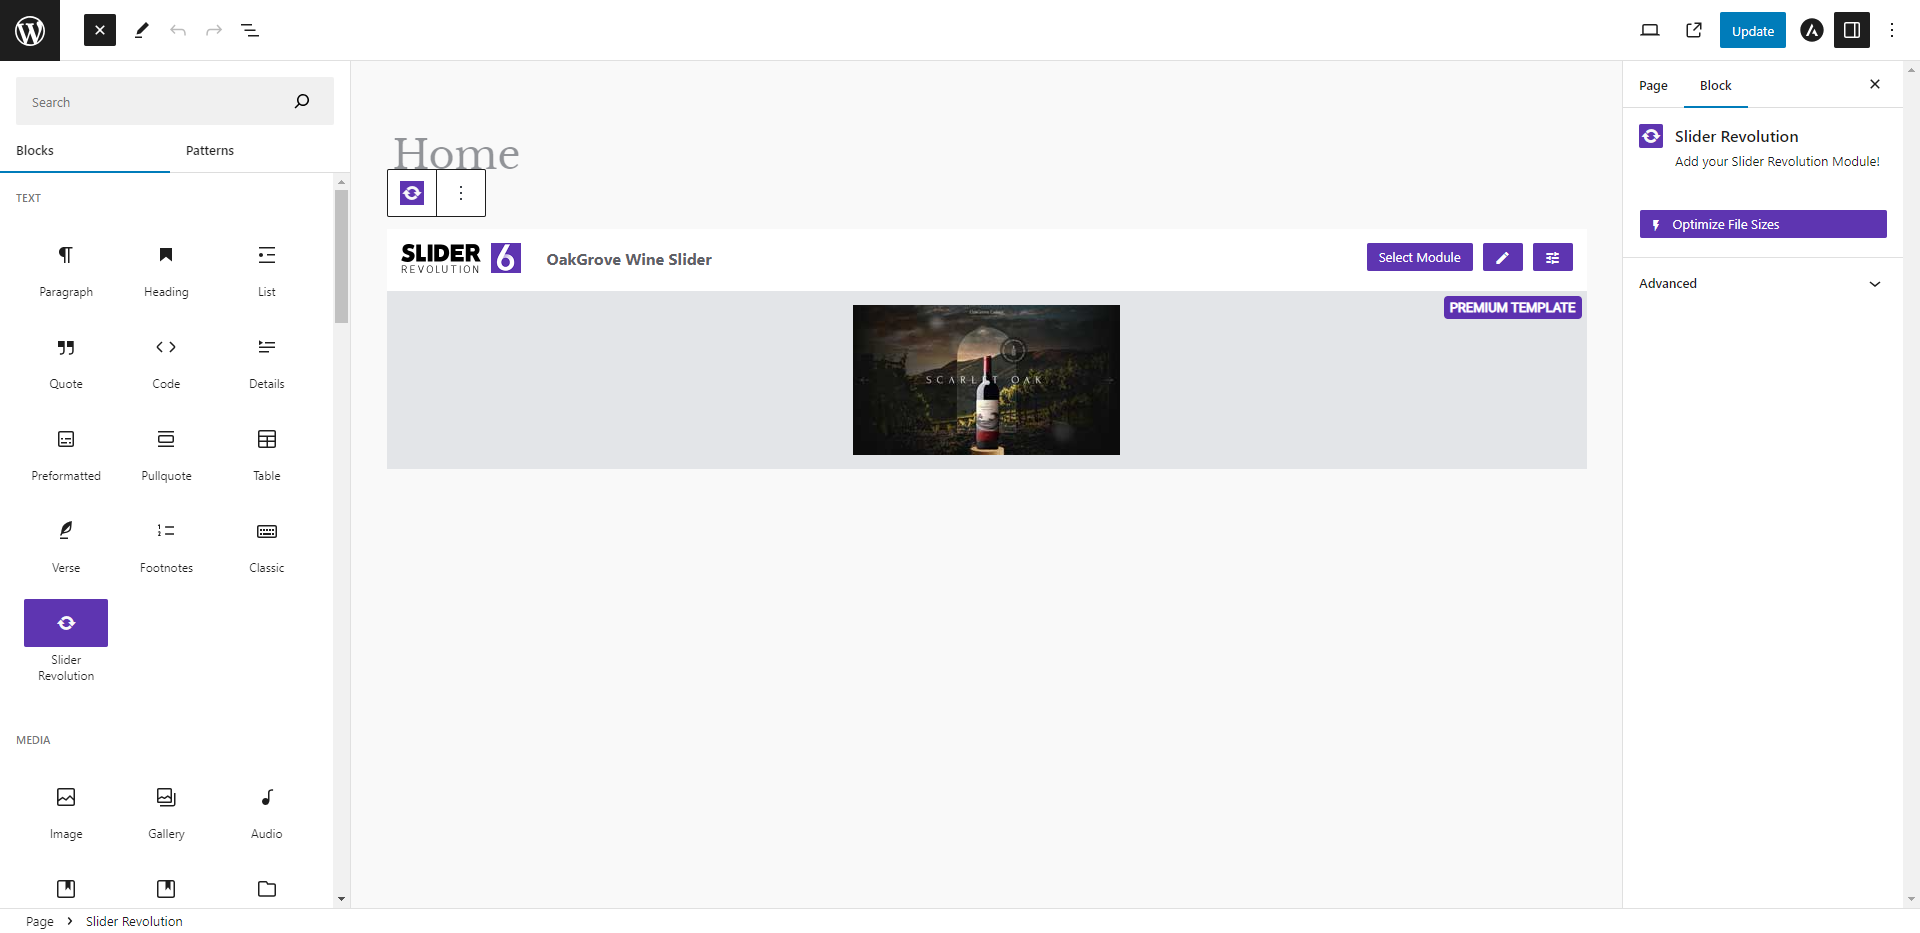
Did you know that you can break apart Slider Revolution templates and use only the bits in them that you need? Take, for instance, this template:
Below we’ll show you how to create a splash page from this product slider. This one gives visitors a tip on how to find the password to the speakeasy:
Note: The home page that appears at the end of this GIF is from a real speakeasy called The Volstead. We did not build this site. We’re simply using it in this example to demonstrate how easy it is to create an alluring splash page and integrate it with your website.
Need an introduction to Slider Revolution? Start with these guides first:
Step 1: Delete every slide but the first
To turn this four-screen slider into a single splash page, we need to delete the extra slides. To do this, go to “Slides” in the top toolbar. Hover over any of the three slides (it doesn’t matter which). Then click the trash can icon that appears to the right to delete them:
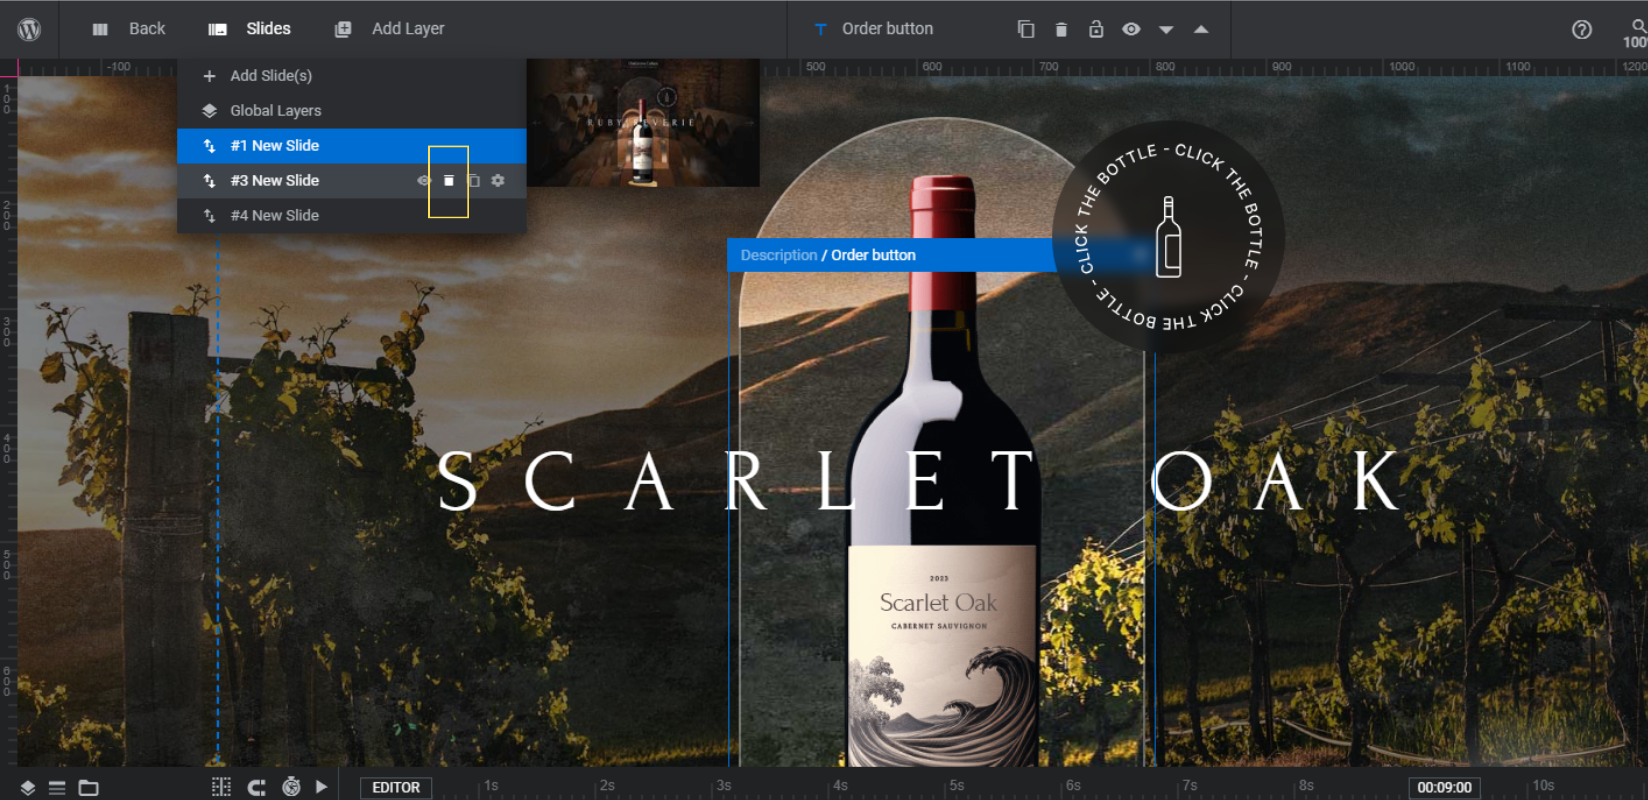
Repeat until there’s only one slide left.
Learn more:
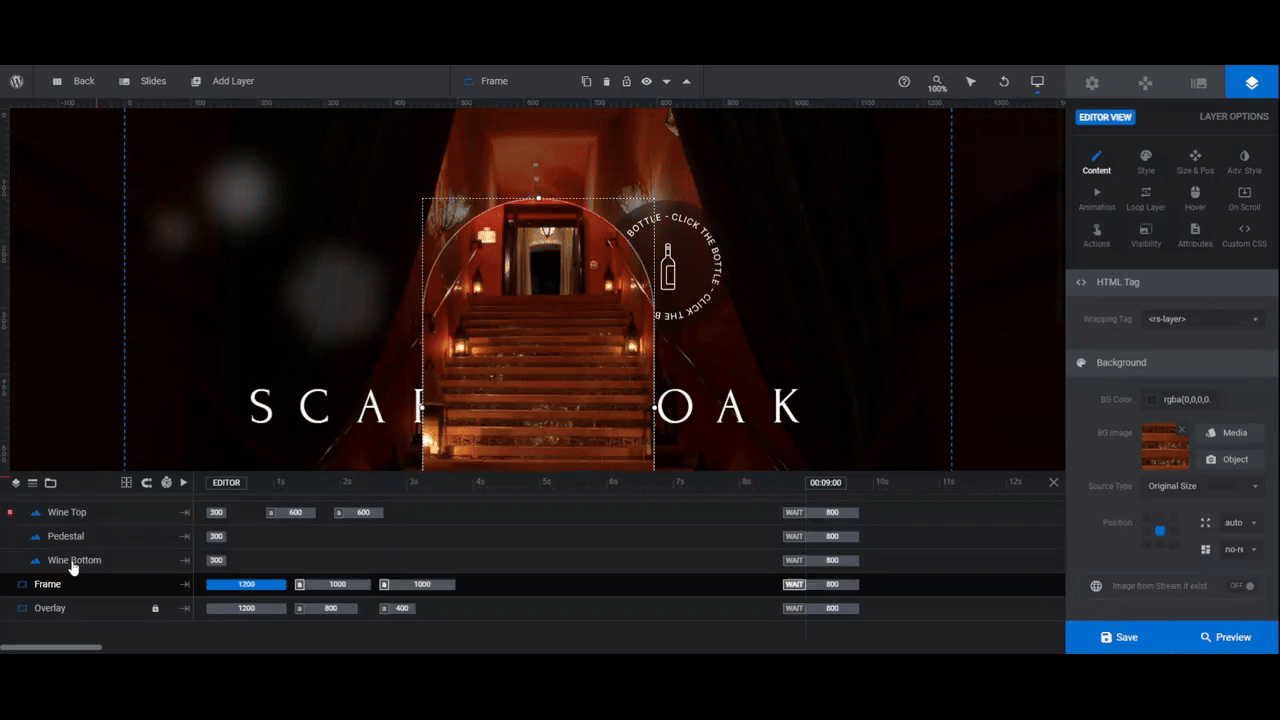
Step 2: Update the photo
The background photo appears twice in this splash page — as the big background image and as the framed image in the center.
To add your photo to the background, go to “Slide Options” and “Background”. Upload the file to the Media Library.
Then select the Frame layer in the timeline editor at the bottom. Go to “Layer Options” and either “Content” or “Style” to swap out the image there as well.
Save your changes when you’re done.
Learn more:
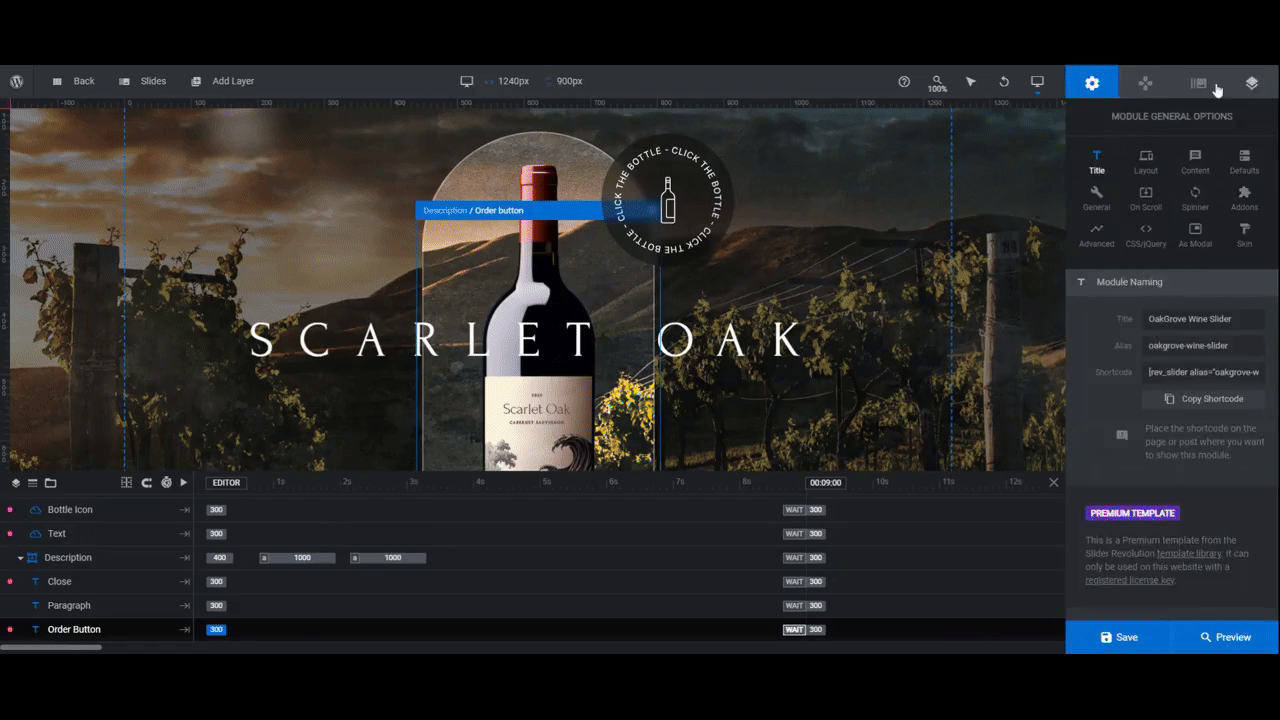
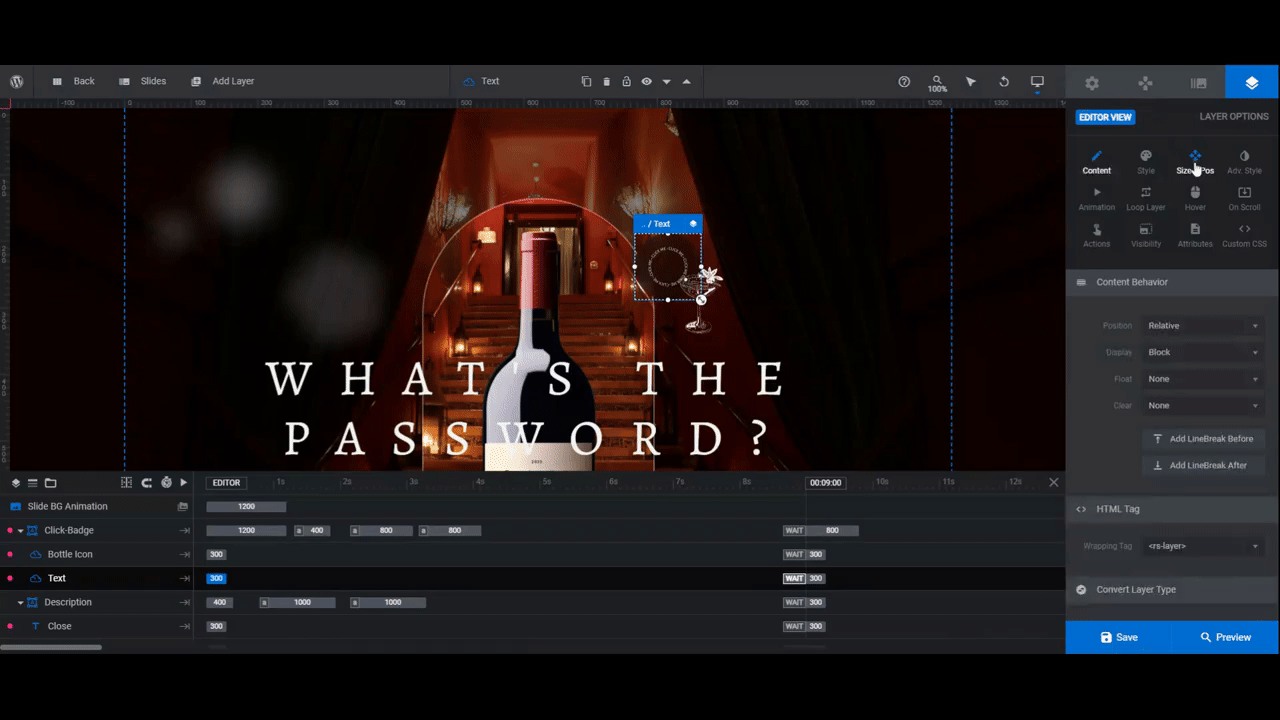
Step 3: Edit the headline
In this step, we’re going to modify the Wine Name headline layer. We’re going to use this for our teaser.
To edit what the text says, select it either in the canvas or the timeline editor. Then go to “Content”. Replace the text in the box with your own.
To modify the font and styling, using the “Style” panel.
Note: Because the actual Volstead website uses Alegreya Sans, we’ll use both the serif and sans serif versions of the font in our design.
Learn more:
Step 4: Edit the pop-up description
There are three components that make up the pop-up:
- Close is the “X” in the top-right corner that closes the pop-up when clicked.
- Paragraph is the description that appears.
- Order Button is the text link at the bottom that takes visitors to the home page.
We’re going to leave the Close layer alone.
To edit the other two layers, use “Content” and “Style” as you did to modify the headline in Step 3.
Note: You won’t be able to see the pop-up description while you edit it in Slider Revolution. To see your changes, click Preview in the bottom-right corner to make sure you’re satisfied with how it turns out.
The Order Button layer is going to need additional modifications.
First, go to “Hover”. Scroll down to “Style”. You can modify the way the button looks when someone hovers over it, including the color, underline, and animated effects.
Next, go to “Actions”. Select the Simple Link button. Enter the URL you want to direct visitors to. Also, set the Target to open in the same window.
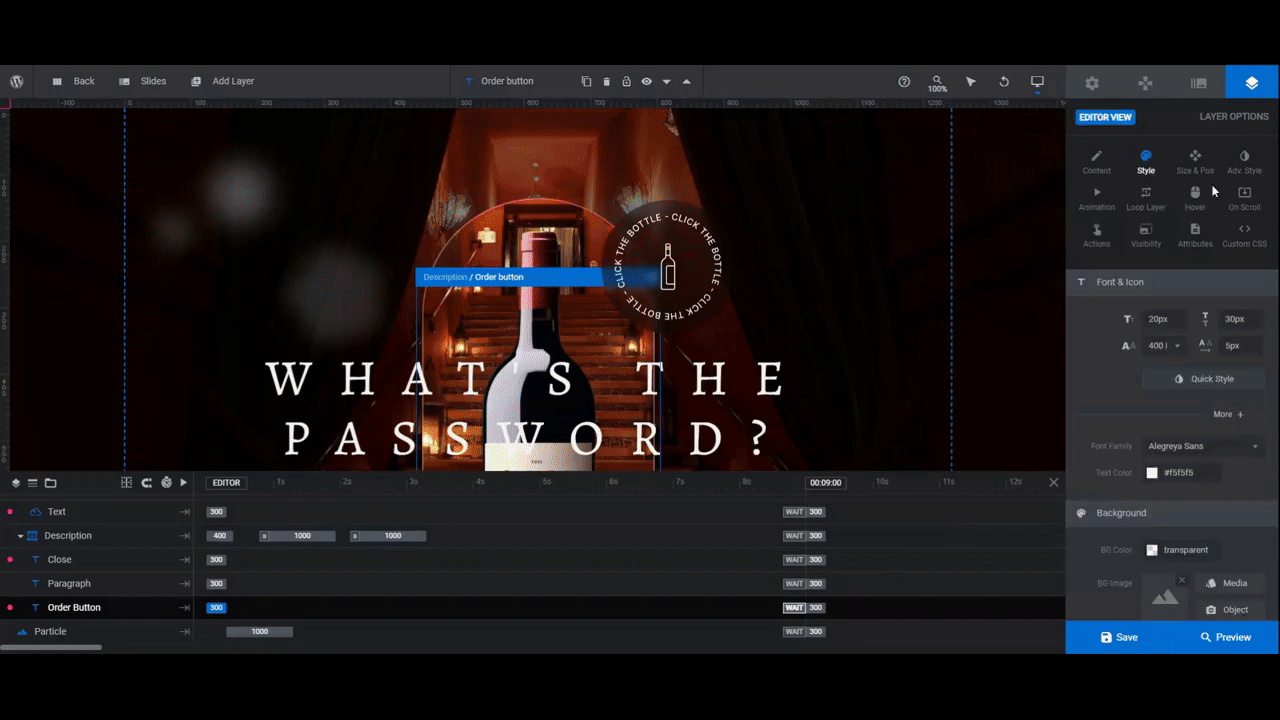
When you’re done, open the Preview to review your modifications as well as the link once more.
Learn more:
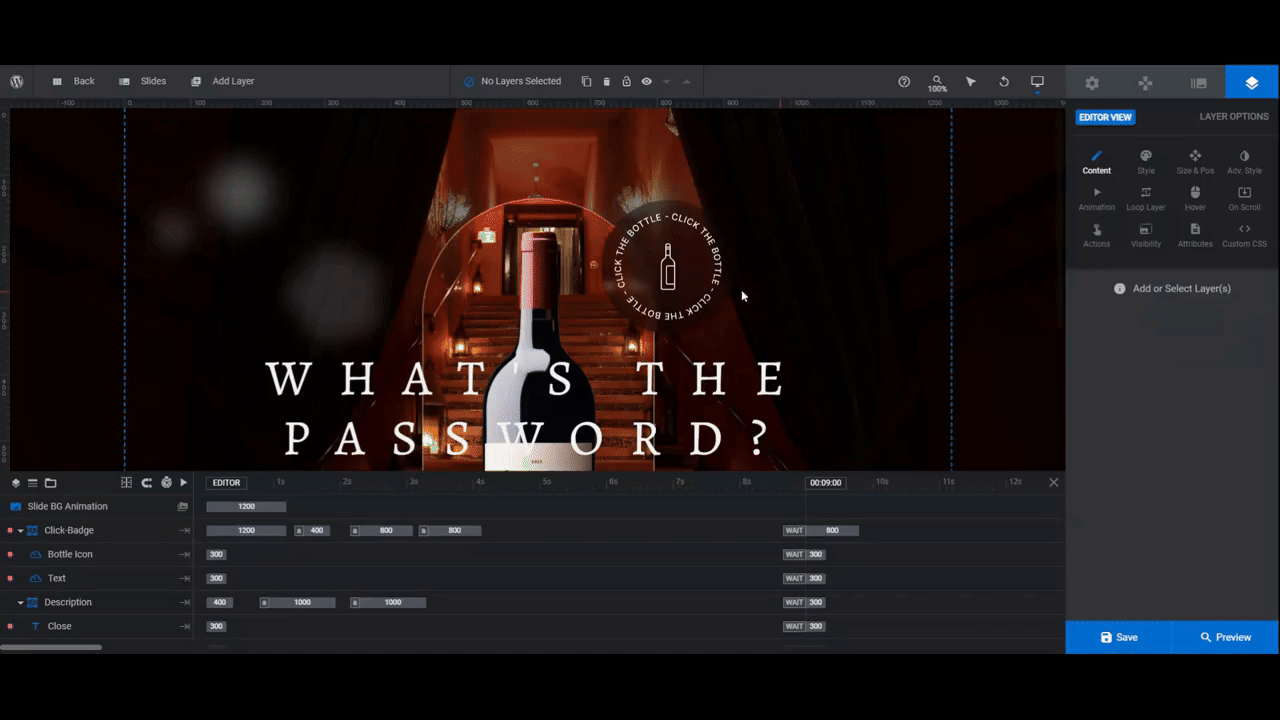
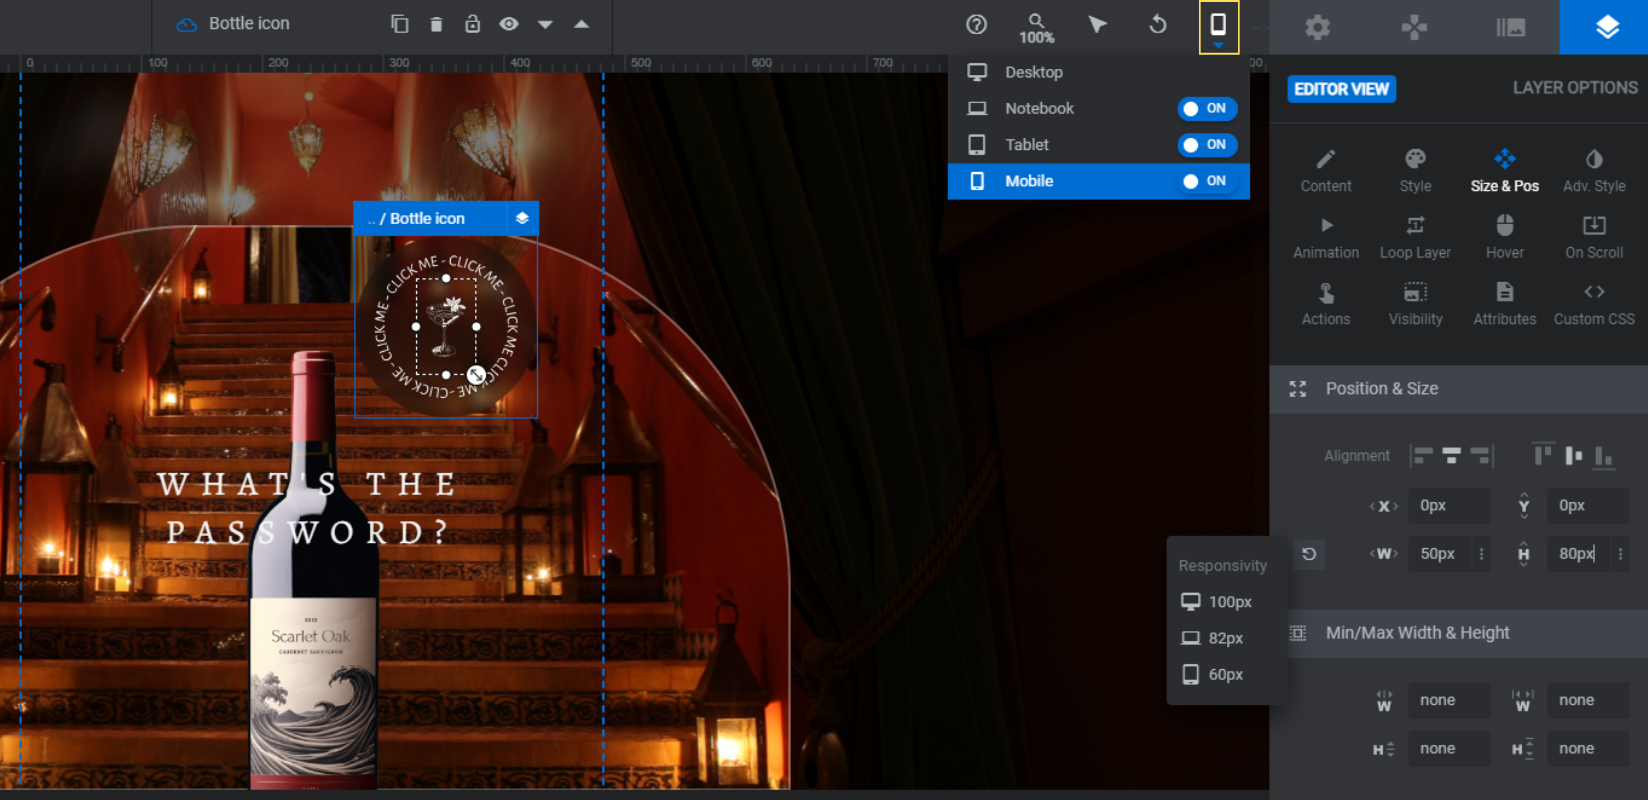
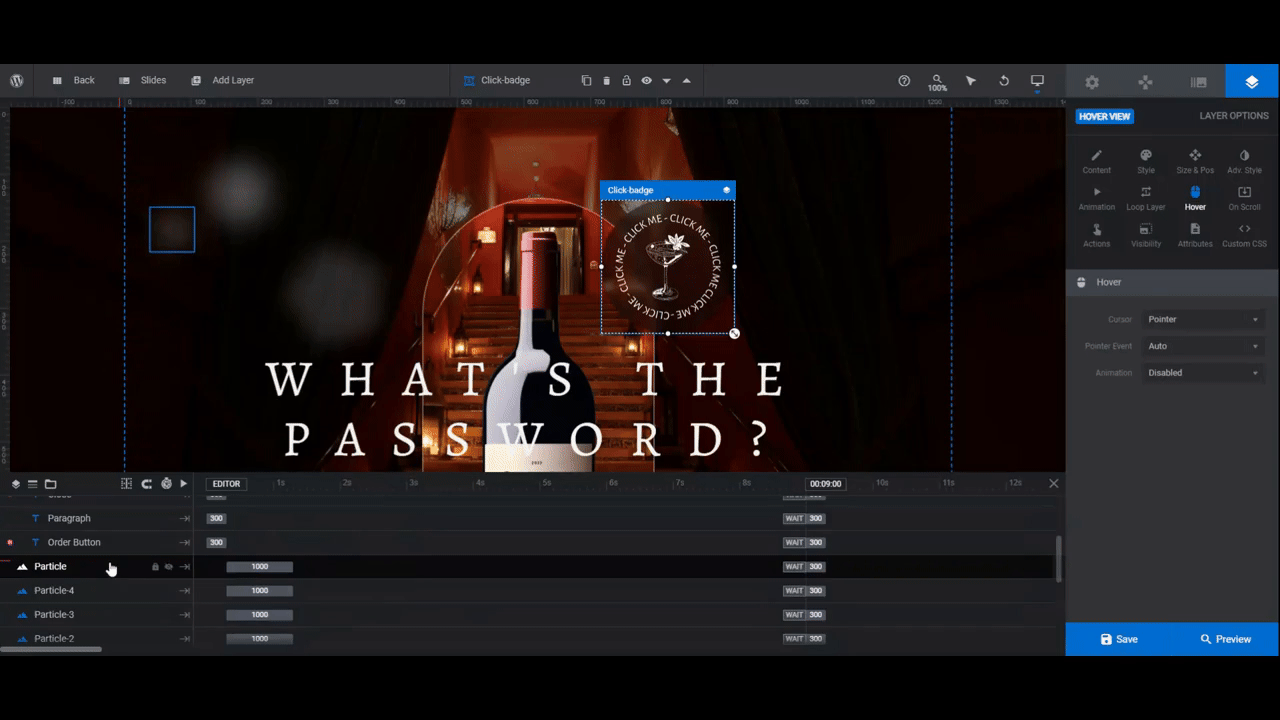
Step 5: Customize the badge
The spinning badge is a group of layers called Click-Badge:
- Click-Badge provides the semi-transparent dark circle in the background.
- Bottle Icon is the icon in the center of the badge.
- Text is the spinning text.
If you’re using a lighter background photo, you may want to edit the color of the badge. You can do this by selecting Click-Badge and then going to “Style”.
The other two layers are SVG layers.
Pro tip: You’ll need to create these layers before proceeding. Make them square in size, a minimum of 200px by 200px, and export them with a transparent background.
When you’re done, double click on the Bottle Icon in the canvas. This will open the Icon / SVG panel.
To import your own, click on My SVG Library on the left sidebar. Then click the blue Import SVG Files button in the bottom-left corner to upload your custom icon.
Hover over the newly uploaded icon from the list and click the plus-sign (+) button that appears. This will replace the existing icon with your own.
Repeat this process for the spinning Text SVG layer.
If any of these layers are added to the page and they don’t appear to fit the previous badge space, go to “Size & Pos”. Use the W (width) and H (height) settings to fix them. They should both be 200px by 200px.
If you make changes to the size, you’ll have to do a responsive check to make sure the SVG looks okay on smaller screens.
When everything looks good, save your changes and return to Desktop editing mode.
Learn more:
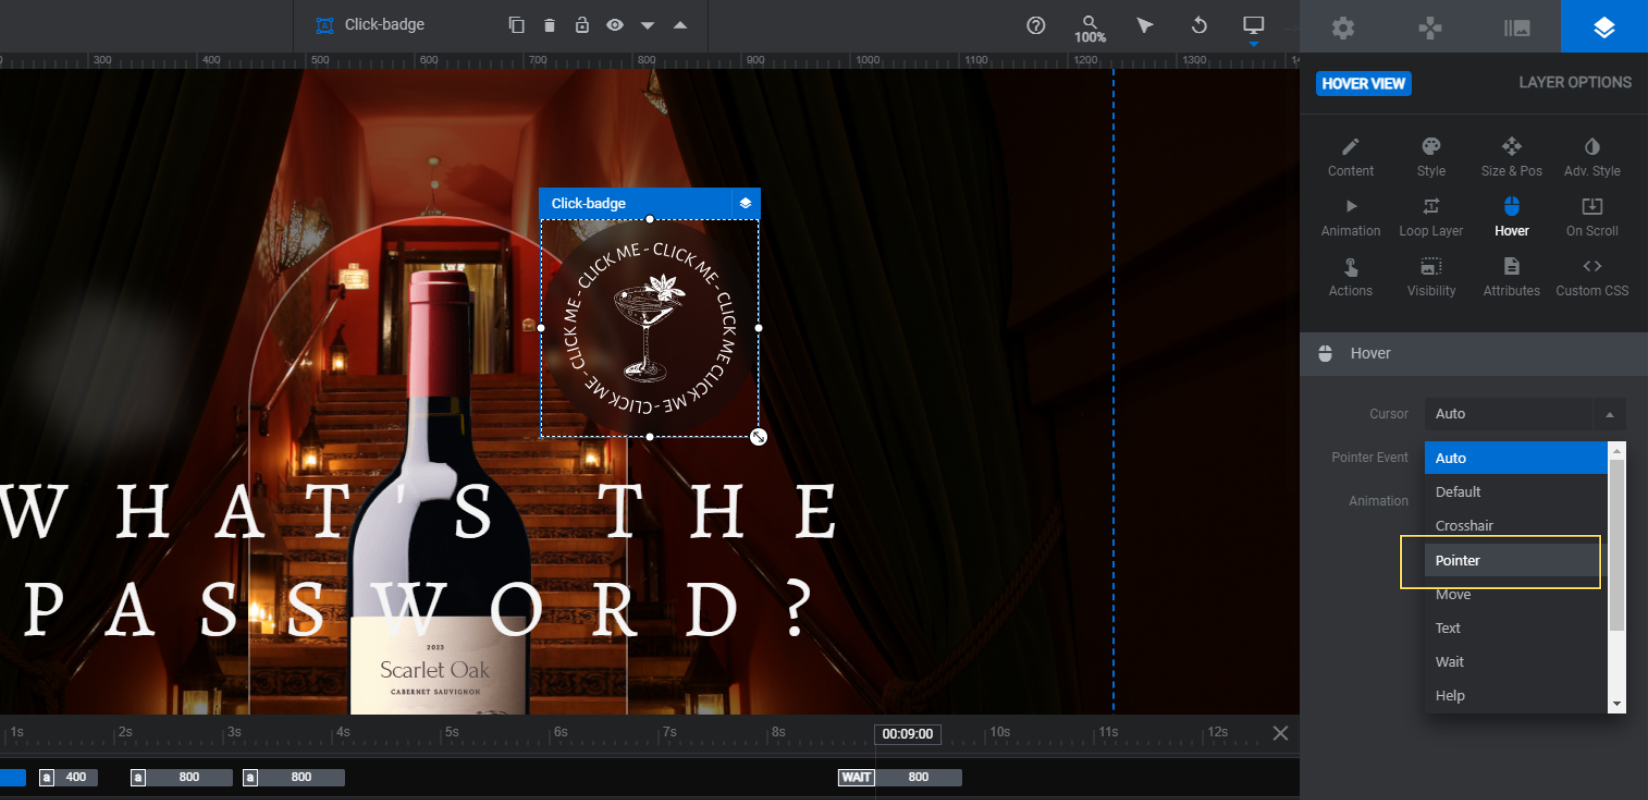
Step 6: Reconfigure the badge
The wine bottle photo was set up to be the only clickable element in the original slider design. However, we’re about to delete that component, so now we need something else to trigger our pop-up description and link.
To turn the badge into the clickable component, first select Click-Badge. Then go to “Actions”. We’re going to set this layer up the same way the wine bottle is set up.
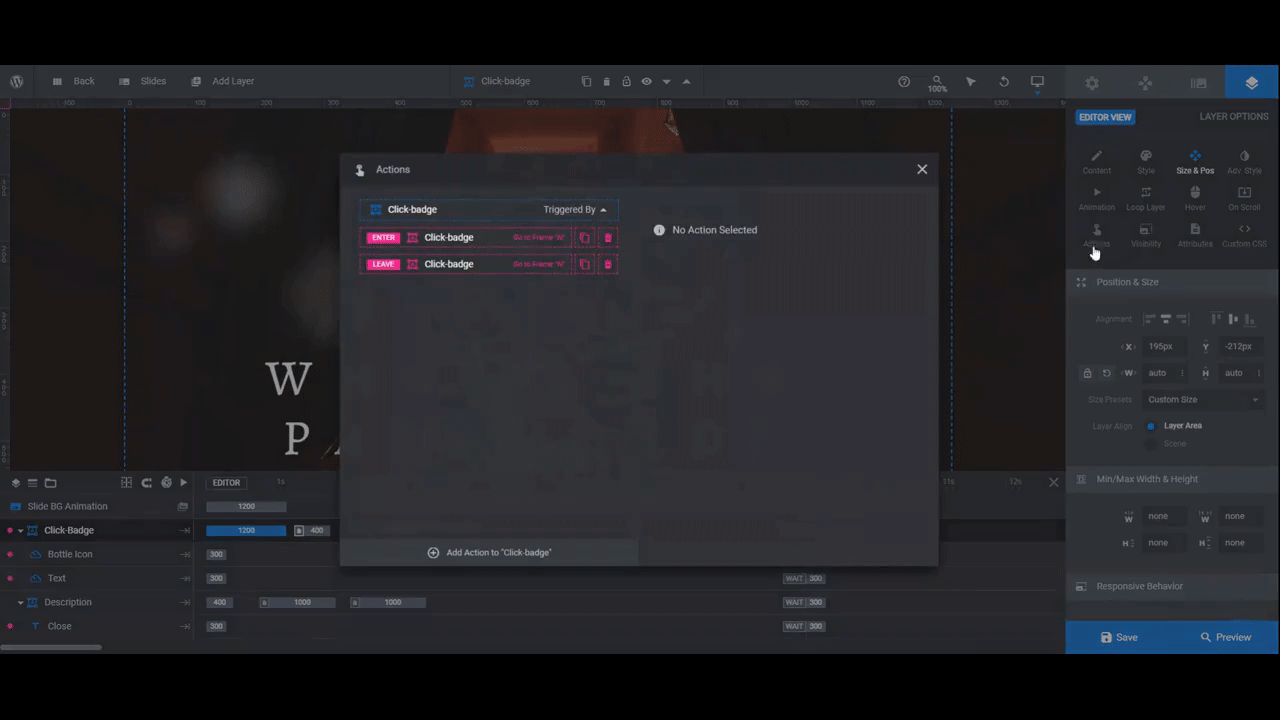
Delete the first two Click-badge actions. Then add the following using the Add action to button at the bottom of the panel:
Click-badge
- Interaction: Click
- Action Type: Toggle “N/M” Frames
- Target Layer: click-badge
- Frame N: hide
- Frame M: show
- Reset Children Timelines: No
Wine name
- Interaction: Click
- Action Type: Toggle “N/M” Frames
- Target Layer: wine name
- Frame N: hide
- Frame M: show
- Reset Children Timelines: No
Overlay
- Interaction: Click
- Action Type: Toggle “N/M” Frames
- Target Layer: overlay
- Frame N: blur
- Frame M: unblur
- Reset Children Timelines: No
Frame
- Interaction: Click
- Action Type: Toggle “N/M” Frames
- Target Layer: frame
- Frame N: hide
- Frame M: show
- Reset Children Timelines: No
Description
- Interaction: Click
- Action Type: Toggle “N/M” Frames
- Target Layer: description
- Frame N: show
- Frame M: hide
- Reset Children Timelines: Yes
These actions dictate what each of the elements do after the click (“N”) and when things return to normal (“M”).
We also need to add a pointer to the Click-Badge element so there’s a visual signal telling visitors that it’s clickable. Go to “Hover”. Select Pointer from the dropdown list next to “Cursor” and Auto next to “Pointer Event”.
Save your changes when you’re done.
Learn more:
Step 7: Delete elements you don’t need
There are a number of extraneous elements we can now clear out of this design.
Since this is no longer a product slider, we can get rid of the Wine grouping which contains Wine Top, Wine Bottom, and Pedestal graphics. We also don’t need the Particle shapes.
To delete these layers, hold down the Ctrl or command key. Then select the layers in the timeline editor. When you’re done, release the Ctrl or command key. Then hit Backspace or delete. This will remove all the layers at once.
Preview your changes to ensure that you only deleted the layers that needed deleting. Save your changes when you’re done.
Learn more:
Step 8: Update global layers
The last thing we need to do is to edit the global layers. To access this view, go to “Slides” in the top toolbar and select Global Layers.
There are four layers that we don’t need since this is no longer a slider:
- Prev
- Next
- Overlay Left
- Overlay Right
Delete them the same way you deleted the layers in Step 7.
Since this is a splash page, you would benefit from keeping the Logo here. You might also decide you want to keep the Slogan as well.
Note: Currently, the Logo layer is a text layer. However, you can remove that layer and replace it with an SVG or Image, depending on what format your logo is in. We’re just going to edit the text for the purposes of this tutorial.

When you finish updating your logo, do one more preview on the frontend. Give the design a lookover and the clickable elements a test drive.
When it’s all good to go, save your changes.
Learn more:
Step 9: Create the splash page
To create a splash page with this design, create a new page in WordPress. You can either embed the design using the module shortcode or you can use the Slider Revolution widget in your page builder.
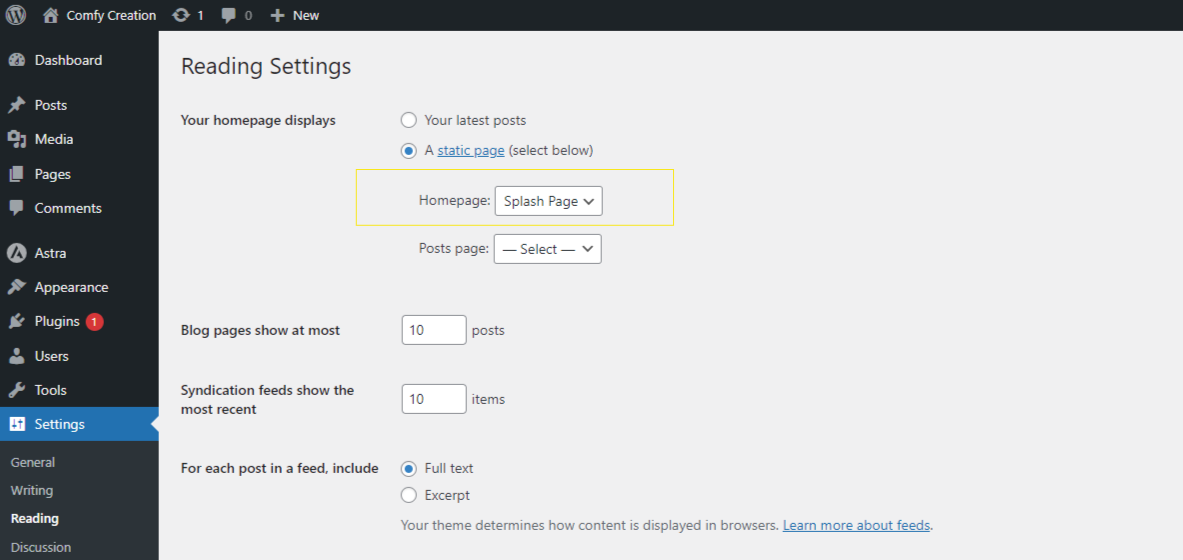
Then set your splash page as your “Homepage” in WordPress. You can do this from the Settings > Reading panel.
Save your changes. Your splash page should be all set now.
Design an alluring splash page and get more visitors inside your site
Although a splash page isn’t needed on every website, it can come in handy for some. With something like a bar or speakeasy, for instance, you can use the splash page to announce changes, confirm the visitor is of drinking age, or invite them to find the password to your secretive drinking establishment.
While the OakGrove Wine Slider template wasn’t originally built for a splash page, it’s easy to modify any of Slider Revolution’s templates to fit your needs.


