
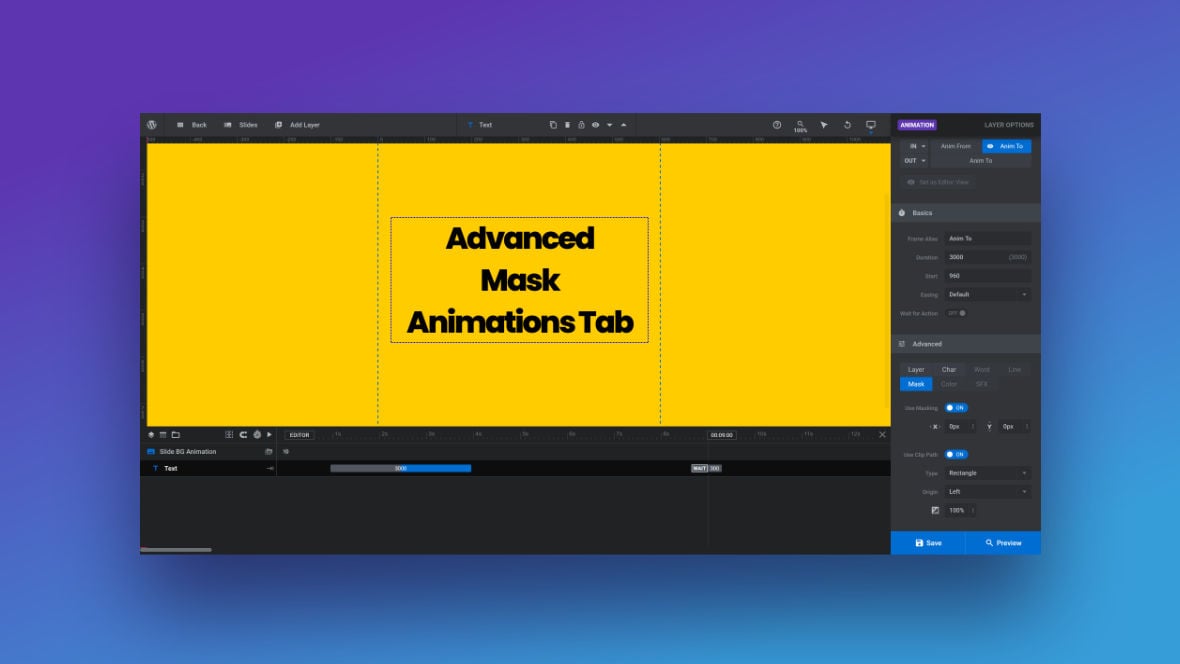
Advanced Mask Animations Tab
In this guide we’ll cover advanced options for creating and modifying animation masks.
Advanced Mask Animation Options
Mask animations allow you to create and modify various elements of a layer [?]
Layers are containers for visual, audio or layout items and are added to slides. For example, text, button, image, audio, video, group and row are all types of layers.
Layers are added to slides via the module editor. mask to create sophisticated wipe and reveal animations.
In this guide we’ll step through the options contained in the Mask tab of the Advanced panel, found under the Animations sub-section of the Layer Options tab:
Mask Tab
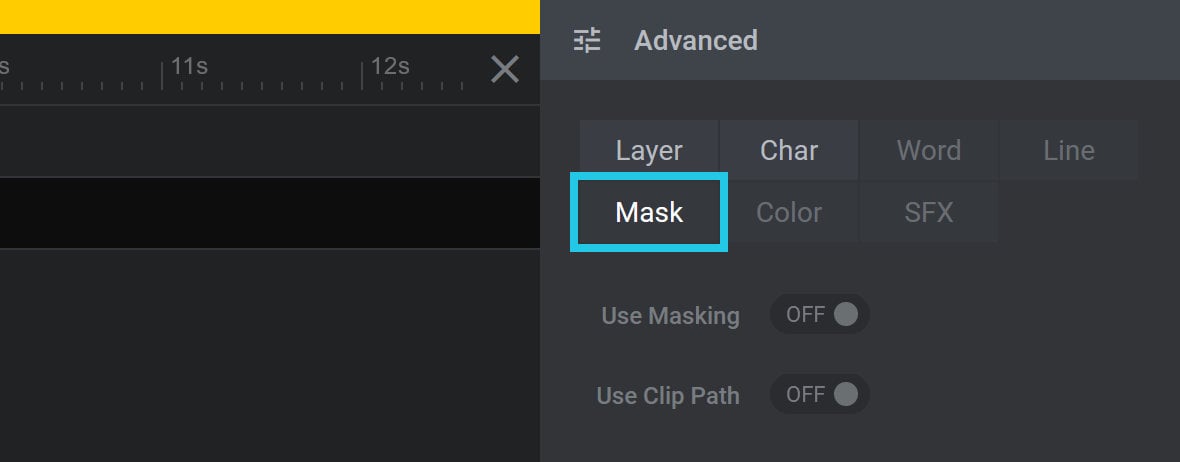
Use Masking
To enable mask animation, toggle the Use Masking option to ON:

After doing so, two additional options will appear: Mask X Position and Mask Y Position:

When masking is enabled the effect of layer animations, such as translating or scaling, will only be visible within the confines of the layer mask.
For example, translating a layer from right to left without masking might look like this:
But with masking active the same animation looks like this:
And animating a layer’s scaleX and scaleY options from 4 to 1 looks like this without masking:
But the same animation with masking active creates a zoom effect like this:
Note: When Use Masking is toggled to ON and the Slide Direction Based Mirroring panel is visible, the Use Clip Path option will move into the Slide Direction Based Mirroring panel.
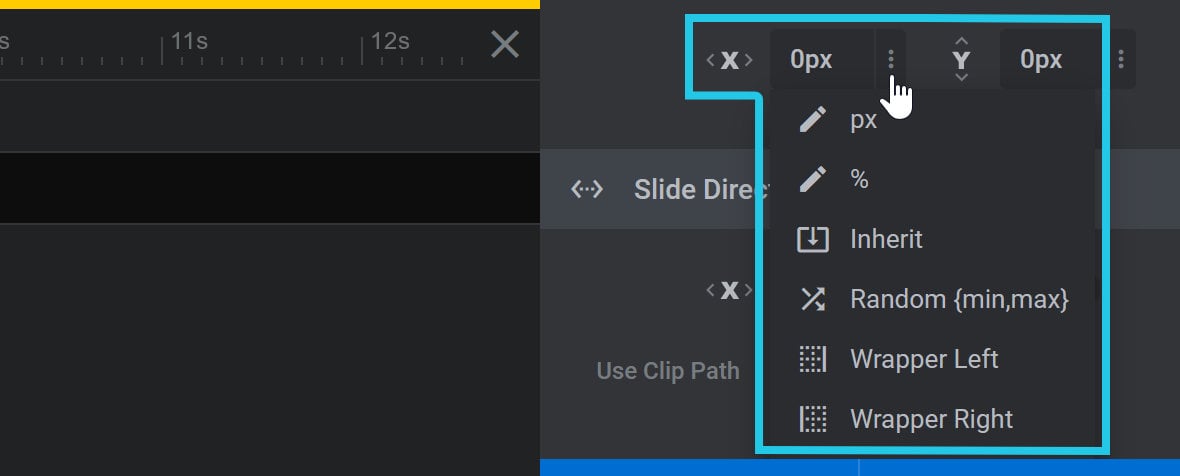
Mask X Position
The Mask X Position option can be used to offset the horizontal position of the layer mask:

A positive value will offset the position of the mask horizontally to the right.
A negative value will offset the position of the mask horizontally to the left.
Combining an offset Mask X Position with animating the layer’s TranslateX position can create a stylish “unfurling” style visual effect.
For example, here this layer is animating from a starting TranslateX position of 100%, and the Mask X Position starts at 300px:
Clicking the three dots at the right end of the Mask X Position field opens a drop-down with eight shortcuts for priming the value: px, %, Inherit, Random {min,max}, Wrapper Left, Wrapper Right, and Wrapper Center:
px
Choosing the px shortcut primes the Mask X Position field for input of a pixel based value:

You can alternatively directly type a value with px at the end.
%
Choosing the % shortcut primes the Mask X Position field for input of a percentage based value:

You can alternatively directly type a value with % at the end.
A percentage based Mask X Position value will be multiplied by the layer’s base width.
For example, if the base width is 300px and the Mask X Position value is 50%, the horizontal offset amount will be 150px.
Inherit
The Inherit setting inherits a Mask X Position value from the previous keyframe:

0%.Random {min,max}
The Random {min,max} setting allows you to give the keyframe’s Mask X Position a random value each time the animation runs. The value is set as a range, in the format {min,max}, where min is the minimum Mask X Position value and max is the maximum Mask X Position value:

-20,20} .A setting of {-20,20} means the keyframe will get a random Mask X Position value between -20px and 20px.
To illustrate this clearly, if we set Translate X for our layer to 150%, and modify the default Random {min,max} value to {-520,520}, and then run the result three different times, we get the following three random results:
{-520,520} on an image with Translate X set to 150%.Wrapper Left
Selecting Wrapper Left will align the right edge of the layer mask with the left edge of the wrapper, i.e. either the layer area or scene depending on the Layer Align setting for the layer:

Wrapper Right
Selecting Wrapper Right will align the left edge of the layer mask with the right edge of the wrapper, i.e. either the layer area or scene depending on the Layer Align setting for the layer:

Wrapper Center
Selecting Wrapper Center will align the center of the layer mask with the center of the wrapper:

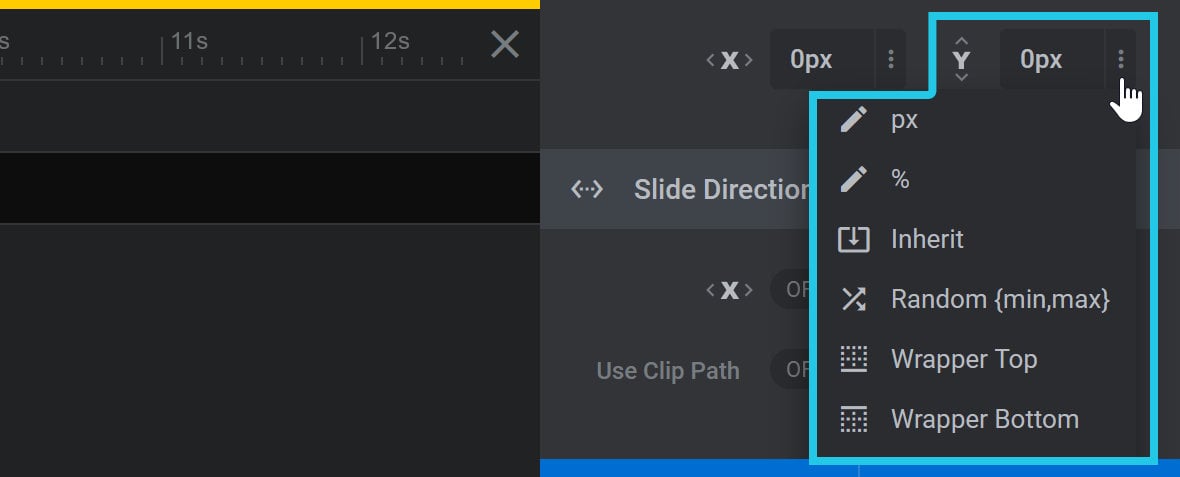
Mask Y Position
The Mask Y Position option can be used to offset the vertical position of the layer mask:

A positive value will offset the position of the mask vertically downward.
A negative value will offset the position of the mask vertically upward.
The effect of animating the Mask Y Position is the same as the Mask X Position, only on a vertical axis rather than horizontal.
For example, here this layer is animating from a starting TranslateY position of 50%, and the Mask Y Position starts at 200px:
Clicking the three dots at the right end of the Mask Y Position field opens a drop-down with eight shortcuts for priming the value: px, %, Inherit, Random {min,max}, Wrapper Left, Wrapper Right, and Wrapper Center:
px
Choosing the px shortcut primes the Mask Y Position field for input of a pixel based value:

You can alternatively directly type a value with px at the end.
%
Choosing the % shortcut primes the Mask Y Position field for input of a percentage based value:

You can alternatively directly type a value with % at the end.
A percentage based Mask Y Position value will be multiplied by the layer’s base height.
For example, if the base height is 300px and the Mask Y Position value is 50%, the vertical offset amount will be 150px.
Inherit
The Inherit setting inherits an Mask Y Position value from the previous keyframe:

Random {min,max}
The Random {min,max} setting allows you to give the keyframe’s Mask Y Position a random value each time the animation runs. The value is set as a range, in the format {min,max}, where min is the minimum Mask Y Position value and max is the maximum Mask Y Position value:

A setting of {-20,20} means the keyframe will get a random Mask Y Position value between -20px and 20px.
To illustrate this clearly, if we set Translate Y for our layer to 100%, and modify the default Random {min,max} value to {-520,520}, and then run the result three different times, we get the following:
{-520,520} on an image with Translate Y set to 100%.Wrapper Top
Selecting Wrapper Top will align the bottom edge of the layer mask with the top edge of the wrapper, i.e. either the layer area or scene depending on the Layer Align setting for the layer:

Wrapper Bottom
Selecting Wrapper Bottom will align the top edge of the layer mask with the bottom edge of the wrapper, i.e. either the layer area or scene depending on the Layer Align setting for the layer:

Wrapper Middle
Selecting Wrapper Middle will align the middle of the layer mask with the center of the wrapper:

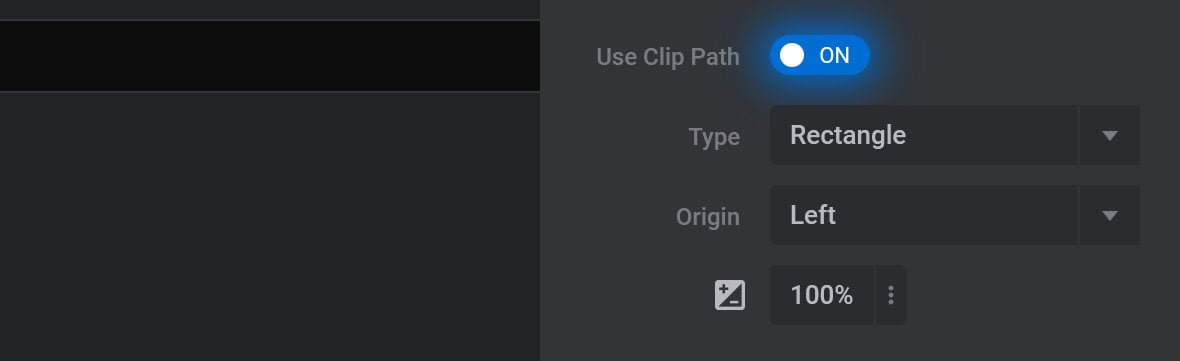
Use Clip Path
The Use Clip Path option allows you to apply additional masking based reveal animations, such as rectangular wipes or circular zooms:

To enable clip path animation, toggle the Use Clip Path option to ON, and then three additional options will appear: Clip Path Type, Clip Path Origin, and Clip Percentage:
Note: When Use Masking is toggled to ON and the Slide Direction Based Mirroring panel is visible, the Use Clip Path option will move into the Slide Direction Based Mirroring panel.
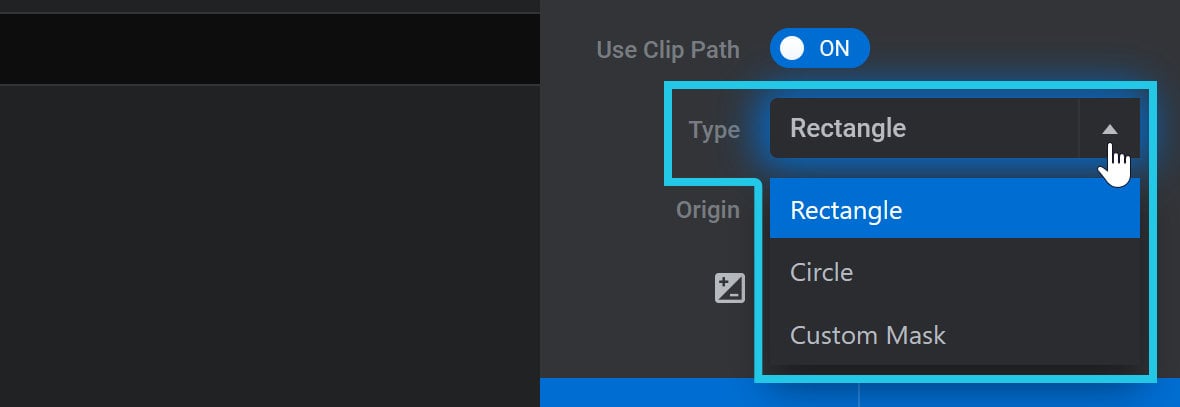
Clip Path Type
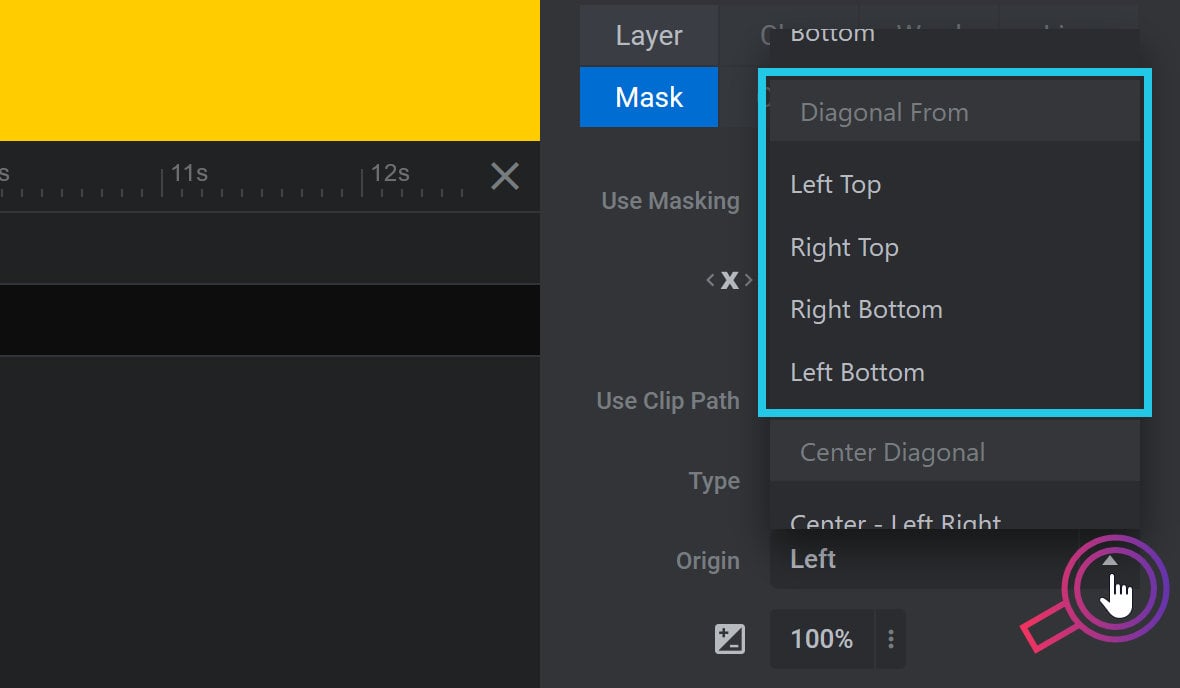
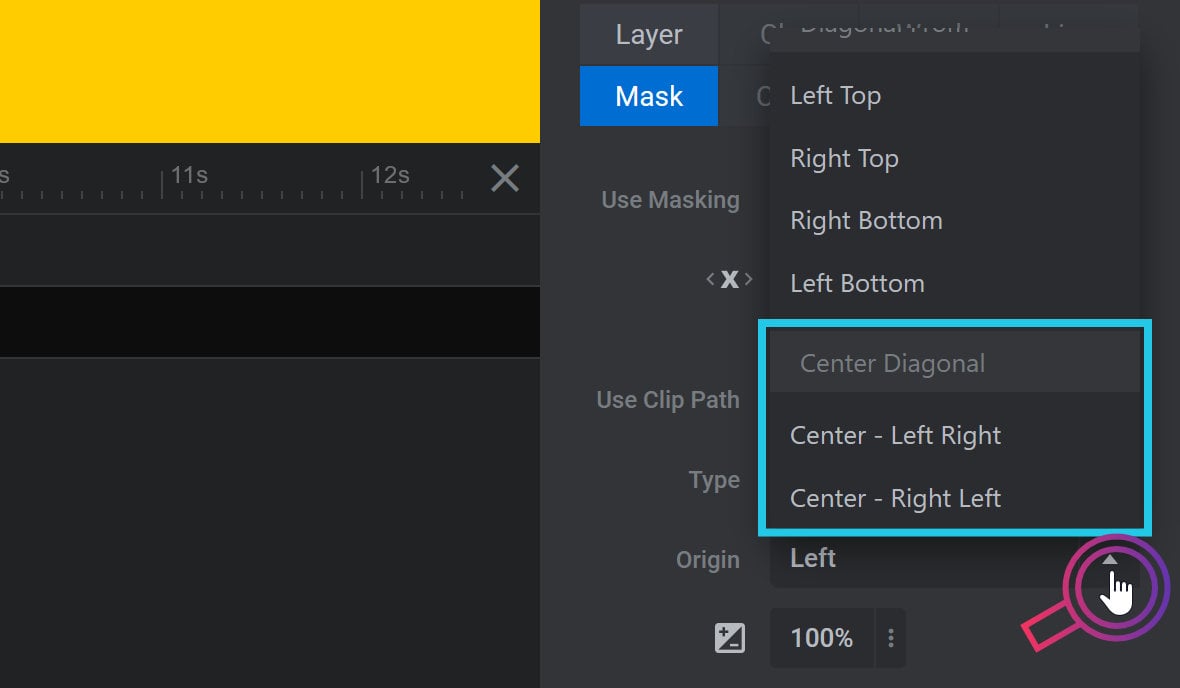
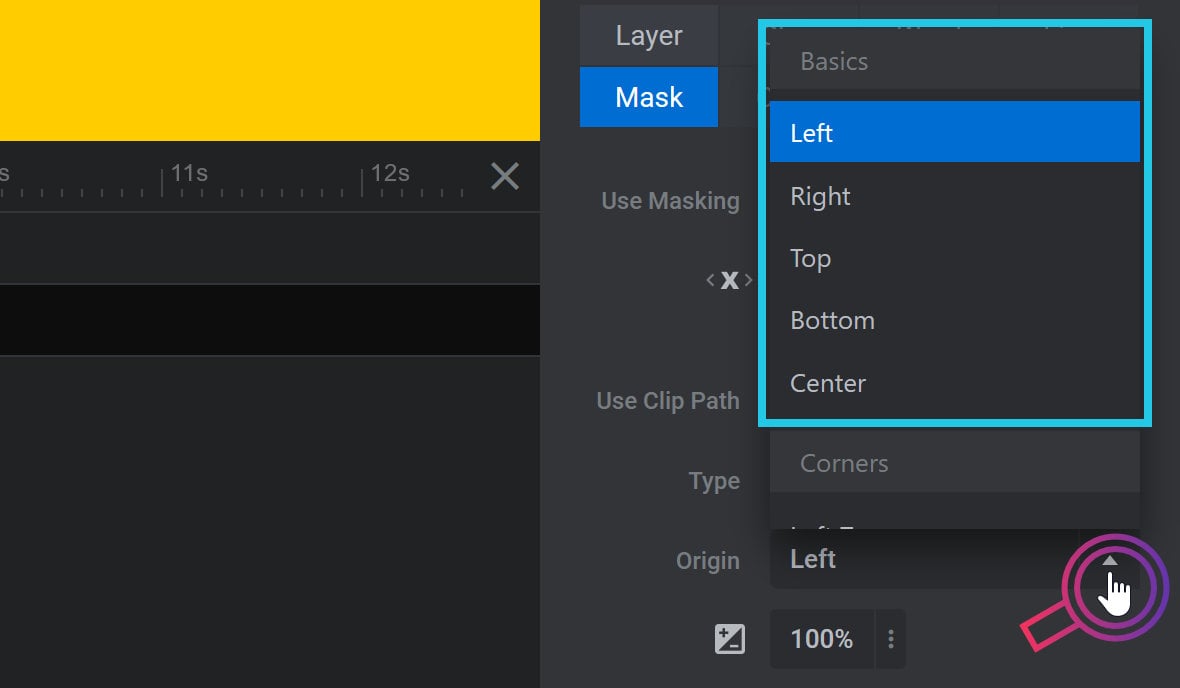
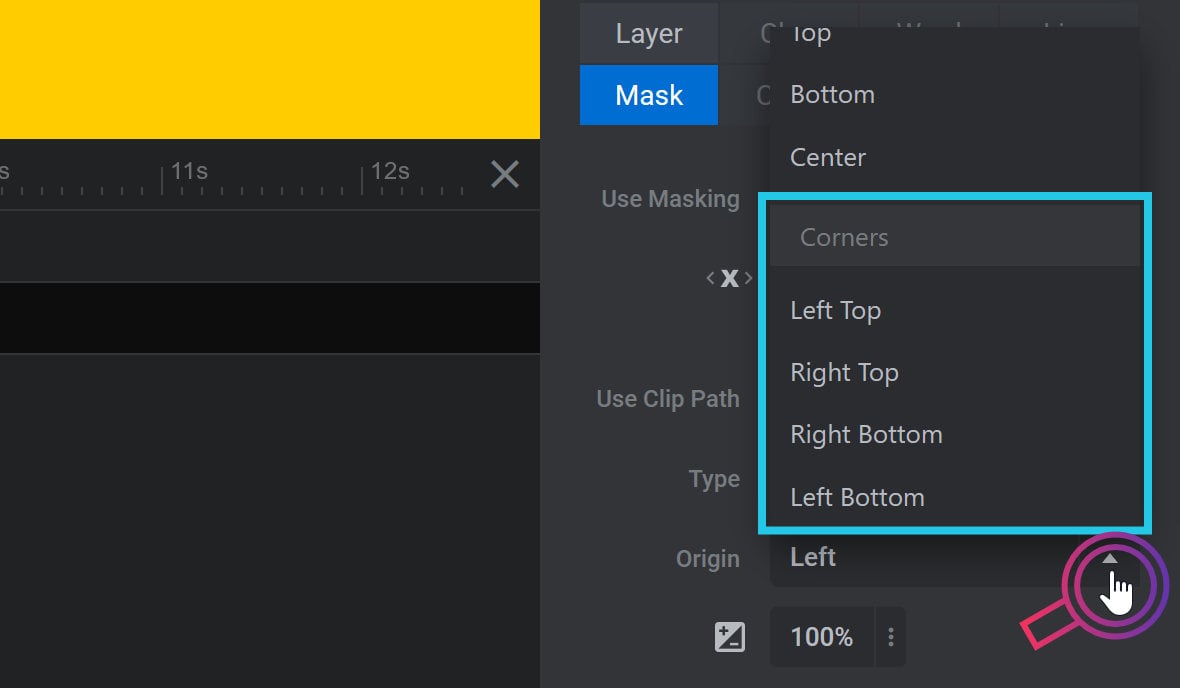
The Clip Path Type option can be used to set the shape of the clip path being used. Click the drop-down to select one of three options: Rectangle, Circle and Custom Mask:
Rectangle
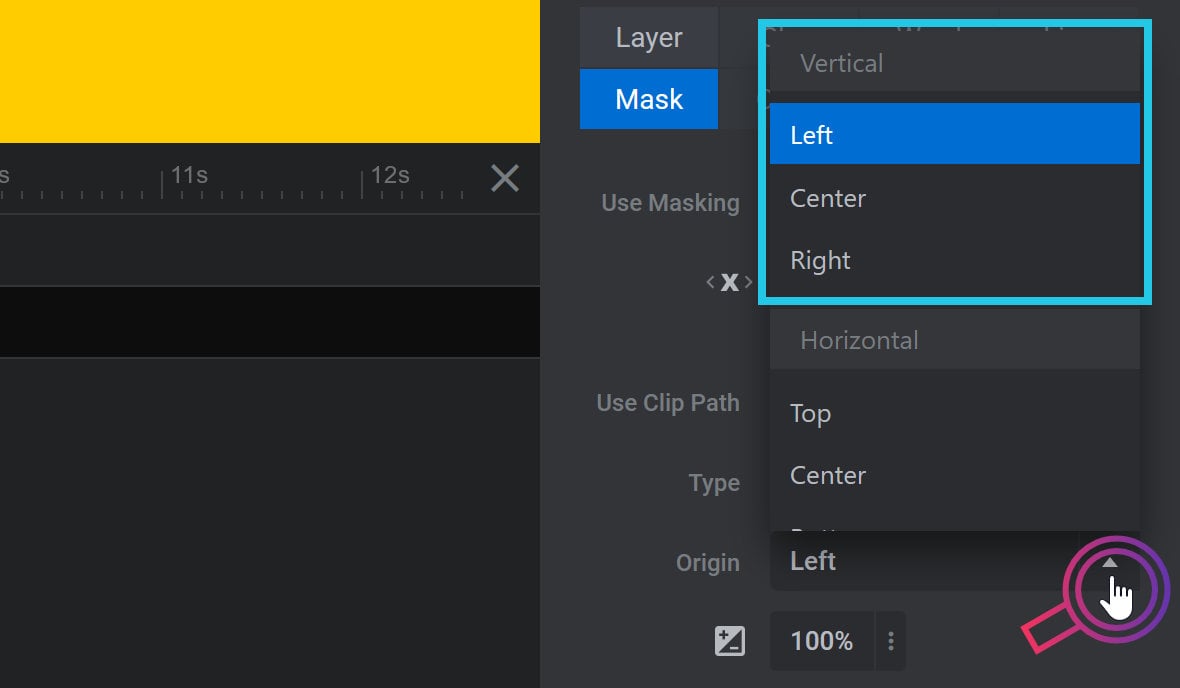
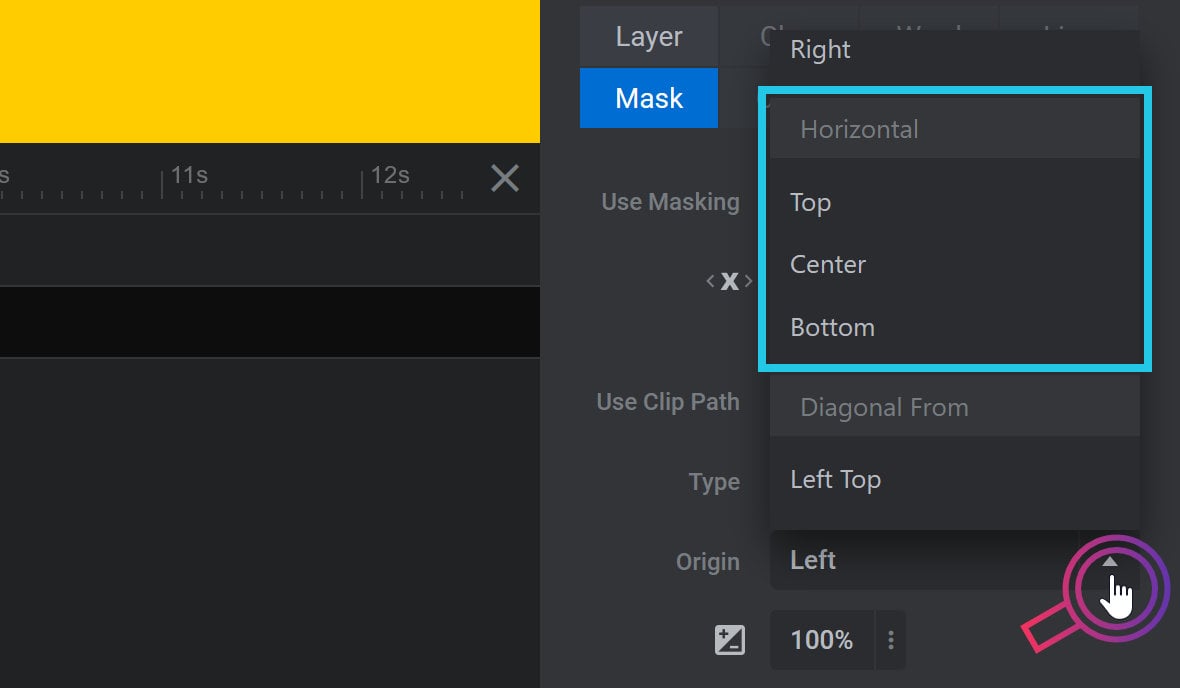
A Rectangle clip path creates straight edged wipes, with the ability to choose between vertical, horizontal, diagonal from corner, and diagonal from center animations:

Rectangle clip path animations will look different depending on what you select in the Origin option:

Vertical animation can have an origin from the left, center or right:
Horizontal animation can have an origin from the top, center or bottom:
Diagonal from corner animation can have an origin from the left top, right top, right bottom or left bottom:
Diagonal from center animation can have an origin stretching across the center to the top left & bottom right corners, (Center – Left Right setting), or across the center to the top right & bottom left corners, (Center – Right Left setting):
Circle
A Circle clip path creates circular zooms and wipes, with the ability to choose between basic and corner animations:

Circle clip path animations will look different depending on what you select in the Origin option.
Basic animation can have an origin from the center, left, right, top, or bottom edge:
Corner animation can have an origin from the top left, top right, bottom left or bottom right:
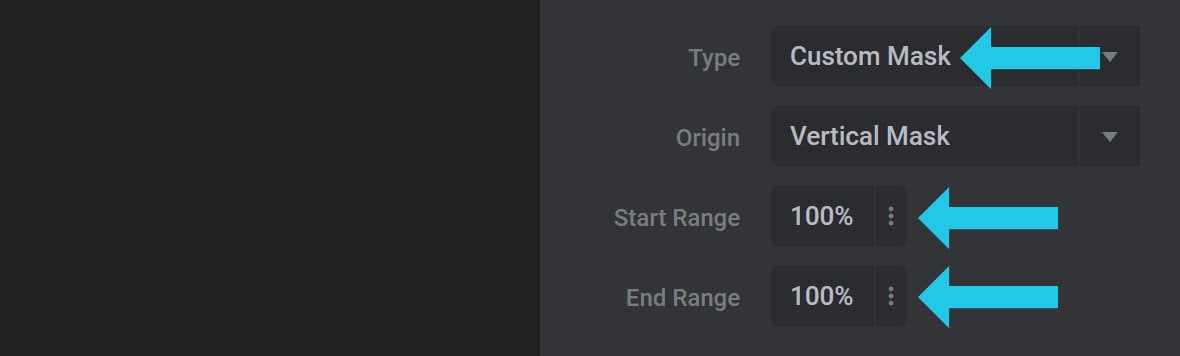
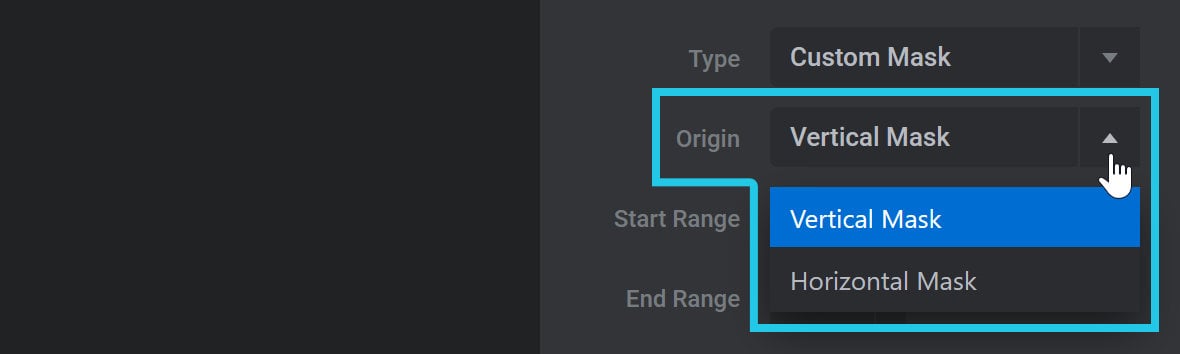
Custom Mask

A Custom Mask clip path works similarly to a Rectangle clip path, but with two key differences.
First, by default it hides a layer rather than revealing it.
Second, it allows you to control the portion of the layer that is masked using the Start Range and End Range options:
Circle clip path animations will look different depending on what you select in the Origin option.
Vertical Mask applies a vertical animation, while Horizontal Mask applies a horizontal animation:
Start Range and End Range
The Start Range and End Range options sets where the custom mask starts and ends for the selected keyframe. Both are set as percentage(%) values.

If using a Vertical Mask, the Start Range refers to the top edge of the layer and the End Range refers to the bottom edge. The Start Range option allows you to control the visible area moving from the top of the layer toward the bottom, while the End Range option allows you to control the visible area moving from the bottom of the layer towards the top.
To illustrate this, if we set our Anim To keyframe to a Start Range of 10% and an End Range of 25%, the animation will reveal a visible area from the top of the layer to the bottom by 10%, and from the bottom of the layer to the top by 25%:
You can use the Start Range and End Range values to create various types of masking or revealing effects. For example, if we adjust our Anim To keyframe’s Start Range to 50% and End Range to 50%, we get the following vertical reveal effect:
Note: In the above example, our Anim From keyframe has a Start Range of 0% and an End Range of 0%, which means the mask remains unmoved and covering the entire image, rendering our image invisible at the beginning of the animation.

If using a Horizontal Mask, the Start Range refers to the left edge of the layer and the End Range refers to the right edge. The Start Range option allows you to control the visible area moving from the left of the layer toward the right, while the End Range option allows you to control the visible area moving from the right of the layer towards the left.
To illustrate this, if we set our Anim To keyframe to a Start Range of 20% and an End Range of 45%, the animation will reveal a visible area from the left of the layer to the right by 20%, and from the bottom of the layer to the top by 45%:
You can use the Start Range and End Range values to create various types of masking or revealing effects. For example, if we adjust our Anim To keyframe’s Start Range to 20% and End Range to 80%, we get the following vertical reveal effect:
Clip Percentage
If using a Rectangle or Circle mask, the Clip Percentage option is used to specify the portion of the layer to mask, as a percentage (%):

A value of 0% hides the layer completely, while a value of 50% applies the mask effect to half of the selected layer.
The area of the layer the Clip Percentage applies to is determined by the value chosen in the Origin option. For example, if Origin is set to Right, then the Clip Percentage value will be applied from the right edge.
To illustrate, if we use a Circle mask, set Origin to Center, and then set our Clip Percentage to 35%, we get the following result where 35% of the visible area of our layer animates from the center of the circle:
Slide Direction Based Mirroring Panel
It’s possible to take a masking animation on IN or OUT animation that moves in a certain direction and have it play in a mirrored direction, depending on whether a visitor is moving forward or backwards through a module.
Because this functionality only relates to IN and OUT animations, the Slide Direction Based Mirroring panel only appears when the Anim From keyframe of the IN animation is selected, or the Anim To keyframe of an OUT animation. The Use Masking option also has to be toggled to ON:
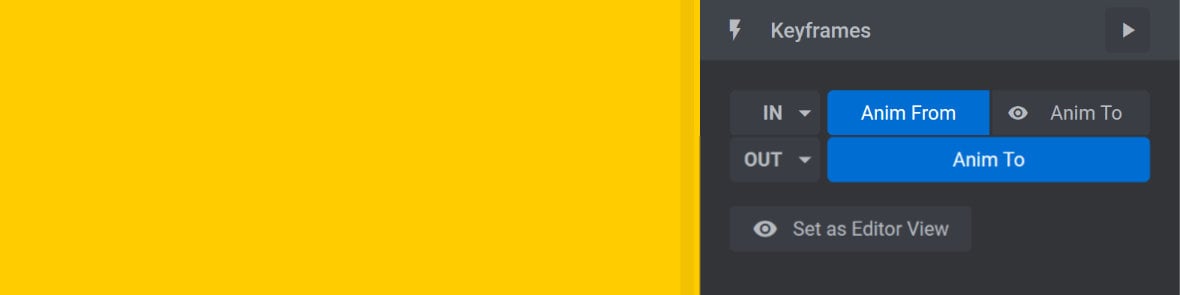
Here you will find two toggle-based options: X and Y:

You can decide which of these options to toggle to ON depending on the kind of movement used in the IN or OUT animation you wish to mirror.
For example, if the animation moves horizontally that means it is translating on the X axis, so you should activate the X option:
